
Is your kitchen or bathroom backsplash looking a little… tired? Maybe it’s outdated, chipped, or just not your style anymore. You’ve decided it’s time for a change, but the thought of actually *removing* that backsplash tile feels like a daunting task, right? Choosing the right way to tackle this project can be tricky. You might worry about damaging your walls, making a huge mess, or spending too much time and money on a task that seems simple but can quickly become complicated.
Don’t let the fear of demolition hold you back from a fresh, new look! This post is here to guide you through the process of removing backsplash tile. We’ll break down the most effective methods, explain what tools you’ll need, and offer tips to make the job go smoothly. By the end, you’ll have a clear understanding of how to tackle this DIY project with confidence, saving you stress and potentially a lot of cash.
Get ready to say goodbye to that old backsplash and hello to a brand-new space. Let’s dive into the best ways to get that tile off your wall!
Top Way To Remove Backsplash Tile Recommendations

- 【Effortless Tile Extraction】Our tile removal tool is designed with a non-slip rubber handle, ensuring a comfortable grip and effortless operation. The ergonomic design allows for quick disassembly, making your tile removing process more efficient and less time-consuming.
- 【Robust Baseboard Pry Bars】Crafted from hardened steel and coated with a black polish, our baseboard removal tool is not only corrosion and rust-resistant but also capable of withstanding heavy blows. This durability ensures that your trim puller tool for baseboard remains effective even with extensive use.
- 【Precision and Protection】With a larger, flatter, and wider contact area, our trimming tools outperform traditional methods, offering higher trimming efficiency while minimizing damage to walls and floors. This feature makes our trim puller an ideal choice for both delicate and robust tile tools applications.
- 【Versatile Home Renovation Companion】Perfectly suited for a variety of house renovation projects, this baseboard pry bars and nail pullers set is ideal for extracting baseboards, decorative strips, bottom plates, door frames, and decorative panels. Its versatility makes it an indispensable tool for both professional and DIY enthusiasts.
- 【Wide Application in Home Improvement】Our hangable wood tile trim molding removal tool is not just limited to residential projects but is also perfect for commercial work, repair, and remodel projects. Its precision and care make it suitable for tasks involving cabinets, countertops, flooring, and much more, including being an effective carpet tack strip remover tool and siding removal tool.

- Trim Saving - The trim removal tool has a larger, flatter and wider contact area than clumsy traditional tools and features an integrated wedged center that provides increased removal efficiency and prevents damage to both the trim and wall.
- Sturdy Pry Bars - Our trim puller is made from carbon steel and 65Mn steel with black electrophoretic and polished finish, which protects against corrosion and gives our pry bar added durability and strength. So the Trim Puller is a very beefy tool, and it will hold up well to repeated whacking.
- Multi-Function - Ideal for commercial work, repair and remodel projects where care and precision are needed, including cabinets, countertops, flooring, and many more. It can be used on a kitchen remodel, removing a couple of sections of baseboard, a countertop from some base cabinets, and pulling up a ceramic tile floor. The very edge can also be used to pry up the staples.
- Ergonomic Handle - All our trim puller is built with an ergonomic, comfortable and textured dipped handle. An impact-absorbing TPR+PP handle makes it comfortable to hold, though.
- Revolutionary Tool - Our Trim Puller is a very beefy tool. The Built-in spring design assists in separating the trim from the wall freely and quickly. The 15-degree wedged center is for easy extraction of trim and baseboards.Goldblatt holds a U.S. patent for this Trim Puller, patent number US 11,142,921.
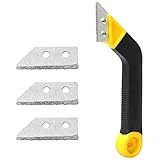
- Premium Material: Grout saw is made of high-quality plastic and hard metal, “diamond style” blade helps you remove grout with minimal effort.
- Angled Design: The tile grout ripper has an angled head for removing grout from the hard-to-reach places the machine can’t reach, easy to use.
- Ergonomic Handle: This is a handy little tool for cleaning out the old grout. The anti-slip handle is 8 inches long, comfortable to use.
- 3PCS Extra Blades: The blade attaches to the saw with 2 screws, it can be easily replaced and keep you going until the job is done.
- Compact and Practical Size: Measuring 8 inches in length and 2 inches in width, this grout saw is compact yet effective, making it a practical choice for precise grout removal tasks.

- → Material: made of high-quality hardened steel, with black polishing coating, anti-corrosion and anti rust, which can well resist repeated heavy blows.
- → Design: labor-saving operation. The decorative puller has an anti-skid rubber handle, which is comfortable to use. It can be disassembled quickly under the synergy of ergonomics and save time. A shock absorbing handle makes it comfortable to hold.
- → Multifunctional: This skirting board removal tool with nail extractor is very suitable for disassembly, prying, scraping, lifting and remodeling projects. The skirting board crowbar and nail extractor are perfectly matched with the house reconstruction project. It is very suitable for extracting base plate, decorative strip, base plate, door frame and decorative plate.
- → Size:7.4*25cm/3*9.6inch.
- → Wide application: suitable for commercial work, maintenance and transformation projects requiring care and accuracy, including cabinets, countertops, floors, etc. Hanging home decoration wood tile trim strip removal tool. The edge can also be used to pry up staples.

- Recommended for manually scoring and cutting ceramic wall tiles up to 6" x 6" and 1/4" thick
- Heavy-duty, rust-resistant chrome-plated steel for durability
- Designed with a 1/2" tungsten carbide scoring wheel for accurate scoring
- Cuts small ceramic wall tiles without setting up tile saws or cutters
- Easy to clean by rinsing with hose or in clean water after each use

- #1 MOST EFFECTIVE LIMESCALE REMOVER - Eliminates tough lime, calcium, and rust stains caused by hard water minerals without scrubbing.
- FAST-ACTING FORMULA – Works in seconds to dissolve stubborn limescale and mineral deposits.
- VERSATILE FOR EVERY HARD WATER CHALLENGE – Ideal for sinks, faucets, tubs, tiles, shower doors, and glass surfaces; not for natural stone or marble.
- FROM DULL TO SHINE – Brings shine to fixtures and glass for a sparkling clean finish.
- MESS FREE SPRAY APPLICATION – Easy-to-use trigger design for precise application; perfect for regular cleaning and deep stain removal.

- 2-3 Times Thickness: Much thicker than ordinary peel & stick tile, 2mm-2.5mm each, durable and solid tile, unlike soft sticker tiles
- Stronger Upgrade Adhesive: 3X Stronger backing glue than ordinary vinyl backsplash tile, not only stick firmly to the smooth surface, but also available on lightly textured wall
- 1.4 Times Coverage Area: 10 sheets thickened self-adhesive tiles, 12" X 12" each, which covers 40% more area than 10"x10" tile
- Widely Use: Perfectly decorated in kitchen island walls, bathroom backsplash, shower, fireplace, and installed behind the stove
- Easy Do It Yourself: Just peel, interlock and stick. No need to overlap, no grout and no mess, save your time and money on labor

- GLASS TILE CUTTER - Download Free Instructions & Watch Glass Cutting Videos, Read Pro Tips, Oil Replaceable Carbide Wheel Before Scoring Glass Subway Tiles or Cutting Glass Tile on a Sheet. Work on a Solid Board at Waist Height. Run Wheel Up and Down a Board to Ensure It Spins Freely — a Dry Wheel Drags and Won’t Create V-Cut Needed for Clean Breaks. Check the Wheel and Oil as You Work. Practice on Spare Glass to Perfect Your Technique Before Cutting Your Backsplash or Glass Subway Tile.
- STRAIGHT LINES ON GLASS TILE SHEET - Draw Line with Marker, Watch Back of the Wheel as You Score Across Tiles Making a V-Shaped Groove. Use a Smooth Thick Guide, Steel Not Wood, Tape to Tiles to Prevent Sliding. Glass Needs a Shallow V-Shaped Groove to Weaken. Scoring Tile Without Oil Leaves Wide, Dusty Groove That Won’t Break Cleanly. This Tile Cutter for Glass Tiles Makes It Easy to Mark and Score, Whether Working on Subway Tile, Glass Panels, Glass Sheet, or Glass Backsplash Tile.
- CORRECT GRIP, CONTROL, AND PRESSURE - The Handles Are Only for Squeezing - Never Hold Them While Scoring. Grip Close to Wheel for Control and Pressure. No Two Glass Tiles Cut the Same, So Practice - Some Need Firm Pressure, Others a Lighter Touch. Start Score Directly on Top of Glass Tile, Never Over the Edge, You’ll Jump and Create a Gap in the Score. Always Score Completely Across from Edge to Edge. One Firm Score Is Enough; Multiple Scores Cause Wide Grooves, Chipping, and Failed Breaks.
- BREAKING GLASS TILE WITH PLIERS FOR CLEAN BREAK - Break Each Tile with Pliers. Place Each Tile Deep into the Jaws and Dead Center on Score. Squeeze Gently, Increase Pressure Until It Snaps Cleanly. Align the Breaker Directly over Score So Bar Pushes Upward Directly Below Score. Too Much Pressure Chips Edges. For Large Glass Panels or Glass Subway Tile, Bend Tile at Score Over Small Wooden Strip Apply Pressure to Both Sides. This Glass Backsplash Tile Cutter Works on Small or Large Tiles
- DIRECTION AND TOOL CARE - Always Pull Toward You As You Score Glass Tile - Never Push Away, Scores Weaken With Extended Arms. Wear Eye Protection And Keep Hands Clear Of Sharp Edges. Unlike Nippers That Shatter And Chip Glass Tiles, This Glass Tile Cutting Tool Delivers Clean, Minimal-Chipping Results On Glass, Subway, And Backsplash Materials. With Proper Oiling And Care, Your Glass Tile Cutter Will Last A Lifetime — The Perfect Hand Tool For Diy And Professional Tile Artists Alike.
Your Go-To Guide: Tackling Backsplash Tile Removal
Removing old backsplash tile can seem like a big job, but with the right tools and a little know-how, you can make your kitchen or bathroom look brand new. This guide will help you choose the best way to get the job done.
Key Features to Look For in Removal Methods
When you’re deciding how to remove your backsplash tile, think about these important features:
- Ease of Use: You want a method that’s not too complicated. Simple tools and clear steps make the job faster and less frustrating.
- Speed: Some methods remove tile much quicker than others. If you’re in a hurry, look for faster options.
- Minimal Damage to Walls: The goal is to remove the tile, not destroy the drywall behind it. Choose methods that protect your walls.
- Dust Control: Tile removal can create a lot of dust. Look for ways to keep the dust down.
- Cost: Tools and materials can add up. Consider your budget when picking a removal method.
Important Materials You’ll Need
Gathering the right materials beforehand saves you trips to the store. Here’s what you’ll likely need:
- Safety Gear: This is super important! Always wear safety glasses to protect your eyes from flying debris. Gloves keep your hands safe from sharp edges. A dust mask or respirator prevents you from breathing in dust.
- Scrapers and Pry Bars: These are your main tools for getting under the tile and prying it off. A putty knife can work for smaller tiles, while a wider pry bar is better for larger ones.
- Hammer: You might need a hammer to gently tap a chisel or scraper.
- Chisel: A chisel helps break up stubborn grout or tile.
- Utility Knife: Use this to score the grout lines before you start prying.
- Drop Cloths or Plastic Sheeting: These protect your countertops and floor from dust and debris.
- Trash Bags: You’ll have a lot of tile pieces to throw away. Heavy-duty bags are best.
- Bucket: Useful for holding tools or water if needed.
Factors That Improve or Reduce Quality
How well your tile removal goes depends on a few things:
- Type of Tile: Ceramic and porcelain tiles are harder to remove than softer tiles like natural stone.
- Adhesive Used: Some adhesives are stronger than others. Stronger glues make removal harder.
- Grout Condition: If the grout is old and crumbly, it will be easier to remove. Fresh, strong grout makes the job tougher.
- Wall Material: Removing tile from drywall is different than removing it from cement board. Drywall is more easily damaged.
- Your Skill Level: Practice makes perfect. The more you do it, the better you’ll get.
User Experience and Use Cases
People remove backsplash tile for many reasons:
- Renovating the Kitchen or Bathroom: This is the most common reason. You want a fresh new look.
- Repairing Damage: Maybe a section of tile got broken and you need to replace it.
- Updating the Style: Trends change, and you might just want a more modern backsplash.
- Preparing to Sell a Home: A fresh backsplash can make your home more appealing to buyers.
The user experience can be challenging but rewarding. It’s a hands-on project that gives you a sense of accomplishment. Some people find it therapeutic, while others find it a bit messy and tiring. Taking breaks and staying organized makes the experience much better.
Frequently Asked Questions about Backsplash Tile Removal
Q: What is the easiest way to remove backsplash tile?
A: The easiest way often involves scoring the grout with a utility knife and then using a pry bar or scraper to gently lift the tiles. For stubborn tiles, a hammer and chisel can help, but be careful not to damage the wall.
Q: Do I need to remove the grout first?
A: Yes, scoring or removing the grout between the tiles helps break the seal. This makes it much easier to get your scraper or pry bar underneath the tiles.
Q: How can I protect my countertops and floor?
A: Lay down thick drop cloths or plastic sheeting. Make sure they cover the entire area where you’ll be working and extend a bit beyond. This catches dust and falling tile pieces.
Q: What’s the best tool for prying off tiles?
A: A sturdy pry bar or a wide putty knife works well. For larger tiles, a wider pry bar offers more leverage.
Q: How do I deal with dust?
A: Wear a dust mask or respirator. You can also dampen the area slightly with water (but not too much!) to help keep dust down. Keep windows open for ventilation.
Q: What if the tile is really stuck on?
A: You might need to use a hammer and chisel. Gently tap the chisel along the edge of the tile to loosen it. Work slowly and carefully.
Q: Can I remove tile from drywall without damaging the wall?
A: It’s tricky. The key is to work slowly and avoid using too much force. If the drywall paper tears, you’ll need to repair it before retiling or painting.
Q: How much time should I budget for this project?
A: It depends on the size of your backsplash and the type of tile. A small backsplash might take a few hours, while a larger one could take a full day or more.
Q: What do I do with the old tile?
A: Carefully collect all the pieces and put them in heavy-duty trash bags. Check with your local waste disposal service for any special instructions on disposing of construction debris.
Q: Should I hire a professional?
A: If you’re not comfortable with DIY projects, have very stubborn tile, or want to ensure minimal wall damage, hiring a professional is a good option. They have the experience and tools to do the job quickly and efficiently.