
Is your golf cart not starting? You turn the key or press the pedal, but nothing happens? Or maybe you hear a click, but the cart still stays put? A common reason for these problems is a faulty solenoid. What is a golf cart solenoid? Think of it as a big electrical switch. It lets power flow from the batteries to the motor when you tell the cart to go. This guide will help you check if your solenoid is working right, covering common issues like when your golf cart won’t start no solenoid click or if your golf cart solenoid clicking but won’t start. We will walk through golf cart solenoid troubleshooting steps using simple tools.
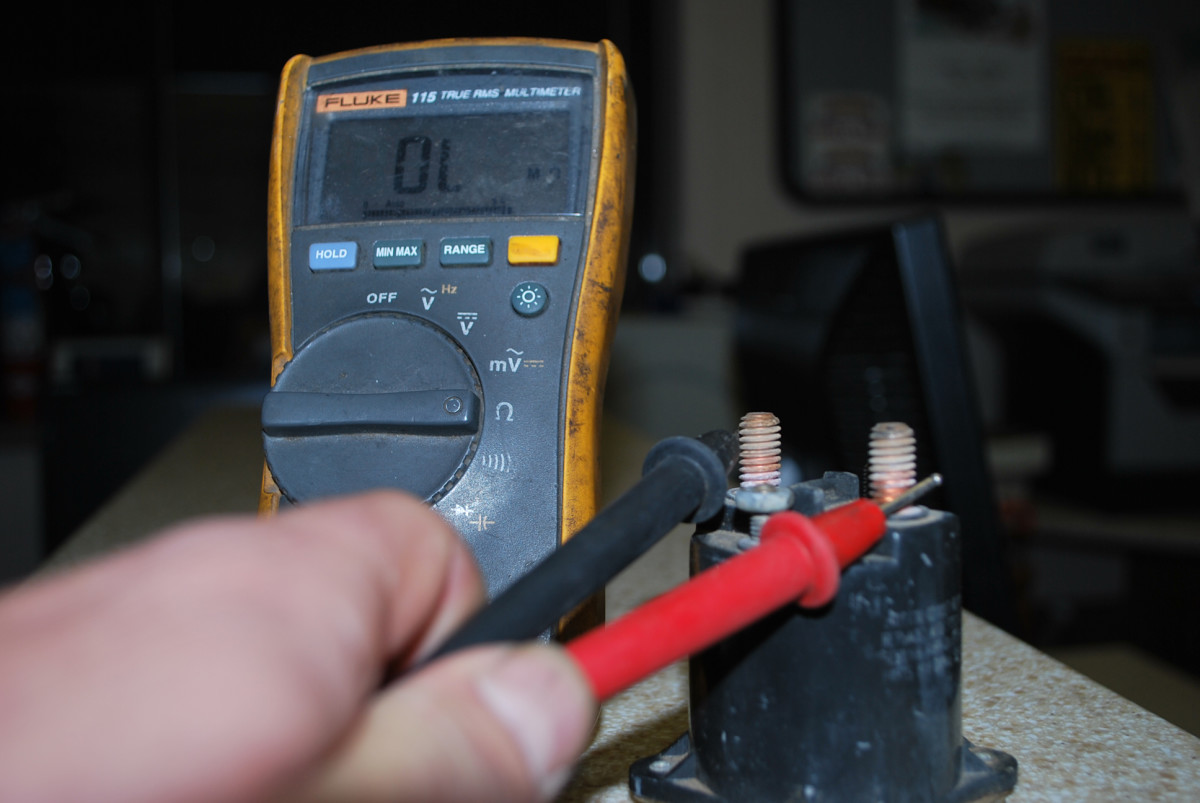
Image Source: images.saymedia-content.com
Deciphering Solenoid Function
What exactly does a solenoid do on your golf cart? It is a crucial part of the electrical system. When you press the accelerator pedal (or turn the key on some models), a small amount of power goes to the solenoid’s control circuit. This makes a magnetic field inside the solenoid. The magnetic field pulls a metal disc or plunger, which bridges two large terminals. This connects the main battery pack’s power directly to the motor or controller. It’s like closing a gate to let a lot of electricity flow through.
Without a working solenoid, the high current needed to power the motor cannot get there. This is why the cart won’t move even if the batteries are full and the motor is fine.
Recognizing Symptoms of a Bad Solenoid
Knowing the signs of a failing solenoid helps you figure out where to start looking for the problem. Here are the most common symptoms of a bad golf cart solenoid:
- Cart doesn’t start: This is the main sign. You activate the cart, but nothing at all happens. No movement, no sound from the motor.
- No click sound: Usually, when the solenoid engages, you hear a clear click. If you activate the cart and hear nothing, it might mean the solenoid isn’t even trying to work. This is the classic golf cart won’t start no solenoid click issue.
- Solenoid clicking but won’t start: You hear the click, which means the control side of the solenoid is getting power and activating. However, the cart still doesn’t move. This often means the main power contacts inside the solenoid are bad or burnt. They aren’t letting the big battery power get to the motor.
- Cart starts but is slow or weak: Sometimes, the contacts in the solenoid might only be partly damaged. They let some power through, but not enough for the cart to run at full speed or power.
- Solenoid is hot to the touch: A solenoid that is getting unusually hot might have internal resistance or a problem in its coil, indicating it’s failing. Be careful when checking this, especially after trying to start the cart.
If you are seeing any of these symptoms, it is a good idea to check the solenoid. This is the start of golf cart solenoid troubleshooting.
Safety Steps Before Testing
Working with golf cart electrical systems can be dangerous. They use high voltage battery packs (usually 36V or 48V, sometimes more). Always put safety first.
Here are the important safety steps you must follow:
- Turn off the cart: Make sure the key switch is off.
- Put the F/R switch in the neutral position: This prevents the cart from moving if power is accidentally applied.
- Set the parking brake: Make sure the cart cannot roll away.
- Disconnect the main battery pack: This is the most critical step to remove power from the system.
- Find your battery pack. It’s usually under the seat.
- Find the main positive (+) and negative (-) terminals on the entire pack, not just one battery. There is usually a thick cable going from the last positive terminal to the cart’s electrical system, and a thick cable from the first negative terminal to the frame or electrical system.
- Use an insulated wrench to loosen and remove the cable connected to the main negative (-) terminal first. This breaks the circuit.
- Make sure the disconnected cable end cannot accidentally touch any battery terminals or metal parts of the cart. You can tape it up or put a glove over it.
- For extra safety, disconnect the main positive (+) cable as well, following the same care.
- Wait a few minutes: Give any remaining charge in the controller time to drain away.
- Wear safety glasses: Protect your eyes from sparks or acid.
- Use insulated tools: This helps prevent short circuits.
Never work on the electrical system with the battery pack connected. This can cause serious shocks, burns, or damage to the cart.
Tools Needed for Solenoid Testing
To check your golf cart solenoid properly, you will need a few basic tools.
- A Multimeter: This is essential for testing voltage and continuity. You don’t need an expensive one. A basic digital multimeter from a hardware store or auto parts store will work. Make sure it can measure:
- DC Voltage (VDC)
- Resistance (Ohms Ω)
- Continuity (usually beeps when there’s a connection)
- (This is how you test golf cart solenoid with multimeter)
- Insulated Wrenches or Socket Set: To disconnect battery cables and loosen solenoid terminals.
- Wire Brush or Sandpaper: To clean terminals if they are dirty or corroded.
- Safety Glasses: Already mentioned, but worth saying again.
- Gloves: To protect your hands.
- Wire Strippers/Crimpers and Wire/Connectors (Optional): If you find a bad wire during troubleshooting and need to fix it.
- Cart’s Wiring Diagram (Helpful): Knowing your specific cart’s wiring can make finding wires easier.
With these tools and safety precautions in place, you are ready to locate and test the solenoid.
Finding the Solenoid on Your Cart
Before you can test the solenoid, you need to know where it is. The location can vary slightly depending on the make and model of your golf cart, but it’s usually easy to spot.
- Lift the seat: On most carts, the batteries and main electrical components are under the seat.
- Look near the batteries or controller: The solenoid is typically mounted on the frame, near the battery pack, the controller, or the main terminal board.
- Identify the solenoid: It looks like a cylindrical or rectangular metal or plastic box. It has two large terminals on top or the sides where thick battery cables connect. It also has two smaller terminals (sometimes called spade terminals) where thinner wires connect.
Here are some common locations for specific cart types:
- EZGO Golf Cart Solenoid Test: On many EZGO models (like TXT, RXV), the solenoid is often mounted on the driver’s side frame rail, in front of the controller or above the batteries. Look for the component with two big posts and two small posts with wires connected.
- Club Car Solenoid Testing: On many Club Car models (like DS, Precedent), the solenoid is often located near the batteries or on the firewall between the battery area and the rest of the cart. Again, look for the distinctive shape with four terminals.
- Other Brands (Yamaha, etc.): The principle is the same. Look for the component serving as the main power switch, typically near the batteries or controller, identifiable by its four terminals.
If you have trouble finding it, checking your cart’s owner’s manual or looking up a diagram for your specific model year online can help.
Step-by-Step Solenoid Testing
Now that you’ve found the solenoid and taken safety steps, you can begin testing. We will use your multimeter for most of these steps. Remember, the battery pack is disconnected for the first few steps.
Visual Inspection
This is a quick and easy first step.
- Look at the solenoid body: Check for any obvious damage, cracks, melting, or burning smells.
- Check the terminals: Look at the large and small terminals. Are they clean? Are the connections tight? Corrosion or loose wires can prevent the solenoid from working right. Clean any dirty terminals with a wire brush or sandpaper.
If there is clear damage, the solenoid is likely bad and needs replacing. If it looks good, move on to electrical testing.
Checking for the Audible Click
This test helps figure out if the control side of the solenoid is getting power and trying to engage. You will need to reconnect the main battery pack for this test. Be extremely careful. Reconnect the main positive (+) cable first, then the main negative (-) cable. Make sure all connections are tight.
- Ensure the cart is in Neutral and parking brake is set.
- Sit in the cart.
- Turn the key switch on.
- Press the accelerator pedal: You should hear a distinct click sound from the solenoid.
- If you hear a click: The control circuit (small terminals) and the solenoid’s coil are likely working. The problem might be with the main contacts inside the solenoid or something else in the drive system (like the controller or motor). This is the situation for golf cart solenoid clicking but won’t start. You’ll need more testing.
- If you do NOT hear a click: The control circuit is not activating the solenoid. This could be a problem with the key switch, F/R switch, accelerator pedal switch, wiring, or the solenoid’s coil itself. This is the golf cart won’t start no solenoid click situation. You’ll need to test the small terminals.
Testing the Control Circuit (Small Terminals)
If you did not hear a click, you need to see if power is getting to the small terminals of the solenoid when it’s supposed to activate. Keep the battery pack connected for this test, but remain cautious.
- Set your multimeter: Turn the dial to measure DC Volts (VDC). Choose a range higher than your cart’s battery voltage (e.g., 50V or higher for a 36V or 48V cart).
- Locate the two small terminals: These are usually spade terminals or screw terminals with smaller wires.
- Connect multimeter probes: Place one probe on each of the two small terminals. It doesn’t matter which is positive or negative for this test; you’re just checking for voltage across them.
- Activate the cart: Turn the key on and press the accelerator pedal (or whatever method starts your cart).
- Read the voltage:
- You should see voltage close to the full battery pack voltage (e.g., 36V or 48V). If you see this voltage when activating the cart, it means the control circuit (key switch, pedal switch, wiring) is working correctly and sending power to the solenoid. If the solenoid didn’t click, the solenoid’s coil is likely bad.
- You see 0 Volts or very low voltage: This means power is not getting to the small terminals. The problem is upstream of the solenoid in the control circuit. Troubleshoot the key switch, pedal switch, F/R switch, or wiring leading to the solenoid. The solenoid itself is likely fine in this case.
This golf cart solenoid voltage test on the small terminals helps isolate the problem to either the solenoid coil or the control wiring.
Testing Main Terminal Voltage (Activated)
If the solenoid clicked (meaning the control circuit and coil are likely good), but the cart won’t start, the main power contacts are probably the issue. You need to check if the full battery voltage is passing through the solenoid when it’s clicked on. Keep the battery pack connected and be very careful of the high voltage on the large terminals.
- Set your multimeter: To measure DC Volts (VDC), range higher than your pack voltage.
- Locate the two large terminals: These have the thick battery cables connected.
- Place probes on the large terminals: Put one probe on each of the large terminals. It’s best to touch the metal posts themselves, not just the cable clamps.
- Activate the cart: Turn the key on and press the accelerator pedal. The solenoid should click.
- Read the voltage:
- You should see voltage close to 0 Volts (ideally 0V). This means the solenoid’s main contacts are closed, and power is flowing freely through it. If you get 0V here but the cart still doesn’t move, the problem is after the solenoid – possibly the controller, motor, or main cables.
- You see voltage close to the full battery pack voltage (e.g., 36V or 48V). This is the voltage across the open switch contacts. If the solenoid clicked but you see high voltage here, it means the main contacts inside the solenoid are not closing properly. They are either burnt, stuck open, or have high resistance. This confirms the solenoid is bad.
This golf cart solenoid voltage test on the large terminals tells you if the solenoid’s main power contacts are working correctly.
Testing Main Terminal Continuity (Deactivated and Activated)
This test also checks the main contacts using the resistance or continuity setting on your multimeter. For the first part (deactivated), you must disconnect the main battery pack again for safety.
Part 1: Solenoid Deactivated (Battery Pack Disconnected)
- Disconnect the main battery pack negative cable (and positive for extra safety).
- Set your multimeter: Turn the dial to the Resistance (Ohms Ω) setting. Some multimeters have a Continuity setting which usually beeps. Use that if available.
- Place probes on the two large terminals: Touch one probe to each large terminal post.
- Read the result:
- You should see infinite resistance (OL or I on the screen) or no beep. This means the main contacts are open, which is correct when the solenoid is not activated.
- You see very low resistance (close to 0 Ohms) or hear a beep. This means the main contacts are stuck closed. This would cause a constant drain on your batteries and potentially other issues. The solenoid is bad.
Part 2: Solenoid Activated (Battery Pack Connected, Requires a helper or jumper wire – USE CAUTION)
This test is a bit more advanced and requires safety. You need to hold the main terminals open while the solenoid is activated. A safer way is to activate the solenoid coil using a separate 12V battery (like from a car) if you know which small terminal is positive and negative for the coil, but this adds complexity. The simplest way is to test it in situ while activated, but this means the high voltage is present.
- Reconnect the main battery pack carefully.
- Set your multimeter: To the Resistance (Ohms Ω) or Continuity setting.
- Activate the cart: Turn the key on and press the pedal so the solenoid clicks.
- Quickly place probes on the large terminals: Be careful not to short anything.
- Read the result:
- You should see very low resistance (close to 0 Ohms) or hear a loud, steady beep. This means the main contacts are closed and making a good connection, allowing power to flow.
- You see high resistance (above 1-2 Ohms), infinite resistance (OL), or no beep. This means the contacts are not closing properly or have high resistance. This confirms the solenoid is bad, specifically the main power contacts.
This continuity test, especially when activated, is a very reliable way to diagnose golf cart solenoid issue specifically related to the main power path.
Interpreting Test Outcomes
Let’s summarize what the different test results mean.
| Test | Condition Tested | Expected Result (Good Solenoid) | Actual Result (Potential Problem) | Diagnosis |
|---|---|---|---|---|
| Audible Click | Control Circuit & Coil | Hears a click when activated | No click heard when activated | Problem in control circuit (key switch, pedal switch, F/R, wiring) OR Solenoid Coil is bad. |
| Hears a click when activated | Cart doesn’t move | Solenoid Main Contacts are bad OR Problem after solenoid (controller, motor). | ||
| Small Terminals Voltage | Power to Coil Circuit | Full pack voltage when activated | 0V or low voltage when activated | Problem in control circuit BEFORE solenoid. Solenoid likely OK. |
| Full pack voltage when activated | Full pack voltage when activated (but no click heard) | Solenoid Coil is bad. | ||
| Large Terminals Voltage | Main Contacts (Activated) | Near 0 Volts when activated | Full pack voltage when activated (solenoid clicked) | Solenoid Main Contacts are bad. Solenoid needs replacing. |
| Near 0 Volts when activated | Full pack voltage when activated (solenoid did NOT click) | Problem before solenoid or Solenoid Coil is bad. Use other tests. | ||
| Large Terminals Resist. | Main Contacts (Deact.) | Infinite resistance (OL) or no beep | Low resistance (near 0 Ohms) or beep | Solenoid Main Contacts are stuck closed. Solenoid needs replacing. |
| Large Terminals Resist. | Main Contacts (Act.) | Very low resistance (near 0 Ohms) or loud beep | High/Infinite resistance or no/weak beep | Solenoid Main Contacts are bad (burnt/open). Solenoid needs replacing. |
Using this table helps you diagnose golf cart solenoid issue based on your test results.
Common Golf Cart Solenoid Problems Explained Simply
What exactly goes wrong inside a solenoid?
- Burnt Contacts: The most common issue. Every time the solenoid activates, a spark happens as the contacts close. Over time, this wears down the metal contacts. They become pitted and burnt. Eventually, they can no longer make a good connection, causing high resistance or completely failing to pass power. This leads to the ‘clicking but won’t start’ problem or reduced power.
- Coil Failure: The small wires wrapped inside the solenoid (the coil) can break or short out. If the coil is bad, the magnetic field won’t form when power is applied to the small terminals. This means the contacts won’t pull together, and you won’t hear the click. This is the ‘no click’ problem.
- Stuck Contacts: Less common, but the main contacts can sometimes fuse or get stuck in the closed position. This means the cart would try to go as soon as the key is on (or even with the key off on older systems). This is dangerous and requires immediate battery disconnection.
When Your Solenoid Tests Good
What if you go through all the steps, test golf cart solenoid with multimeter, and it seems to be working fine? You hear the click, you get 0V across the main terminals when activated, the small terminals get power, and the resistance tests look good.
If the solenoid is working but your cart still has issues, the problem is likely elsewhere in the system. This is part of broader golf cart solenoid troubleshooting, moving beyond just the solenoid itself. Other common culprits include:
- Batteries: Are your batteries fully charged and healthy? Weak batteries are a very common reason for a cart not starting or running poorly. Test the individual battery voltage and the pack voltage.
- Controller: The controller regulates power from the batteries to the motor. If it fails, the motor won’t get power even if the solenoid is working.
- Motor: The motor itself could be faulty.
- F/R Switch: Issues with the Forward/Reverse switch can prevent the cart from getting power.
- Pedal Box/Accelerator Switch: The switch in the pedal box tells the solenoid and controller to activate. If it’s bad, the cart won’t start.
- Wiring: Damaged or corroded wires anywhere in the system can cause problems.
If your solenoid tests good, you’ll need to continue troubleshooting these other components based on the specific symptoms your cart shows.
The Bypass Solenoid Test (Use with Extreme Caution)
You might see or hear about “bypassing” the solenoid as a quick way to see if the motor works. This involves directly connecting the battery pack’s positive terminal to the cable that goes from the solenoid’s output terminal to the controller/motor.
This is NOT a recommended diagnostic step for the average golf cart owner. It is dangerous because:
- It involves creating a direct connection between the full battery voltage and the rest of the drive system without the safety switch (the solenoid).
- It can cause large sparks.
- It can potentially damage other components if not done correctly or if there’s an issue further down the line (like a short in the motor).
However, because ‘bypass golf cart solenoid test’ is a relevant term, it’s mentioned here to explain what it is, not to endorse it as a safe or easy test.
What the Bypass Test Does (Conceptually – DO NOT DO THIS AT HOME UNLESS YOU ARE EXPERIENCED AND UNDERSTAND THE RISKS):
By using a heavy-duty jumper cable to temporarily bridge the two large terminals of the solenoid (while the main cables are still connected), you are manually forcing the power connection that the solenoid normally makes.
- If the motor runs when bypassed: This suggests the motor and controller might be working, and the solenoid is the likely problem because it wasn’t making this connection itself.
- If the motor does NOT run when bypassed: This suggests the problem is not the solenoid, but likely the batteries, controller, motor, or main cables.
Again, this bypass golf cart solenoid test is high risk and should be avoided. The multimeter tests described earlier are safer and more accurate ways to diagnose a solenoid problem.
Specific Cart Considerations (EZGO, Club Car)
While the testing principles are the same, the exact location and wiring colors might differ slightly between brands like EZGO and Club Car.
- EZGO Golf Cart Solenoid Test: EZGO carts often use a similar 4-terminal solenoid. The general location is usually near the batteries or controller on the frame. Wiring diagrams for specific EZGO models are readily available online and can help you identify which small terminal is positive and negative (though for voltage presence and resistance tests, knowing polarity isn’t strictly necessary).
- Club Car Solenoid Testing: Club Car solenoids also follow the same design. Their location might differ from EZGO. Again, a wiring diagram for your specific Club Car DS or Precedent model is helpful for locating wires connected to the small terminals and understanding the control circuit path.
The core steps for testing (visual inspection, click test, small terminal voltage, large terminal voltage/resistance) apply to most electric golf carts regardless of brand.
Maintaining Your Solenoid
While solenoids are sealed units and not really “maintainable” internally, you can help ensure their longevity and reliable operation by:
- Keeping Terminals Clean: Periodically inspect the terminals for corrosion and clean them with a wire brush. Corroded connections create resistance, which can make the solenoid work harder and generate heat.
- Ensuring Tight Connections: Make sure the nuts holding the cables onto the solenoid terminals are tight. Loose connections also cause resistance and heat.
- Checking Battery Health: A solenoid is stressed by low voltage or poor connections elsewhere in the system. Keeping your batteries healthy and connections clean reduces the load on the solenoid.
Recap: Key Steps for Solenoid Checking
Here’s a quick summary of the process:
- Safety First: Disconnect the main battery pack before doing anything else.
- Gather Tools: Get your multimeter, wrenches, and safety gear.
- Locate the Solenoid: Find the component with two big and two small terminals, usually near the batteries.
- Visual Check: Look for damage or corrosion.
- Listen for the Click: Carefully reconnect batteries, turn key on, press pedal. Listen. (Helps diagnose golf cart won’t start no solenoid click vs. golf cart solenoid clicking but won’t start).
- Test Small Terminals (Voltage): With cart activated, check for battery voltage across the small terminals. (Helps diagnose control circuit vs. solenoid coil). This is part of the golf cart solenoid voltage test.
- Test Large Terminals (Voltage): With cart activated, check for near 0V across the large terminals. (Diagnoses main contact failure if it clicked but voltage is high). Another part of golf cart solenoid voltage test.
- Test Large Terminals (Resistance/Continuity): With battery disconnected, check resistance. Then, with cart activated (carefully!), check for very low resistance or continuity. (Confirms main contact function or failure). This involves testing golf cart solenoid with multimeter.
- Interpret Results: Use the table to figure out if the solenoid is the problem or if you need to troubleshoot elsewhere. This helps diagnose golf cart solenoid issue.
By following these steps, you can effectively check your golf cart solenoid and determine if it’s the reason your cart isn’t running right. This systematic approach is key to successful golf cart solenoid troubleshooting.
Frequently Asked Questions (FAQ)
h4
What does a golf cart solenoid do?
h5
It acts as a high-current electrical switch. When you activate the cart (press pedal/turn key), a small signal tells the solenoid to close its main contacts, allowing full battery power to flow to the motor or controller.
h4
Why is my golf cart not starting, and there is no click?
h5
If you don’t hear the solenoid click, it means the solenoid’s control circuit is not getting power or the solenoid’s internal coil is bad. You need to test for voltage at the small terminals of the solenoid when the cart is activated. If there’s no voltage there, the problem is in the key switch, pedal switch, F/R switch, or wiring before the solenoid. If there is voltage but no click, the solenoid coil is likely bad. This is the classic golf cart won’t start no solenoid click issue.
h4
My golf cart solenoid is clicking, but the cart won’t move. What does that mean?
h5
This means the control side of the solenoid is working – it’s receiving power and the internal coil is activating. However, the main power contacts inside the solenoid are not closing properly or have failed. This prevents the full battery power from reaching the motor. You need to test the voltage or continuity across the large terminals when the solenoid is clicked on. If you see high voltage (near battery voltage) or high resistance/no continuity across the large terminals when activated, the solenoid’s main contacts are bad, and it needs replacing. This is the golf cart solenoid clicking but won’t start problem.
h4
How do I test a golf cart solenoid with a multimeter?
h5
You use the multimeter in different modes. Use DC Volts to check if power is reaching the small terminals when activated and if power is successfully passing through the large terminals (should be near 0V when activated). Use the Resistance or Continuity setting (with batteries disconnected) to check if the main contacts are open when the solenoid is off and (with batteries carefully connected and solenoid activated) if they are closed with very low resistance. These steps are part of test golf cart solenoid with multimeter.
h4
Can I bypass the solenoid to test it?
h5
While a bypass golf cart solenoid test can conceptually show if the motor works, it is highly dangerous and not recommended for safety reasons and potential damage to other components. The proper and safe way to diagnose a golf cart solenoid issue is by using a multimeter following the steps outlined in this guide.
h4
How do I perform an EZGO golf cart solenoid test or Club Car solenoid testing?
h5
The steps are generally the same for most electric golf carts, including EZGO and Club Car. The location of the solenoid might differ, but it will still have two large and two small terminals. Use the same multimeter tests (voltage on small and large terminals, resistance/continuity on large terminals) following the safety steps. Specific wiring diagrams for your EZGO golf cart solenoid test or Club Car solenoid testing can help locate the component and understand its circuit within that specific cart model.
h4
What voltage should I see on the solenoid terminals?
h5
On the small terminals, you should see voltage close to your full battery pack voltage (e.g., 36V or 48V) when the cart is activated. On the large terminals, you should see full battery pack voltage when the solenoid is deactivated. When the solenoid is activated and working correctly, you should see voltage very close to 0 Volts across the large terminals, indicating the power is flowing through. This is covered in the golf cart solenoid voltage test steps.
h4
If my solenoid is good, what else could be wrong?
h5
If your tests show the solenoid is working correctly, but the cart doesn’t run, the problem is likely elsewhere. Common areas for further golf cart solenoid troubleshooting include checking the batteries, the controller, the motor, the F/R switch, the accelerator pedal switch, and all main cables and wiring for corrosion or damage. This helps diagnose golf cart solenoid issue fully.