
Properly aligning your golf cart is a crucial task. It helps your cart drive straight and makes your tires last longer. Yes, you can do much of this work yourself at home. This guide will show you how to perform a DIY golf cart alignment. You will learn easy steps to adjust your golf cart wheel alignment, especially the front end golf cart alignment.
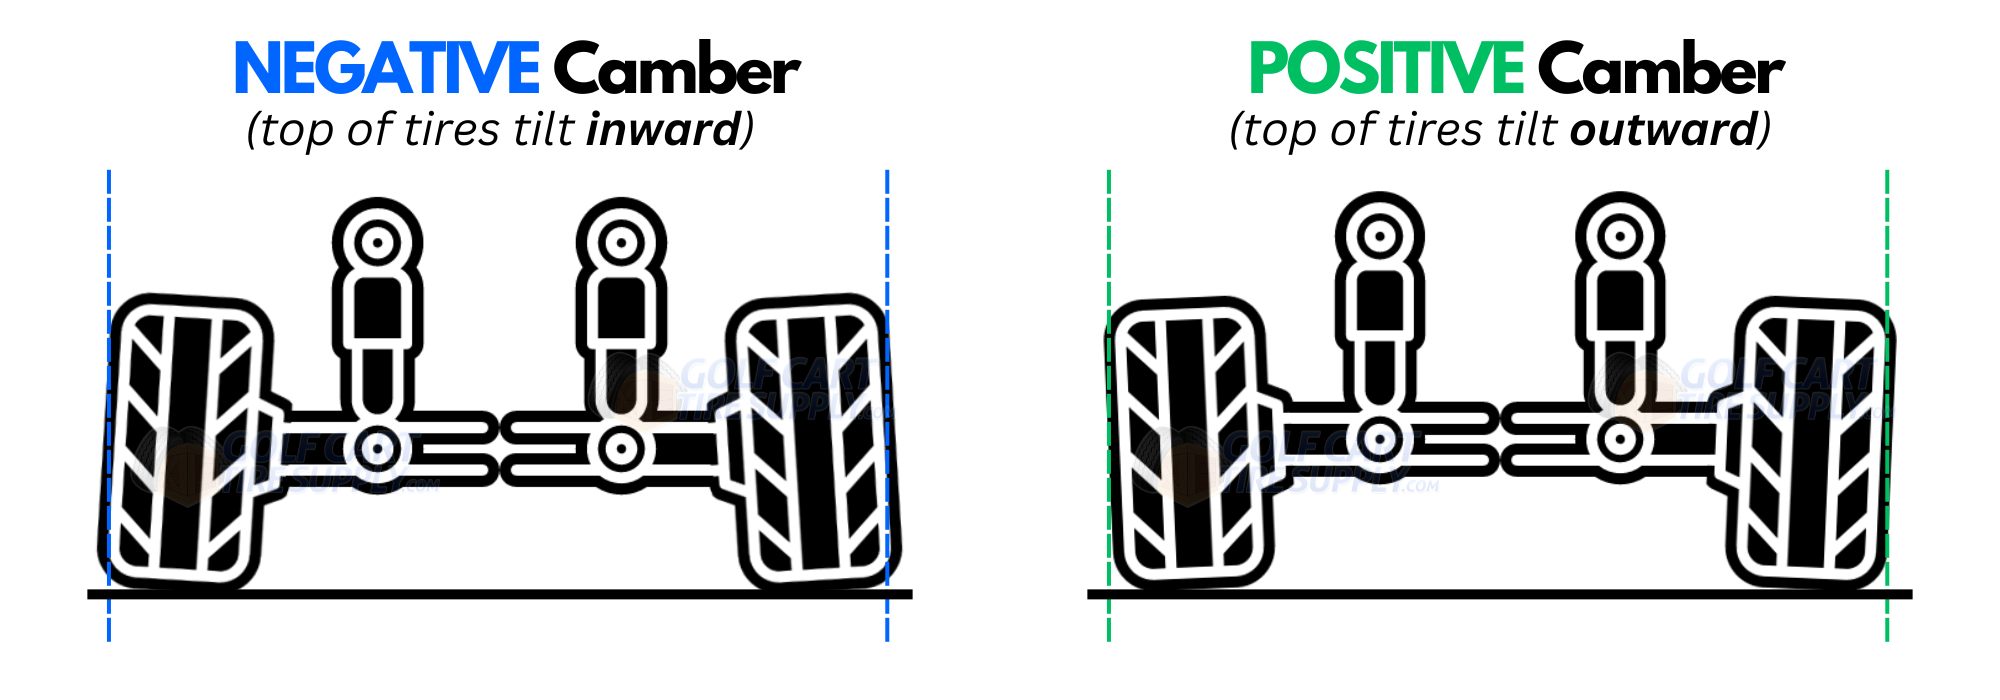
Image Source: cdn2.bigcommerce.com
The Core of Golf Cart Alignment
Getting your golf cart’s wheels to point in the right direction is very important. Think of it like aligning a car. When the wheels are off, many problems can happen. This section will cover why alignment matters and how to spot trouble.
Why Your Golf Cart Needs Proper Alignment
Good golf cart wheel alignment keeps your ride smooth and safe. If your wheels are not aligned, it can cause many issues.
- Uneven Tire Wear: This is a big one. Bad alignment makes some parts of your tires wear out faster than others. This means you buy new tires sooner.
Tire wear golf cart alignmentproblems often show up as worn edges on your tires. - Poor Steering and Handling: Your golf cart might pull to one side. It can feel hard to steer. It might even shake or wobble at speed. This makes driving less safe and less fun.
Golf cart steering alignmentis key for good handling. - Less Stable Ride: An unaligned cart can feel bouncy or unstable. This is especially true on rough paths.
- Lost Power: When wheels drag or fight each other, your cart works harder. This can use more battery power or fuel.
Signs Your Golf Cart Needs Alignment
Your golf cart will often tell you if something is wrong with its alignment. Look for these signs:
- Steering Wheel Not Straight: When driving in a straight line, your steering wheel might be off-center. It could be turned to the left or right.
- Cart Pulls to One Side: You might have to hold the steering wheel to keep the cart going straight. It wants to go left or right on its own.
- Tires Wearing Unevenly: Feel the edges of your tires. Do they feel rough or worn down on one side only? This is a strong sign of
tire wear golf cart alignmentissues. - Loose Steering: Does the steering feel vague or sloppy? Is there a lot of play before the wheels turn?
- Squealing Tires: Tires might squeal when turning even at low speeds. This means they are fighting the road surface.
Essential Alignment Terms Explained
To align your golf cart, you need to know a few key terms. These words help you know what to check and adjust.
Toe-In and Toe-Out: The Main Focus
“Toe” is about how much the front of your wheels point inward or outward. It’s the most common adjustment you will make.
- Toe-In: The front edges of your wheels point slightly inward. Think of them looking pigeon-toed. Most golf carts need a little toe-in. This helps the wheels run straight and stable.
- Toe-Out: The front edges of your wheels point slightly outward. Like a duck’s feet. Too much toe-out can make steering nervous. It also causes tire wear.
Adjusting golf cart toe adjustment is usually done by turning tie rod ends. We will cover this soon.
Camber: Lean of the Wheels
“Camber” is how much your wheels tilt inward or outward at the top. Think of a picture frame leaning against a wall.
- Positive Camber: The top of the wheel leans out from the cart.
- Negative Camber: The top of the wheel leans in towards the cart.
Most golf carts aim for very little camber, or a small amount of negative camber. This helps with even tire wear. Large camber issues often mean worn parts. Some carts allow golf cart camber settings using shims or special bolts.
Caster: Steering Stability
“Caster” is about the angle of the steering pivot point. It’s like the front wheel of a shopping cart. The wheel trails behind the pivot. This makes the cart go straight. Caster helps the steering wheel return to center after a turn. On golf carts, caster is usually not adjustable without special parts. But it’s good to know what it means.
Gathering Your Tools: What You Need
Before you start, get your tools ready. Having the right golf cart alignment tools makes the job easier and faster.
- Jack and Jack Stands: You will need to lift the front of your cart. Safety first!
- Wrench Set: For loosening and tightening tie rod ends. Open-end wrenches are usually enough.
- Tape Measure: A good quality, accurate tape measure.
- String: About 10-12 feet of thin string or fishing line.
- Two Straight Edges or Long Metal Bars: These can be level pieces of wood or metal. They should be longer than your tires are wide.
- Chalk or Marker: To mark your tires.
- Level: A basic carpenter’s level can check camber.
- Pen and Paper: To write down your measurements.
- Optional: Golf Cart Alignment Kit: Some kits offer special plates or gauges. They can make measurements easier. But they are not always needed for a basic DIY job.
Before You Begin: Pre-Alignment Checks
Before you start aligning, check for other problems. Fixing these first can save you time and trouble. Bad parts can make proper golf cart wheel alignment impossible.
- Tire Pressure: Make sure all tires are filled to the correct pressure. Use the pressure listed on the tire wall or in your cart’s manual. Uneven pressure can mess up your measurements.
- Worn Suspension Parts: Check for loose or worn parts.
- Tie Rod Ends: Grab each tie rod and try to shake it. If it moves a lot, it might be worn.
- Ball Joints: Check the ball joints where the wheel hub attaches. Look for tears in the rubber boots or play in the joint.
- Wheel Bearings: Lift the front of the cart. Grab the top and bottom of each wheel. Try to wiggle it in and out. Any looseness means worn wheel bearings.
- Bushings: Look at the rubber bushings in the A-arms or leaf springs. Cracked or squashed bushings can cause issues.
- Loose Steering Components: Grab the steering wheel and wiggle it. Does it move a lot before the wheels turn? This could be a loose steering box or other
golf cart steering alignmentproblems. You might need to adjust or replace parts here first.
If you find worn parts, replace them before doing any golf cart suspension adjustment or alignment. Trying to align a cart with worn parts is like building on sand. It won’t hold.
Step-by-Step: DIY Front End Alignment
Now for the main part: doing the front end golf cart alignment yourself. We will focus on adjusting toe, as it’s the most common and easiest DIY fix.
Step 1: Set Up Your Cart
- Park on Level Ground: Find a flat, hard surface. This is very important for accurate measurements.
- Steering Wheel Straight: Turn the steering wheel so it is centered. Try to keep it as straight as possible throughout the process. You can even tie it in place if it moves easily.
- Roll the Cart: Roll the cart back and forth a few feet. This helps the suspension settle.
Step 2: Measure Toe (The String Method)
This is a simple and accurate way to measure toe at home.
- Mark Your Tires:
- Use your chalk or marker.
- On the front of each tire, at about hub height, make a small, clear mark.
- Do the same on the back of each tire. Make sure the marks are exactly opposite each other.
- Set Up Your String:
- Get your two straight edges or metal bars.
- Place one straight edge along the outside of the front tires. Make sure it touches both tires evenly.
- Place the second straight edge along the outside of the back tires.
- Run a string or fishing line tightly from the front straight edge to the back straight edge on each side of the cart. Make sure the strings are parallel to each other and to the cart’s frame. This creates a box around your cart.
- Alternatively, and often simpler for golf carts: You can use two jack stands (or heavy items) placed in front of and behind each tire. Tie a string between the two jack stands on each side, running parallel to the cart’s body. Adjust the string height so it lines up with the center of the wheel hub. This makes a clear line to measure against.
-
Measure Distance from String to Wheel Rim:
- With the string set up, measure the distance from the string to the front edge of the front rim. Let’s call this measurement “A.”
- Then, measure the distance from the string to the back edge of the front rim. Let’s call this measurement “B.”
- Do this for both front wheels.
Example Table for Toe Measurement (String Method – Example Values)
Measurement Point Left Wheel Right Wheel A (Front of Rim) 1.00 inch 1.00 inch B (Back of Rim) 1.15 inch 1.15 inch - Calculate Toe: For each wheel, subtract A from B (B – A). This gives you the toe for that wheel relative to the string.
- If B is larger than A, it means the wheel is pointing inward (toe-in).
- If A is larger than B, it means the wheel is pointing outward (toe-out).
A Simpler Toe Measurement (Tape Measure Method):
- Lift the front of the cart with your jack. Place it on jack stands for safety.
- Spin each front tire and make a precise chalk mark on the center of the tire tread at the rear of the wheel.
- Lower the cart back down.
- Use your tape measure to measure the distance between the two chalk marks on the rear of the tires. Have a helper hold one side of the tape. Write this down. Let’s call this
Measurement 1. - Carefully push the cart forward about 10-15 feet. This rotates the tires exactly half a turn. The chalk marks will now be at the very front of the tires.
- Measure the distance between the two chalk marks on the front of the tires. Write this down. Let’s call this
Measurement 2.
Example Table for Toe Measurement (Tape Method)
Measurement Point Value Measurement 1 (Rear) 40 inches Measurement 2 (Front) 39.875 inches - Calculate Total Toe: Subtract
Measurement 2fromMeasurement 1(Measurement 1 - Measurement 2). - If
Measurement 1is larger thanMeasurement 2, you have toe-in. This is good! - If
Measurement 2is larger thanMeasurement 1, you have toe-out. This needs fixing.
Target Toe: Most golf carts need a small amount of toe-in. This helps them track straight. A common target is 1/8 inch to 1/4 inch (0.125 to 0.250 inches) total toe-in. This means the front of the tires should be 1/8 to 1/4 inch closer together than the back of the tires. Check your golf cart’s manual for the exact number.
Step 3: Adjust Toe
This is where you make the changes. The golf cart toe adjustment is done using the tie rod ends.
- Locate Tie Rods: You will see a rod running from the steering gearbox to each front wheel. These are the tie rods. At each end, there’s a tie rod end.
- Loosen Nuts: On each tie rod end, there are jam nuts. You need to loosen these nuts. Turn them counter-clockwise using your wrench. Loosen them enough so you can turn the tie rod.
- Adjust Tie Rod:
- To get more toe-in (pull wheels inward): Turn the tie rod itself. You can often use a wrench on the flat parts of the rod. Turn it so it gets shorter. This will pull the front of the wheel inward.
- To get less toe-in or more toe-out (push wheels outward): Turn the tie rod so it gets longer. This will push the front of the wheel outward.
- Important: Try to make equal adjustments to both sides. If you make the left tie rod shorter, make the right one shorter by the same amount. This keeps your steering wheel centered.
- Re-measure: After making an adjustment, roll the cart back and forth a few feet to settle the suspension. Then, re-measure your toe using the string or tape method.
- Repeat: Keep adjusting and re-measuring until you reach your target toe-in (e.g., 1/8 inch to 1/4 inch total toe-in).
- Tighten Nuts: Once you are happy with the toe, tighten the jam nuts firmly against the tie rod ends. Make sure they are very tight so they don’t come loose.
Step 4: Check Camber (If Adjustable)
Camber is less commonly adjustable on golf carts. Many carts have fixed camber. But if your cart allows golf cart camber settings, here’s how to check it. This is where golf cart suspension adjustment sometimes comes into play, usually through shims or special bolts.
- Level Ground: Make sure your cart is on level ground.
- Use a Level: Hold a carpenter’s level vertically against the side of the wheel. The level should touch the tire at the very top and very bottom.
- Read the Bubble:
- If the bubble is in the center, you have zero camber. This is often ideal.
- If the top of the wheel leans out (positive camber), the bottom of the bubble will be towards the cart.
- If the top of the wheel leans in (negative camber), the top of the bubble will be towards the cart.
- Adjust (If Possible):
- Some golf carts use shims between the A-arms and the frame to adjust camber. Adding or removing shims changes the angle.
- Others might have eccentric bolts that allow for slight adjustment.
- If your camber is off and not easily adjustable, it might mean worn bushings or a bent suspension part. This would need professional help or part replacement.
Special Case: Lifted Golf Cart Alignment
Lifted golf cart alignment can be more complex. When you lift a golf cart, especially with taller tires, it changes the geometry.
- More Extreme Changes: Lifting often leads to more significant changes in camber and caster.
- Need for Adjustment Kits: Many lift kits include adjustable components or require special
golf cart suspension adjustmentkits. These kits often add adjustable camber bolts or longer tie rods. - Professional Help: If you have a highly
lifted golf cart alignmentissue, it might be best to seek a professional. They have specialized equipment to measure all angles (toe, camber, and caster) at once. - Tire Size Matters: Larger tires can also affect how the steering feels. They put more stress on steering components.
Always follow the instructions that came with your lift kit for alignment settings.
Test Drive and Final Checks
After your DIY golf cart alignment, it’s time to see how it drives.
- Go for a Drive: Drive your golf cart slowly at first. Pay attention to how it feels.
- Check Steering: Does it track straight without you holding the wheel? Is the steering wheel centered? If not, you might need to make small, equal adjustments to both tie rods to re-center the steering wheel. This is part of fine-tuning your
golf cart steering alignment. - No Pulling: Does it still pull to one side? If so, re-check your toe measurements. A slight difference between the left and right toe can cause a pull.
- Listen: Do you hear any new noises?
- Check Tires: Keep an eye on your tires over the next few weeks. Look for signs of even wear. This is the ultimate test of successful
tire wear golf cart alignment. If you see uneven wear starting again, re-measure. - Tighten Everything: Double-check that all nuts and bolts you loosened are tight.
Frequently Asked Questions (FAQ)
Q: How often should I align my golf cart?
A: It’s a good idea to check your golf cart’s alignment once a year. You should also check it after hitting a big bump, after replacing suspension or steering parts, or if you notice any of the signs of bad alignment.
Q: Can I really do this myself, or do I need a special golf cart alignment tool?
A: Yes, you can do a basic toe alignment yourself with common tools like a tape measure and string. For camber and caster, specialized tools or professional help might be needed if your cart allows for adjustment and it’s severely off.
Q: What if I adjust the toe, but the steering wheel is still off-center?
A: If the steering wheel is off-center but the toe is correct, you likely did not adjust both tie rods equally. To fix this, you need to loosen both tie rod jam nuts again. Then, turn both tie rods in the same direction (e.g., both shorter or both longer) by the same amount until the steering wheel centers. This adjusts the golf cart steering alignment without changing the toe setting.
Q: My tires still wear unevenly after alignment. What else could be wrong?
A: Uneven tire wear golf cart alignment can still happen if:
* There are worn suspension parts you missed (ball joints, bushings, wheel bearings).
* Your camber is off and not adjustable, or the chassis is bent.
* Tire pressure is consistently incorrect.
* You frequently drive on very rough terrain.
Q: Is golf cart suspension adjustment related to alignment?
A: Yes, very much so. Issues with your golf cart suspension adjustment (like worn springs, shocks, or bushings) can directly affect wheel angles (camber, caster, and even toe). Always fix suspension problems before trying to align your cart.
Q: What is the ideal toe setting for a golf cart?
A: Most golf carts perform best with a small amount of toe-in, typically 1/8 inch to 1/4 inch. Always check your specific golf cart’s manual for the exact recommended setting.
Concluding Thoughts
Taking the time to align your golf cart is a smart move. It saves you money on tires. It makes your cart safer and more fun to drive. With these DIY golf cart alignment steps, you can tackle most common golf cart wheel alignment issues yourself. Remember to be patient, measure carefully, and always put safety first. If you face big problems or are unsure, do not hesitate to call a professional. Enjoy your smooth-riding golf cart!