
A golf cart solenoid is a small but mighty part. It acts like an electrical switch. When you press the pedal, it sends power from the battery to the motor. This makes your golf cart start. A golf cart starter solenoid helps get the cart moving. If your golf cart is not starting, the solenoid might be bad. You can test a 12V golf cart solenoid with a multimeter. A multimeter checks electrical flow. Many golf cart solenoid issues come from old parts. Diagnosing golf cart solenoid issues helps find the problem. You can learn how to bypass a golf cart solenoid for a quick check. This is not a fix, only a test. We will show you how to do a golf cart solenoid continuity test. This checks if the solenoid’s coil is good. If your golf cart solenoid is clicking but not starting, we will cover that too. This guide also talks about general golf cart no start troubleshooting.
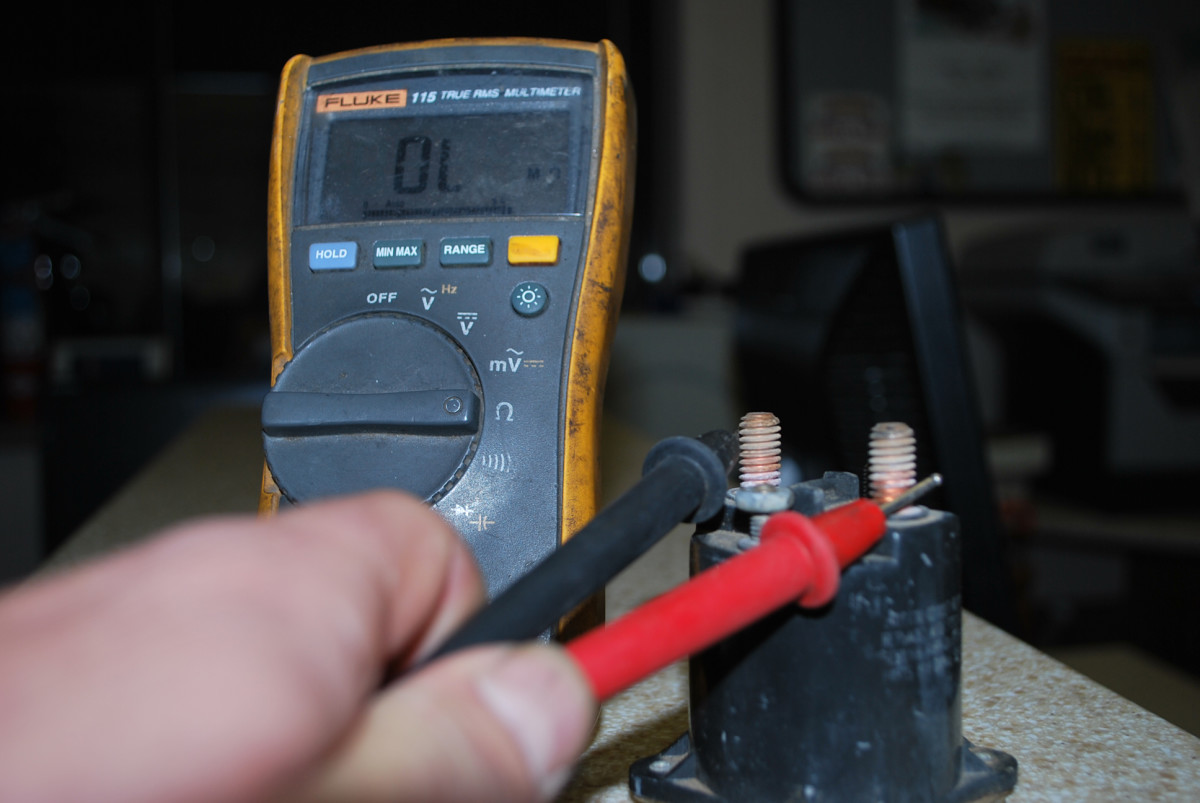
Image Source: images.saymedia-content.com
Deciphering the Golf Cart Solenoid
What is a golf cart solenoid? Think of it as a gatekeeper for power. When you step on the gas pedal, you send a small signal. This signal tells the solenoid to open its gate. Once the gate is open, a big surge of electricity flows. This power goes from your golf cart’s battery. It travels to the starter motor. The starter motor then turns on the engine. If you have an electric golf cart, it sends power right to the drive motor. This gets your cart moving.
Most golf carts use a 12V solenoid. This means it needs 12 volts to work. Some heavy-duty carts might use a 36V or 48V system. But the solenoid itself usually runs on 12V. This is because the control circuit is 12V.
A solenoid has a few key parts:
* Two big terminals: These are for the main power. One connects to the battery. The other connects to the motor.
* Two small terminals: These are for the control power. They get a small 12V signal. This signal tells the solenoid to turn on.
* A coil: This is inside the solenoid. When the small terminals get power, the coil makes a magnetic field. This field pulls a plunger. The plunger connects the two big terminals.
* A plunger/disc: This moves inside the solenoid. It closes the circuit between the big terminals.
When the solenoid works, you often hear a “click.” That click is the plunger moving. It means the solenoid is getting power. It is trying to work. If you don’t hear a click, it can mean many things. We will cover this later.
Symptoms of a Bad Golf Cart Solenoid
Knowing the signs of a bad solenoid helps a lot. It can save you time. It helps with golf cart starter solenoid troubleshooting. Here are common problems:
- No Click, No Start: You press the pedal. Nothing happens. No sound. No movement. This can be a sign of a bad solenoid. It might not be getting power. Or its coil might be broken.
- Click But No Start: This is a very common issue. You press the pedal. You hear a clear “click.” But the cart does not move. The motor does not turn. This often means the solenoid is trying to work. But it cannot pass the main power. The big contacts inside might be worn out. They might be burnt. This is a big part of diagnosing golf cart solenoid issues.
- Slow or Weak Start: The cart tries to start. It sounds weak. It might struggle to get power. This can mean the solenoid is partly bad. Its contacts might be burnt. They are letting some power through. But not enough. This makes the motor run slow.
- Overheating Solenoid: You might feel the solenoid. Is it very hot? This is a bad sign. It can mean there is too much resistance inside. It means it is working too hard. Or it is failing.
- Burning Smell: A bad smell can mean a burnt solenoid. Electrical parts can melt when they fail. This can cause a bad odor.
- Solenoid Stays On: Sometimes, the solenoid gets stuck. It keeps power flowing. Even when you let off the pedal. This can drain your battery. It can also harm your motor. This is a rare but serious issue.
These symptoms help point to the solenoid. But they don’t always mean it’s the only problem. Other parts can cause similar issues. This is why testing is important.
Tools You Will Need
Before you start, get your tools ready. Having the right tools makes the job easier. It also makes it safer.
- Multimeter: This is a must-have tool. It measures voltage, resistance (ohms), and continuity. We will use it a lot.
- Wrench Set or Socket Set: You will need these to remove battery cables. You also need them for solenoid terminals.
- Wire Brush: To clean battery terminals. Clean terminals help with good connections.
- Safety Glasses: Always protect your eyes. Battery acid can be harmful.
- Gloves: Protect your hands.
- Battery Terminal Cleaner/Protector: After cleaning, use this. It helps prevent rust.
- Test Light (Optional but helpful): A test light can check for power. It lights up when power is present. It’s simpler than a multimeter for basic voltage checks.
- Jumper Wire (for temporary bypass): This is a thick wire. It needs alligator clips on both ends. Use it only for bypassing the solenoid.
Gather these items first. This way, you won’t stop in the middle of a test.
Safety First!
Working with golf cart batteries needs care. They hold a lot of power. This power can hurt you. It can also damage your cart. Always follow these safety rules:
- Wear Safety Glasses: This protects your eyes from sparks or battery acid.
- Wear Gloves: These protect your hands.
- Turn Off the Cart: Make sure the key is off. Put the forward/reverse switch in neutral.
- Disconnect the Battery: This is the most important step. Always disconnect the main negative battery cable first. Then disconnect the positive cable. This cuts off all power. It stops any accidental shocks.
- Work in a Well-Lit Area: Good light helps you see what you are doing. It helps prevent mistakes.
- Avoid Metal Objects: Do not let tools touch both battery terminals at once. This can cause a short circuit. It can make sparks. It can cause a fire.
- No Smoking or Open Flames: Batteries make hydrogen gas. This gas is explosive. Keep sparks and flames away.
- Have a Fire Extinguisher Ready: Just in case. A small electrical fire can happen.
Remember, safety is key. Take your time. Do not rush.
Step-by-Step Solenoid Testing
Now, let’s test the solenoid. We will use your multimeter for this. Testing a 12V golf cart solenoid with a multimeter is the best way.
h4. Preparation Steps
- Locate the Solenoid: On most golf carts, the solenoid is near the batteries. It is a cylinder-shaped part. It has two big terminals. It has two small terminals.
- Inspect Visually: Look at the solenoid and its wires. Do you see any burnt spots? Are wires loose? Are terminals rusty? A golf cart contactor check starts here. Make sure all connections are tight. Clean any corrosion with your wire brush. Loose or dirty wires can cause issues.
- Charge Your Batteries: Make sure your batteries are fully charged. Low power can give false readings.
h4. Test 1: Checking for Control Power (Small Terminals)
This test checks if the solenoid is getting the signal to turn on.
- Set Your Multimeter: Turn the dial to DC Volts (VDC). Set it to 20V.
- Connect Multimeter: Put the black lead on the negative battery terminal. Or put it on a good frame ground.
- Test Small Terminals:
- Touch the red lead to one small terminal of the solenoid.
- Have someone press the accelerator pedal.
- You should see around 12V (for a 12V system).
- Repeat for the other small terminal.
- Both small terminals should show 12V when the pedal is pressed.
What the readings mean:
* 0V on both small terminals: The solenoid is not getting power. The problem is upstream. Check the key switch, pedal switch, or controller. This means your golf cart starter solenoid troubleshooting needs to go deeper.
* 12V on one small terminal, 0V on the other: The solenoid coil is not getting a full circuit. It could be a bad ground wire to the solenoid. Or a problem with the controller.
* 12V on both small terminals (when pedal pressed): The control power is good. The problem is likely in the solenoid itself. Or in the main power connections.
h4. Test 2: Solenoid Continuity Test (Testing the Coil)
This checks the internal coil of the solenoid. This is a golf cart solenoid continuity test. It tells us if the coil is broken.
- Disconnect Wires from Small Terminals: Make sure no wires are connected to the two small terminals.
- Set Your Multimeter: Turn the dial to Ohms ($\Omega$). This setting checks for resistance. Or use the continuity setting (it usually beeps).
- Test Coil: Touch one multimeter lead to each small terminal.
What the readings mean:
* A reading of 2 to 5 ohms: The coil is good. It has proper resistance. The solenoid is likely okay at this point.
* “OL” or “Open Line” or “No reading” (no beep on continuity): The coil is broken. It is an open circuit. The solenoid is bad. It needs replacing.
* 0 ohms (short circuit): The coil is shorted. The solenoid is bad. It needs replacing.
h4. Test 3: Checking Main Terminals (Main Power Flow)
This test checks if the solenoid passes the main power. This is part of the golf cart contactor check.
- Reconnect Battery: Reconnect the battery cables. Remember, negative last.
- Set Multimeter: Set to DC Volts (VDC), 20V range.
- Test Input Terminal:
- Put the black lead on the negative battery post.
- Touch the red lead to the “input” big terminal of the solenoid. This is usually the one connected directly to the positive battery cable.
- You should read full battery voltage (e.g., 12V, 36V, or 48V, depending on your cart’s system). If not, check battery cables.
- Test Output Terminal (Static):
- Keep the black lead on the negative battery post.
- Touch the red lead to the “output” big terminal of the solenoid. This is the one going to the motor.
- You should read 0V (or very close to it) when the pedal is not pressed. This means no power is flowing.
- Test Output Terminal (Active):
- Now, have someone press the accelerator pedal.
- Keep the leads on the output terminal and negative battery.
- You should now read full battery voltage (e.g., 12V, 36V, or 48V).
What the readings mean:
* Full voltage on input, full voltage on output (when pedal pressed): The solenoid is working correctly. It is passing power. The problem is not the solenoid. You need to do more golf cart no start troubleshooting. Look at the motor, wiring, or controller.
* Full voltage on input, 0V on output (when pedal pressed, even with a click): The solenoid is bad. It is getting the signal to turn on. But its internal contacts are not closing. This is the classic “clicking but no start” issue. The solenoid needs replacing.
* Full voltage on input, but less voltage on output (when pedal pressed): The solenoid is partly bad. Its contacts are corroded or burnt. It’s letting some power through. But not enough. This can cause weak starting. The solenoid needs replacing.
Use the table below to summarize your multimeter readings for diagnosing golf cart solenoid issues.
| Test Point | Multimeter Setting | Pedal Pressed? | Expected Good Reading | What it Means if Bad |
|---|---|---|---|---|
| Small Terminals (Input) | VDC (20V) | Yes | ~12V on both | No control signal to solenoid. |
| Solenoid Coil | Ohms ($\Omega$) | No | 2-5 Ohms | Broken coil, solenoid is bad. |
| Large Terminals (Output) | VDC (System V) | No | 0V | Solenoid stuck closed or short. |
| Large Terminals (Output) | VDC (System V) | Yes | Full System V | Solenoid passes power correctly. |
Grasping Solenoid Wiring
A golf cart solenoid wiring diagram helps you see how everything connects. Each golf cart model can be a bit different. But the basic setup is similar.
Most solenoids are “4-terminal” solenoids. This means they have two large terminals and two small terminals.
- Large Terminal 1 (Input): This connects directly to the positive (+) post of your main battery pack.
- Large Terminal 2 (Output): This connects to the starter motor (for gas carts) or the main drive motor (for electric carts).
- Small Terminal 1 (Activation Input): This usually gets 12V when you press the pedal. This power often comes through the key switch, the forward/reverse switch, and the pedal microswitch.
- Small Terminal 2 (Ground/Return): This completes the 12V control circuit. It often connects to the main negative battery post. Or it goes to a controller that switches the ground.
Some older or simpler solenoids might be “3-terminal.” In these, one of the small terminals is internally grounded. So, it only has one small terminal to connect.
Basic Wiring Path (When you press the pedal):
1. Key Switch: Turns on the main control circuit.
2. Forward/Reverse Switch: Sends power to the correct direction.
3. Pedal Microswitch: This switch is under your accelerator pedal. It closes when you press the pedal. It sends 12V to the solenoid’s small terminal.
4. Solenoid: Gets the 12V signal. Its coil activates. It clicks.
5. Main Power Flow: The solenoid closes its big contacts. Power flows from the battery to the motor.
6. Motor: Gets power and starts the cart.
If you are confused, look for a golf cart solenoid wiring diagram for your specific cart model. These diagrams show colors of wires. They show where each wire goes. It’s a great tool for golf cart no start troubleshooting.
Troubleshooting Common Solenoid Problems
Sometimes, your solenoid is not the only issue. Or its failure is a symptom of another problem. Let’s look at more golf cart starter solenoid troubleshooting.
h4. Golf Cart Solenoid Clicking But Not Starting
This is perhaps the most common issue. You hear the click. This means the solenoid’s coil is working. It means it is getting the signal to activate. But the cart still doesn’t move.
Possible Causes:
- Bad Solenoid Main Contacts: This is the most likely cause. The internal contacts that carry the main power are burnt or worn out. They can’t make a good connection. This means the solenoid “clicks,” but no big power goes through. Fix: Replace the solenoid.
- Low Battery Voltage (Main Pack): If your main battery pack is weak, it might not have enough power. The solenoid might click, but there’s not enough voltage to turn the motor. Fix: Charge batteries fully. Test each battery with a load tester.
- Corroded Battery Cables/Terminals: Dirty or loose connections on the battery or motor can stop power flow. Even with a good solenoid, power can’t get to the motor. Fix: Clean all battery terminals. Tighten all cable connections. Use a wire brush.
- Bad Motor: Less common, but possible. The motor itself could be faulty. It might be seized. It might have internal shorts. Even if the solenoid sends power, the motor won’t turn. Fix: Test the motor (can be complex, might need a professional).
- Motor Brushes Worn: For electric carts, motor brushes can wear out. This stops power from reaching the motor’s spinning parts. Fix: Replace motor brushes.
- Controller Issues (Electric Carts): On electric carts, the controller manages power to the motor. A bad controller can stop power. Even if the solenoid works. Fix: Test controller (often needs special tools or a professional).
If you hear the click, your focus should be on:
* The solenoid’s main contacts (Test 3 above).
* The main power path (batteries, cables).
* The motor.
h4. No Clicking At All, No Start
If you press the pedal and hear nothing, the solenoid is not activating.
Possible Causes:
- No Control Power to Solenoid: The 12V signal is not reaching the small terminals.
- Bad Key Switch: The switch is not sending power. Fix: Test key switch for continuity/voltage.
- Bad Pedal Microswitch: The switch under the pedal is not closing. Fix: Test pedal microswitch.
- Bad Forward/Reverse Switch: The switch is not sending power. Fix: Test F/R switch.
- Broken Wire: A wire in the control circuit is broken or loose. Fix: Visually check wires. Use multimeter to trace power.
- Blown Fuse: A fuse in the control circuit is blown. Fix: Check and replace fuses.
- Bad Solenoid Coil: The internal coil is broken. It can’t make a magnetic field. Even with 12V, it won’t click. Fix: Test Solenoid Coil (Test 2 above). Replace solenoid if bad.
- Low Battery Voltage (12V Accessory Battery): If your cart has a separate 12V battery for control, it might be dead. Fix: Charge or replace 12V battery.
- Corroded Connections on Small Terminals: Dirty connections can stop the 12V signal. Fix: Clean small terminals and wires.
Use Test 1 (Checking for Control Power) to narrow down the problem here. If you get power to the small terminals, but no click, it’s likely the solenoid coil.
h4. Slow or Weak Start
The cart might start, but it sounds tired. It struggles.
Possible Causes:
- Partially Failing Solenoid: The internal contacts are corroded. They allow some power through. But not full power. This causes voltage drop. Fix: Replace solenoid.
- Weak Batteries: The main battery pack is low on charge. Or one or more batteries are bad. Fix: Fully charge batteries. Test each battery with a hydrometer and load tester.
- Corroded Battery Cables: Similar to weak batteries, bad cables limit current flow. This causes voltage drop under load. Fix: Clean and tighten all main battery cables.
- Loose Connections: Any loose connection in the high-current path (battery to solenoid to motor) can cause this. Fix: Tighten all connections.
How To Bypass Golf Cart Solenoid (Temporary Test)
Important: Bypassing the solenoid is a temporary diagnostic step only. It is not a permanent fix. It should only be done briefly. You are directly sending full battery power to the motor. There is no switch or safety control. This can be dangerous.
When to Bypass:
You can bypass the solenoid if you hear a “click” but the cart doesn’t move. This test helps confirm if the solenoid is truly the issue. It checks if the motor works if it gets power.
Tools Needed:
* Heavy-duty jumper cables (the type used for cars).
* Safety glasses and gloves.
Steps to Bypass (DO THIS VERY CAREFULLY!):
- Park Safely: Park the cart on flat ground. Put the forward/reverse switch in neutral. Turn the key off. Engage the parking brake.
- Disconnect Main Battery: Remove the negative (-) cable from the main battery pack.
- Connect Jumper Cable:
- Identify the two large terminals on the solenoid.
- Attach one end of your heavy-duty jumper cable to one large terminal.
- Attach the other end of the jumper cable to the other large terminal. You are essentially making a direct connection. You are bypassing the solenoid’s internal switch.
- Reconnect Main Battery (Briefly): Reconnect the negative (-) battery cable.
- Observe:
- If the cart starts/motor turns: This strongly suggests the solenoid is bad. It means the motor and batteries are getting power. The solenoid was the weak link.
- If nothing happens: The problem is likely elsewhere. It could be the motor, the main battery pack, or major cables. This means your golf cart no start troubleshooting needs to go deeper.
- Disconnect Immediately: As soon as you get a result (cart moves or doesn’t), immediately disconnect the jumper cable. Then, disconnect the main battery again.
Why it’s Dangerous and Temporary:
* No Safety Controls: When bypassed, there’s no way to stop the cart. The key switch, pedal switch, and F/R switch are all bypassed. The motor gets full power.
* Arcing/Sparks: Connecting heavy cables can cause sparks. Be careful.
* Overheating/Damage: If the motor is seized or shorted, bypassing the solenoid can cause severe damage. It can also cause cables to overheat.
* Loss of Control: The cart could move unexpectedly.
Only use this method for a very quick test. Never drive the cart with the solenoid bypassed. Replace the bad solenoid as soon as possible.
Replacing a Solenoid (Brief Overview)
If your tests show a bad solenoid, replacement is the fix. It’s a fairly simple job for most DIYers.
- Buy the Right Solenoid: Make sure you get a solenoid designed for your golf cart model and voltage system.
- Disconnect Batteries: Always disconnect the main negative battery cable first. Then the positive.
- Take Pictures: Before you remove any wires, take clear photos. This helps you remember where each wire goes.
- Remove Old Solenoid: Use your wrenches to disconnect all four wires. Unbolt the solenoid from its mounting point.
- Install New Solenoid: Mount the new solenoid. Refer to your pictures to connect the wires correctly.
- Remember: Battery + to one large terminal. Motor to the other large terminal. The two small control wires to the small terminals.
- Reconnect Batteries: Reconnect the positive battery cable. Then reconnect the negative battery cable last.
- Test: Turn on the key. Press the pedal. Listen for the click. See if the cart starts.
Preventative Maintenance
A little care can go a long way. This can help prevent future golf cart solenoid issues.
- Keep Batteries Clean: Battery terminals should be free of corrosion. Clean them often. Use a wire brush and battery terminal cleaner.
- Check Cable Connections: Make sure all battery cables are tight. Also, check the connections at the solenoid and motor. Loose connections cause heat and resistance.
- Keep the Solenoid Clean: Wipe down the solenoid. Keep it free of dirt and grime.
- Regular Battery Checks: Test your battery voltage often. Make sure batteries are fully charged. Weak batteries can overwork the solenoid.
- Inspect Wiring: Look for any frayed or cracked wires. Replace damaged wires.
Frequently Asked Questions (FAQ)
Q1: How do I know if my golf cart solenoid is 12V, 36V, or 48V?
A1: The solenoid itself usually runs on 12V. This is for its control circuit. But the main power it switches will match your cart’s system voltage. Check your golf cart’s battery pack. Count the 6-volt batteries (6V x number of batteries = total voltage). Or check the voltage written on your battery charger. For example, six 6V batteries make a 36V system. Eight 6V batteries make a 48V system.
Q2: Can a bad solenoid drain my battery?
A2: Yes, but it’s rare. If the solenoid’s internal contacts stick in the “on” position, it can keep power flowing to the motor. This drains the battery even when the cart is off. More often, a bad solenoid just stops the cart from starting.
Q3: Is it hard to replace a golf cart solenoid?
A3: For most people, it’s a simple DIY job. It only requires basic tools. The most important step is to disconnect the batteries first. Taking pictures of the wiring helps a lot. If you follow the steps, it’s quite easy.
Q4: My golf cart makes a humming noise instead of clicking. What does that mean?
A4: A humming noise instead of a sharp click often means the solenoid coil is getting power. But it’s not strong enough to fully pull in the plunger. This can happen with low battery voltage (the 12V control battery or main pack). It could also mean the coil is failing.
Q5: Where is the golf cart solenoid usually located?
A5: On most golf carts, the solenoid is in the battery compartment. It’s often mounted on the wall or frame near the batteries. It is cylinder-shaped. It has two large terminals for thick battery cables. It also has two smaller terminals for control wires.
Q6: Can a golf cart solenoid be repaired?
A6: No, usually not. Solenoids are sealed units. The internal contacts often burn or wear out. Trying to repair them is not practical or safe. It is always best to replace a bad solenoid with a new one.
Q7: My cart starts sometimes, but not always. Is it the solenoid?
A7: This could be a solenoid starting to fail. Its internal contacts might be weak or corroded. Sometimes they connect, sometimes they don’t. It could also be loose wiring or weak batteries. Start by checking all connections. Then test the solenoid.
Q8: What is a golf cart contactor check?
A8: A “contactor” is another name for a solenoid, especially for higher power applications. A “golf cart contactor check” refers to the same tests we covered here. You check for power to the small terminals. You check for continuity of the coil. You check for power flow through the main terminals.
Conclusion
Troubleshooting your golf cart solenoid can seem daunting. But with this guide, you have the steps. You also have the knowledge. A multimeter is your best friend here. Always remember to put safety first. Disconnect batteries before you start. By checking the control power, the coil, and the main contacts, you can pinpoint the issue. Whether it’s a simple “clicking but no start” or a complete power loss, these tests will guide you. Regular care and quick action will keep your golf cart running smoothly.