
Is your golf cart not starting, perhaps giving you nothing but a click? A common culprit might be the solenoid. You can test a golf cart solenoid yourself with some basic tools like a multimeter. This guide will show you how to test your golf cart solenoid with a multimeter, perform a golf cart solenoid click test, try a golf cart solenoid bypass test, and help with general golf cart not starting troubleshooting. We will also cover checking golf cart solenoid continuity, performing a golf cart solenoid voltage test, and explain how to jump a golf cart solenoid safely as part of your golf cart starter solenoid diagnosis when dealing with golf cart electrical system problems and solenoid terminal connections.
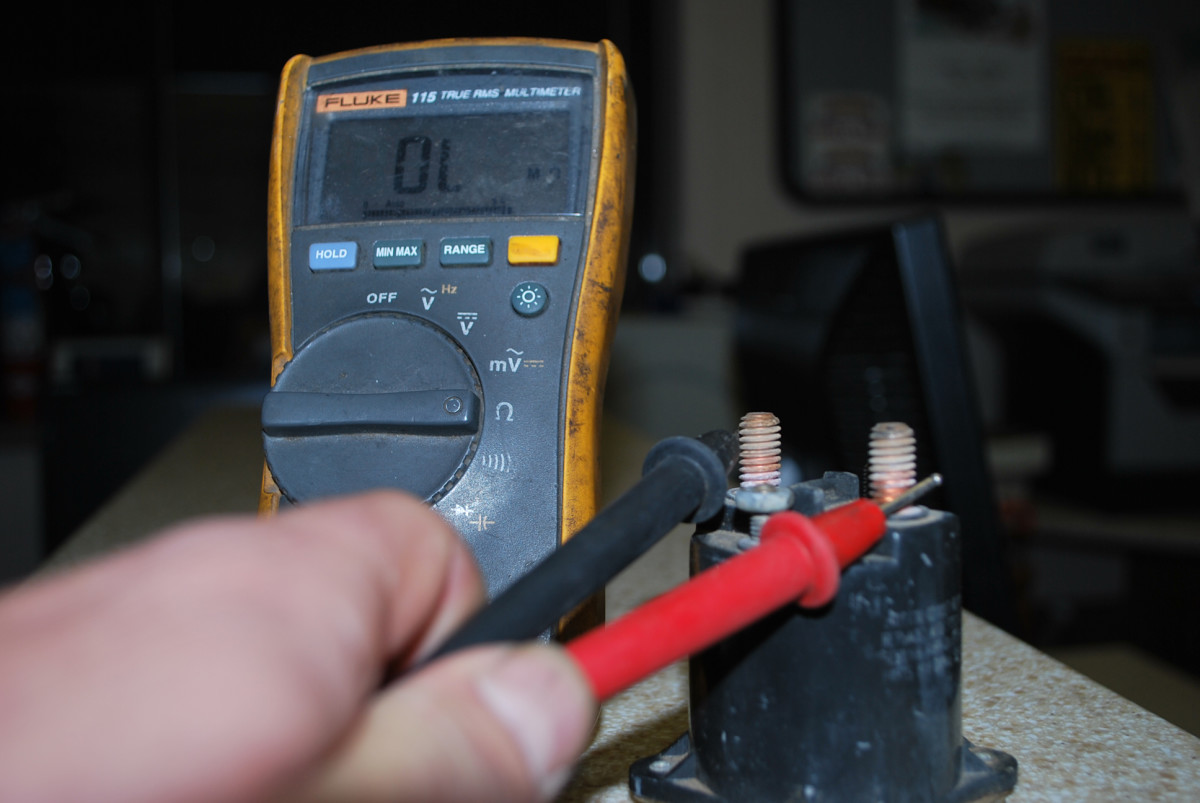
Image Source: images.saymedia-content.com
What is a Golf Cart Solenoid?
Think of the solenoid as a simple electrical switch, but a heavy-duty one. It sits between your golf cart’s battery and its motor or controller. When you step on the accelerator pedal (or turn the key on older carts), a small electrical signal goes to the solenoid. This signal makes the solenoid connect the main power wires from the battery to the motor or controller. This allows a large amount of electricity to flow, which is needed to start the motor and move the cart. Without the solenoid working right, the main power circuit stays open, and your cart won’t move.
Why Your Solenoid Might Fail
Solenoids are tough parts, but they can go bad over time. Here are some common reasons:
- Age: Like any electrical part, they wear out.
- Arcing: When the contacts inside the solenoid open and close, tiny sparks (arcing) happen. Over time, this can pit or burn the contacts, making them unable to carry current properly.
- Overheating: Too much current, loose connections, or operating in hot conditions can damage the coil or contacts.
- Moisture or Corrosion: Water or rust on the solenoid terminal connections can cause problems.
- Vibration: Constant shaking while driving can loosen internal parts.
- Problems in the Control Circuit: If the small wires that activate the solenoid have issues (like low voltage), the solenoid might not pull in correctly.
Common Signs of a Failing Solenoid
Knowing the signs helps you narrow down the problem.
- Golf cart not starting: This is the main symptom. The cart does nothing when you try to go.
- A single click, but no movement: This often points directly to the solenoid. The small coil in the solenoid is getting power and trying to close the contacts, but the contacts are bad and not letting the main power through.
- No click at all: This could be the solenoid or something else in the control circuit (like the key switch, pedal switch, or controller) that isn’t sending power to the solenoid’s small terminals.
- Slow or jerky starting: Sometimes a failing solenoid lets some power through, but not enough, or the connection is poor.
If your golf cart is not starting troubleshooting should always include checking the solenoid early on.
Safety First: Important Steps Before You Start
Working with electricity is dangerous. Golf cart batteries hold a lot of power. Always follow these safety rules:
- Turn off the cart: Make sure the key is off and the direction selector is in the neutral position.
- Disconnect the main battery negative cable: This is the most important step. Find the main battery pack negative terminal (usually marked with a minus sign ‘-‘). Use a wrench to loosen the nut and disconnect the cable. Move it away so it can’t accidentally touch the terminal again. For electric carts, this cuts power to the entire system. For gas carts, it disconnects the battery from the starter circuit.
- Wear safety glasses: Protect your eyes from sparks or battery acid.
- Use insulated tools: This helps prevent accidental shorts.
- Avoid touching metal parts together: Do not let tools bridge between terminals or between a terminal and the cart’s frame.
- Work in a well-lit, dry area.
Never try to test or jump a solenoid without taking proper safety steps, especially disconnecting the battery!
Identifying Your Golf Cart Solenoid
Before you test, you need to find the solenoid.
- Electric Golf Carts: The solenoid is usually a round or square cylinder with four terminals. Two large terminals connect to the main battery cables (one comes from the battery pack positive, the other goes to the controller or motor). Two small terminals are for the control wires (these get power when you press the pedal). It’s often located near the battery pack or the controller.
- Gas Golf Carts: Gas carts have a starter solenoid, often located near the starter motor or on the firewall. It also has large terminals for the battery and starter cable, and small terminals for the ignition or start signal.
Look for a part that looks like a small metal can or box with wires attached. Your cart’s service manual (if you have one) will show its exact location.
Getting Ready to Test
You will need a few tools:
- Basic hand tools: Wrenches or sockets to disconnect battery cables and potentially remove the solenoid.
- Multimeter: This is essential for accurate testing. Make sure it can measure DC voltage (V=) and resistance/continuity (Ω or a speaker symbol).
- Jump wire: A short piece of thick insulated wire (at least 12 gauge, preferably 10 gauge) or a screwdriver with a good insulated handle might be needed for the golf cart solenoid bypass test.
- Pen and paper: To write down readings.
Initial Checks: Simple Things to Look For
Before you grab the multimeter, do some basic visual checks.
H4 Checking Solenoid Terminal Connections
Look closely at the solenoid.
- Are all the wires connected?
- Are the connections clean? No rust or corrosion?
- Are the nuts holding the wires tight? Loose or corroded solenoid terminal connections can cause your golf cart electrical system problems that seem like a bad solenoid. Clean any corrosion with a wire brush and baking soda solution (rinse with water and dry thoroughly). Tighten any loose nuts.
- Are the wires themselves in good shape? No frayed insulation or broken strands?
Sometimes, simply cleaning and tightening connections fixes the problem.
H4 The Golf Cart Solenoid Click Test
This is the simplest test and gives you a big clue.
- Make sure the battery is connected and charged (you can test the main battery voltage first, it should be over 36V for a 36V cart, over 48V for a 48V cart, etc.).
- Sit in the cart.
- Turn the key switch on.
- Shift the direction selector to Forward or Reverse.
- Slowly press the accelerator pedal down.
Listen very carefully.
- Do you hear a loud click? This sound comes from the solenoid. It means the small control circuit is working, sending power to the solenoid’s coil, and the coil is trying to pull the contacts together. If you hear a click but the cart doesn’t move, the problem is likely the main contacts inside the solenoid. They are not letting the high-amp power through. This points strongly to a bad solenoid that needs replacing.
- Do you hear a faint click or no click at all? This means the solenoid’s coil is likely not getting power. The problem is probably before the solenoid in the control circuit. This could be the key switch, the forward/reverse switch, the pedal switch (also called the microswitch or limit switch), the controller, or a broken wire in that circuit.
This golf cart solenoid click test is a great starting point for your golf cart not starting troubleshooting.
Deeper Testing with a Multimeter
If the click test isn’t clear, or you heard a click but the cart didn’t move, it’s time to use your multimeter. This will give you more detailed information for your golf cart starter solenoid diagnosis.
Before you start multimeter testing: Remember to disconnect the main battery negative cable again for some tests (like continuity/resistance) to avoid getting false readings from other parts of the circuit. For voltage tests, the battery must be connected. Always be careful.
H4 Test 1: Golf Cart Solenoid Voltage Test (Control Circuit)
This test checks if the small terminals on the solenoid are getting power when you press the pedal. This helps figure out if the issue is the solenoid itself or the control circuit leading to it.
- Make sure the main battery negative cable is reconnected safely.
- Set your multimeter to measure DC Volts (V=). Choose a range higher than your battery voltage (e.g., 50V or 100V).
- Locate the two small terminals on the solenoid. These usually have smaller wires connected to them.
- Connect the black lead of your multimeter to the main battery negative terminal or a good clean spot on the cart’s frame (a solid ground).
- Turn the key on.
- Shift to Forward or Reverse.
- Carefully touch the red lead of your multimeter to one of the small solenoid terminals.
- Slowly press the accelerator pedal down.
What to look for:
- Voltage reading appears (usually battery voltage or close to it): If you see voltage (like 36V or 48V depending on your cart) appear on both small terminals when the pedal is pressed, it means the control circuit is working and sending power to the solenoid coil. If the cart isn’t clicking or starting, the solenoid coil or its internal mechanism is likely bad.
- No voltage reading or very low voltage: If you don’t see voltage on either small terminal when the pedal is pressed, the control circuit has a problem before the solenoid. You need to troubleshoot the key switch, pedal switch, forward/reverse switch, or wiring.
This golf cart solenoid voltage test on the small terminals is key to knowing if the solenoid is even being told to turn on.
H4 Test 2: Golf Cart Solenoid Voltage Test (Main Circuit)
This test checks if power is getting through the solenoid when it’s activated.
- Make sure the main battery negative cable is reconnected.
- Set your multimeter to measure DC Volts (V=). Choose a range higher than your battery voltage.
- Locate the two large terminals on the solenoid.
- Connect the black lead of your multimeter to the main battery negative terminal or a good ground.
- Carefully touch the red lead to the large terminal that has the main battery positive cable connected to it (this terminal should always have battery voltage). You should see full battery voltage here.
- Now, carefully touch the red lead to the other large terminal (the one going to the motor/controller).
- Turn the key on, shift to F or R, and slowly press the accelerator pedal.
What to look for:
- Voltage appears (full battery voltage) on the output terminal only when the pedal is pressed and the solenoid clicks: This is normal operation. The solenoid is working correctly. Your golf cart not starting problem lies elsewhere (motor, controller, brakes, etc.).
- Voltage appears (full battery voltage) on the output terminal even without pressing the pedal: This means the solenoid’s main contacts are stuck closed. This is dangerous! Disconnect the main battery cable immediately and replace the solenoid.
- No voltage on the output terminal when the pedal is pressed and you hear a click: This confirms the click test result. The solenoid coil is pulling in, but the main contacts are bad. The solenoid needs replacing.
- No voltage on the output terminal and no click when the pedal is pressed: This confirms the control circuit voltage test result. The solenoid isn’t even trying to turn on. Troubleshoot the control circuit first (key switch, pedal switch, etc.).
These voltage tests are crucial for your golf cart starter solenoid diagnosis and help pinpoint where the break in the circuit is.
H4 Test 3: Test Golf Cart Solenoid with Multimeter (Coil Resistance)
This test checks the health of the small activation coil inside the solenoid. You must disconnect the main battery negative cable for this test to get an accurate reading and avoid damaging your meter or creating a short.
- Disconnect the main battery negative cable.
- Disconnect the two small wires from the solenoid’s small terminals. It’s best to remove them entirely from the terminals.
- Set your multimeter to measure Resistance (Ω). Start with a low range (like 200Ω).
- Touch one multimeter lead to one small solenoid terminal and the other lead to the other small terminal.
What to look for:
- A specific resistance reading (usually between 5 and 500 ohms): A healthy solenoid coil will have a resistance value. The exact value varies by solenoid and cart model, but it should be a stable number within the expected range for a solenoid coil. You might need to look up the spec for your specific cart or solenoid, but any reading between 5 and 500 ohms usually means the coil itself is okay.
- A reading of “OL” or infinity (∞): This means the coil is open, or broken. It cannot create the magnetic field needed to close the contacts. The solenoid is bad and needs replacing.
- A reading of 0 or very close to 0 ohms: This could mean the coil is shorted internally. The solenoid is bad and needs replacing.
Checking golf cart solenoid continuity (which is essentially checking for an open circuit using resistance) on the coil confirms if the activation part is working electrically.
H4 Test 4: Test Golf Cart Solenoid with Multimeter (Main Contact Continuity/Resistance)
This test checks the main power contacts inside the solenoid. These contacts should only be connected (have continuity/low resistance) when the solenoid is activated. This test is done with the solenoid off and the main battery disconnected.
- Disconnect the main battery negative cable.
- Disconnect all wires from the solenoid’s four terminals. Label them or take a picture first so you know where they go back!
- Set your multimeter to measure Resistance (Ω) or use the Continuity setting (often a speaker symbol that beeps if there’s a connection).
- Touch one multimeter lead to one large solenoid terminal and the other lead to the other large terminal.
What to look for:
- A reading of “OL” or infinity (∞) or no beep (on continuity setting): This is the correct reading when the solenoid is not activated. It means the main contacts are open, which is how they should be when the cart is off or the pedal is not pressed.
- A reading of 0 or very close to 0 ohms, or a constant beep (on continuity setting): This means the main contacts are stuck closed. This is dangerous and means the solenoid is faulty and stuck on. Replace it immediately.
This test checks checking golf cart solenoid continuity across the main terminals when it’s supposed to be off.
To fully test the main contacts, ideally, you’d test them while the solenoid is activated. This is harder to do on the cart. An easier way to simulate this is the bypass test or applying battery voltage directly to the small terminals off the cart (carefully!).
The Golf Cart Solenoid Bypass Test (Use With Extreme Caution!)
This test directly sends power from the battery to the motor/controller, bypassing the solenoid. This is potentially dangerous as it can cause the cart to move suddenly. Only do this if you are comfortable and have taken all safety steps. Never do this on a gas cart’s starter solenoid, as it can damage the starter. This test is mainly for electric carts.
- Ensure the cart is on a level surface, the brake is set, and the direction selector is in Neutral.
- Crucially, lift the rear wheels off the ground using a jack or stand so the cart cannot move if the motor engages.
- Make sure the main battery negative cable is connected.
- Set the key switch to the ON position.
- Locate the two large terminals on the solenoid.
- Use a heavy-duty insulated tool or a thick jump wire. Carefully touch both large terminals at the same time with the metal ends of the tool/wire. This connects the main battery positive directly to the cable going to the controller/motor.
What to look for:
- The motor spins (rear wheels turn): This means the motor and the circuit after the solenoid are working. If the solenoid clicked before but the cart didn’t move, this confirms the solenoid’s main contacts are bad. The solenoid is the problem.
- Nothing happens: If the motor doesn’t spin, the problem is not the solenoid. It’s likely the motor, controller, or main cables.
This golf cart solenoid bypass test is a way of how to jump golf cart solenoid main terminals to see if the rest of the drive system is okay. It’s a powerful diagnostic step but carries risk if not done safely with wheels off the ground.
Summarizing Solenoid Test Results
Let’s put the golf cart starter solenoid diagnosis steps together.
| Test | Result | What it Means | Next Step |
|---|---|---|---|
| Visual Check | Corroded/Loose Terminals | Poor connection preventing power flow. | Clean and tighten connections. Retest cart. |
| Golf Cart Solenoid Click Test | Loud Click, Cart Doesn’t Move | Control circuit works, Solenoid coil works, but main contacts are bad. | Replace Solenoid. |
| Golf Cart Solenoid Click Test | No Click or Faint Click | Control circuit to solenoid is not sending power or coil is bad. | Proceed to Control Circuit Voltage Test & Coil Resistance Test. |
| Solenoid Voltage Test (Small Terminals) | Voltage when Pedal Pressed | Control circuit is working. | Proceed to Main Circuit Voltage Test & Coil Resistance Test. |
| Solenoid Voltage Test (Small Terminals) | No Voltage when Pedal Pressed | Control circuit before solenoid is faulty. | Troubleshoot Key Switch, Pedal Switch, F/R Switch, Controller, wiring. |
| Solenoid Voltage Test (Large Output) | Voltage appears when Pedal Pressed | Solenoid is working correctly. | Solenoid is likely OK. Troubleshoot motor, controller, brakes, etc. |
| Solenoid Voltage Test (Large Output) | Voltage always present | Solenoid contacts stuck closed (dangerous). | Replace Solenoid Immediately. |
| Solenoid Voltage Test (Large Output) | No Voltage when Pedal Pressed (with click) | Solenoid main contacts are bad. | Replace Solenoid. |
| Test Golf Cart Solenoid (Coil Resistance) | OL or 0 Ohms | Solenoid coil is open or shorted. | Replace Solenoid. |
| Test Golf Cart Solenoid (Coil Resistance) | Specific Ohm Value (5-500 Ω range) | Solenoid coil is likely OK. | Proceed to Main Circuit Voltage Test & Bypass Test. |
| Checking Solenoid Continuity (Large) | Continuity (0 Ω / Beep) when OFF | Solenoid contacts stuck closed (dangerous). | Replace Solenoid Immediately. |
| Checking Solenoid Continuity (Large) | No Continuity (OL / No Beep) when OFF | Solenoid contacts are open when off (correct). | Proceed to Voltage/Bypass Test to see if they close when activated. |
| Golf Cart Solenoid Bypass Test | Motor Spins | Motor/circuit after solenoid are OK. Solenoid main contacts are likely bad. | Replace Solenoid. |
| Golf Cart Solenoid Bypass Test | Motor Does Not Spin | Problem is likely motor, controller, main cables, or brakes. | Solenoid is likely OK. Troubleshoot other parts of the drive system. |
Troubleshooting Other Golf Cart Electrical System Problems
Remember, a golf cart not starting isn’t always the solenoid. Your golf cart electrical system problems could involve other parts.
H4 Checking the Battery
Make sure your batteries are fully charged and healthy. Low voltage can prevent the solenoid from clicking or providing enough power. Check the voltage of the whole pack and individual batteries if possible.
H4 Checking Fuses and Circuit Breakers
Many carts have fuses or breakers, often in the control circuit or the main power circuit. A blown fuse or tripped breaker will stop power flow. Check your cart’s manual for locations.
H4 Checking the Key Switch
The key switch provides power to the control circuit. If it’s faulty, no power gets to the solenoid’s small terminals. You can test for voltage going in and out of the key switch with your multimeter.
H4 Checking the Pedal (Accelerator) Switch
Most modern electric carts have a switch activated by the accelerator pedal. This is often called a microswitch or limit switch. This switch completes the control circuit to the solenoid. If this switch is bad, the solenoid won’t activate. You can usually test this switch for continuity using your multimeter.
H4 Checking the Forward/Reverse Switch
Some F/R switches also include a neutral safety switch that is part of the solenoid’s control circuit. If the F/R switch is worn or misaligned, the solenoid might not get power.
H4 Checking the Controller (Electric Carts)
On many electric carts, the controller manages the signal to the solenoid. If the controller is failing, it might not send the activation signal. Diagnosing a controller is more complex and often requires specialized knowledge or tools. However, if you’ve confirmed the control circuit up to the controller is working, and the solenoid isn’t activating, the controller could be the issue.
H4 Checking the Motor and Main Cables
If the solenoid is clicking loudly, the control circuit is fine, and the bypass test makes the motor run, but it still doesn’t run through the solenoid, the issue is almost certainly the solenoid’s main contacts. However, if the bypass test doesn’t make the motor run, the problem is further down the line – the motor itself, the main cables, or possibly mechanical issues like seized bearings or brakes. You can check the main cables for corrosion under the insulation or loose connections at the motor and controller.
Replacing a Golf Cart Solenoid
If your tests point to a bad solenoid, replacing it is a common DIY fix.
- Safety First: Disconnect the main battery negative cable!
- Label Wires: Take a picture or label exactly which wire goes to which of the four terminals (two large, two small). The positions of the small wires are usually important (positive/negative or activated positive/activated negative depending on the cart).
- Remove Old Solenoid: Use wrenches to remove the nuts holding the wires on the terminals. Then unbolt the solenoid from the cart frame.
- Install New Solenoid: Mount the new solenoid in the same location.
- Connect Wires: Attach the wires to the correct terminals based on your labels or picture. Make sure the solenoid terminal connections are clean and tight.
- Reconnect Battery: Reconnect the main battery negative cable.
- Test Cart: Try starting the cart. Hopefully, your golf cart not starting problem is fixed!
Choosing a Replacement Solenoid
Make sure you get the right replacement solenoid for your specific golf cart make, model, voltage (36V, 48V, etc.), and potentially the controller type (if applicable). Solenoids have different coil voltages and continuous vs. intermittent duty ratings. Using the wrong one can cause damage. Check your cart’s manual or look up parts specifically for your model.
Keeping Your Solenoid Healthy
Regular maintenance can help extend the life of your solenoid:
- Keep the solenoid terminal connections clean and tight.
- Keep the battery terminals clean and charged.
- Avoid overloading the cart.
- Keep the cart dry to prevent corrosion.
Frequently Asked Questions (FAQ)
H4 My golf cart clicks but doesn’t move. Is it always the solenoid?
Most often, yes. A click means the small activation circuit and the solenoid’s coil are working, but the lack of movement means the main power isn’t getting through the solenoid’s main contacts. This strongly suggests bad contacts inside the solenoid.
H4 Can I drive my golf cart with a bad solenoid?
No. If the main contacts are bad, the cart won’t move. If the contacts are stuck closed (less common but dangerous), the cart could take off unexpectedly or drain the battery. You need to replace a faulty solenoid before using the cart.
H4 How long do golf cart solenoids usually last?
Their lifespan varies greatly depending on use, environment, and quality. Some can last many years (5-10+), while others might fail sooner, especially in harsh conditions or with heavy use.
H4 Can I clean a solenoid instead of replacing it?
Not really. The critical parts (the main contacts) are sealed inside the unit. While you can clean the external solenoid terminal connections, you can’t clean the internal parts that typically fail.
H4 Is testing a gas golf cart starter solenoid different?
The principles are similar (checking for activation voltage and main contact function), but the specific location and wire colors might differ. The bypass test is NOT recommended for gas cart starter solenoids as it can damage the starter motor. Focus on voltage tests and resistance tests for diagnosis.
H4 What does “continuous duty” vs. “intermittent duty” mean for a solenoid?
- Intermittent duty: Designed for short bursts of use, like the few seconds it takes to start a golf cart (like a starter solenoid). They can handle high current briefly but would overheat if left on constantly.
- Continuous duty: Designed to stay on for longer periods, sometimes used in electric carts in the main power circuit or for accessories. They can handle current for extended times.
Make sure you use the correct type for your cart. A standard golf cart starter solenoid is typically intermittent duty.
Wrapping Up
Testing your golf cart solenoid is a key step in troubleshooting why your golf cart is not starting. By following these steps – from the simple golf cart solenoid click test to the detailed golf cart solenoid voltage test and checking golf cart solenoid continuity with a multimeter – you can accurately diagnose whether the solenoid is the cause of your golf cart electrical system problems or if you need to look elsewhere. Remember to always prioritize safety when working on your cart’s electrical system. With a little patience and the right tools, you can perform a successful golf cart starter solenoid diagnosis and get your cart running again.