
Your golf cart needs good batteries to run right. Batteries give it power. If batteries are weak, the cart goes slow or stops. Testing batteries helps you know if they are okay. It helps you find problems early. This saves you time and money later. Testing your golf cart battery condition is a key part of owning a cart. We will look at how to test a golf cart battery using simple steps. We will cover a golf cart battery voltage test, a golf cart battery load test, and a golf cart battery hydrometer test. You will learn to use a multimeter to test golf cart battery. You will also see signs of failing golf cart battery. Checking your golf cart battery charge level is easy with the right tools. Knowing your golf cart battery specific gravity test results is also helpful. These tests are part of good golf cart battery maintenance. Using a golf cart battery tester tool makes this job easier. Let’s start!
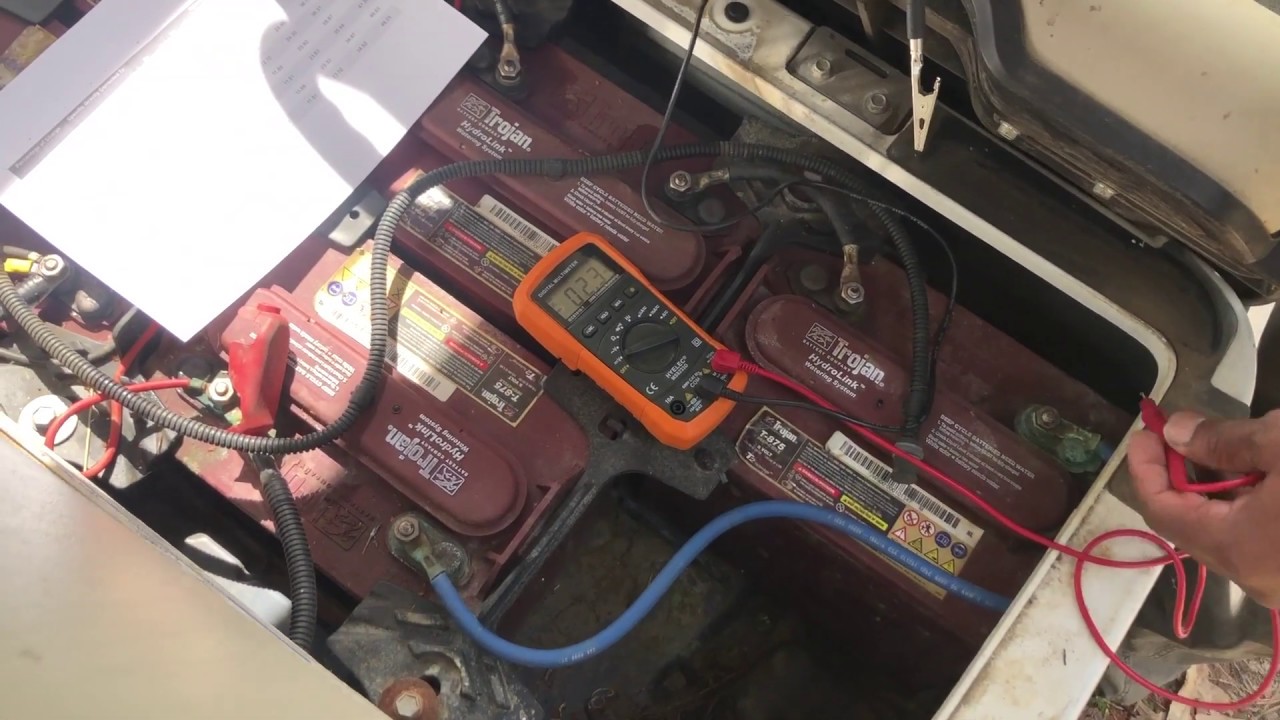
Image Source: i.ytimg.com
Why Check Your Batteries?
Checking your golf cart batteries often is smart. It keeps your cart running well. Good batteries mean your cart goes farther. They give you the power you need. Bad batteries cause problems.
Signs of a Weak Battery
There are signs that tell you batteries might be bad.
* Your cart goes slower than before.
* The cart doesn’t go as far on a full charge.
* Lights seem dim.
* The motor sounds weak.
* The charger runs for a very long time, or not long enough.
* One battery looks different from others (swollen or cracked).
* Batteries are very hot after charging or using the cart.
If you see these signs, it is time to test your golf cart battery condition. Waiting too long can hurt other parts of your cart. It can also leave you stuck far from home. Regular checks help you find these issues before they become big problems. This is key for proper golf cart battery maintenance.
Safety First Always
Working with golf cart batteries needs care. Batteries hold a lot of power. They also have acid inside. This acid can burn you. Gases from batteries can explode if there is a spark. Always put safety first.
Important Safety Rules
- Wear safety glasses. This protects your eyes from acid splashes or sparks.
- Wear gloves. Acid can hurt your skin.
- Take off metal jewelry. Rings, watches, or necklaces can cause a short circuit. This can cause a fire or burn you badly.
- Work in a place with fresh air. Batteries make hydrogen gas. This gas can blow up. Good air flow helps.
- Do not smoke or use open flames near batteries. No sparks!
- Make sure the cart is off. The key should be out. The tow/run switch should be on “tow” or “maintenance” if it has one.
- Have baking soda and water ready. This mix can stop battery acid burns.
- Use tools with handles that do not conduct electricity.
Follow these rules every time you work on your batteries. Your safety is most important.
Getting Your Tools Ready
To test your golf cart battery condition well, you need the right tools. These tools help you see how much power your batteries have. They also show how healthy they are inside. A golf cart battery tester tool can be simple or complex.
Tools You Will Need
- Multimeter: This is a must-have tool. It checks voltage. You will use it for the golf cart battery voltage test. You can test golf cart battery with multimeter easily. It tells you the charge level.
- Hydrometer: This tool checks the liquid inside the battery cells. It measures specific gravity. This is key for the golf cart battery hydrometer test or golf cart battery specific gravity test. It shows the strength of the acid.
- Battery Load Tester: This tool puts a fake “load” on the battery. It sees how the battery acts when it needs to work hard. This is the golf cart battery load test. It helps find weak batteries.
- Battery Terminal Cleaner: Battery posts can get dirty. This stops power flow. A cleaner tool helps clean them.
- Wrench or Socket Set: To loosen or tighten battery cables.
- Baking Soda and Water: For cleaning battery acid off surfaces or for safety.
- Distilled Water: To add to battery cells if the water level is low (only after charging!).
Having these tools ready makes the testing process smooth. Each tool checks a different part of the battery’s health.
Method 1: Checking Voltage with a Multimeter
The first and most common test is checking voltage. This is the golf cart battery voltage test. It tells you the charge level of each battery and the whole pack. You will test golf cart battery with multimeter.
Preparing for the Voltage Test
- Make sure the batteries are fully charged. For best results, charge them fully. Then, let them rest for 12-24 hours. This rest period lets the voltage settle. Testing right after charging or using gives false high or low readings.
- Turn off the cart. Remove the key. Put the tow/run switch on “tow”.
- Put on your safety gear (glasses, gloves).
- Get your multimeter ready. Set it to measure DC Voltage (VDC or simply V with a straight line). Choose a range higher than your battery pack voltage (e.g., 50V or 100V for a 48V cart).
Testing Individual Battery Voltage
Golf carts use a set of batteries linked together. Common setups are 36V (six 6V batteries) or 48V (four 12V batteries, six 8V batteries, or eight 6V batteries). You need to test each battery by itself first.
- Touch the red (positive) probe of the multimeter to the positive (+) post of one battery.
- Touch the black (negative) probe to the negative (-) post of the same battery.
- Read the number on the multimeter screen.
- Write down the voltage for that battery.
- Do this for every battery in the cart.
What Voltage Readings Mean
After the batteries have rested for 12-24 hours (Surface Charge Gone), the voltage tells you the charge level. Use a table like this:
| Battery Voltage (Approximate) | Charge Level (%) | Condition Notes |
|---|---|---|
| 6 Volt Battery | ||
| 6.30V | 100% | Fully charged |
| 6.24V | 90% | Almost full |
| 6.18V | 80% | Good charge |
| 6.12V | 70% | Still good |
| 6.06V | 60% | Charge soon |
| 6.00V | 50% | Needs charging |
| 5.94V | 40% | Low charge |
| 5.88V | 30% | Very low |
| 5.82V | 20% | Dangerously low, charge now |
| 5.76V | 10% | Very low, can cause damage |
| 5.70V or less | 0% | Empty, needs immediate charging |
| 8 Volt Battery | ||
| 8.40V | 100% | Fully charged |
| 8.32V | 90% | Almost full |
| 8.24V | 80% | Good charge |
| 8.16V | 70% | Still good |
| 8.08V | 60% | Charge soon |
| 8.00V | 50% | Needs charging |
| 7.92V | 40% | Low charge |
| 7.84V | 30% | Very low |
| 7.76V | 20% | Dangerously low, charge now |
| 7.68V | 10% | Very low, can cause damage |
| 7.60V or less | 0% | Empty, needs immediate charging |
| 12 Volt Battery | ||
| 12.60V | 100% | Fully charged |
| 12.48V | 90% | Almost full |
| 12.36V | 80% | Good charge |
| 12.24V | 70% | Still good |
| 12.12V | 60% | Charge soon |
| 12.00V | 50% | Needs charging |
| 11.88V | 40% | Low charge |
| 11.76V | 30% | Very low |
| 11.64V | 20% | Dangerously low, charge now |
| 11.52V | 10% | Very low, can cause damage |
| 11.40V or less | 0% | Empty, needs immediate charging |
Note: These are approximate open-circuit voltages after resting.
What Uneven Voltage Means
All your batteries should have voltages that are close to each other. Maybe within 0.05-0.10 volts difference. If one battery has a much lower voltage than the others (say, 0.2 volts or more lower), it could be a weak battery. This is a key sign of failing golf cart battery. A single weak battery makes the whole set weaker. It works harder and fails faster. The charger might also not charge the whole set right because of one bad battery.
Testing Total Pack Voltage
You can also test the total voltage of all batteries linked together.
- Find the main positive post of the whole set (where the red cable goes to the cart).
- Find the main negative post (where the black cable goes to the cart).
- Touch the red multimeter probe to the main positive post.
- Touch the black probe to the main negative post.
- Read the total voltage.
Compare the total voltage to the expected voltage for your cart (36V or 48V). A fully charged 36V cart should read about 37.8V. A fully charged 48V cart should read about 50.4V (with 8V batteries) or 50.4V (with 6V batteries) or 50.4V (with 12V batteries). The exact number depends on the setup. A low total voltage shows the whole pack is not fully charged, or you have one or more weak batteries pulling the voltage down.
The voltage test using a multimeter is a fast way to check golf cart battery charge level and find possible issues. It is a basic golf cart battery tester tool use.
Method 2: Checking Acid Strength with a Hydrometer
The hydrometer test checks the strength of the electrolyte (the liquid) inside each battery cell. This liquid is a mix of sulfuric acid and water. The strength of this mix tells you the battery’s health and charge level better than voltage alone. This is the golf cart battery specific gravity test.
Preparing for the Hydrometer Test
- Make sure the batteries are fully charged before doing this test. The acid mix changes with charge level. You want to check it when fully charged.
- Put on your safety gear (glasses, gloves).
- Have baking soda and water ready.
- Check the liquid level in each cell. It should be above the plates inside the battery. If it’s low, add distilled water after charging and before testing. (Never add acid).
- Have a hydrometer tool ready. A good hydrometer has a glass tube, a float inside, and a rubber bulb. It measures specific gravity (SG). Pure water has an SG of 1.000. Battery acid mix is heavier.
How to Do the Hydrometer Test
Each battery has several caps on top. Each cap covers a cell. You need to test every cell in every battery.
- Remove one cap carefully.
- Put the tip of the hydrometer into the cell’s liquid.
- Squeeze the rubber bulb, then let it go slowly. This pulls liquid into the glass tube. Pull enough liquid so the float bobs freely.
- Lift the hydrometer. Read the number where the surface of the liquid meets the float. Look at the scale on the float at eye level.
- Write down the reading for that cell.
- Squirt the liquid back into the same cell. Do not mix liquid between cells or batteries.
- Put the cap back on.
- Move to the next cell and repeat. Test all cells in all batteries.
What Specific Gravity Readings Mean
Specific gravity tells you how strong the acid mix is. Higher numbers mean more acid, which means a higher charge and healthier cell. Readings are usually given in numbers like 1.265.
| Specific Gravity (Approximate @ 80°F/27°C) | Charge Level (%) | Condition Notes |
|---|---|---|
| 1.265 – 1.275 | 100% | Fully charged, excellent health |
| 1.250 – 1.260 | 90% | Still good |
| 1.235 – 1.245 | 80% | Good charge level |
| 1.220 – 1.230 | 70% | Acceptable charge |
| 1.205 – 1.215 | 60% | Starting to discharge |
| 1.190 – 1.200 | 50% | Half discharged, needs charging |
| 1.175 – 1.185 | 40% | Low, charge soon |
| 1.160 – 1.170 | 30% | Very low |
| 1.145 – 1.155 | 20% | Dangerously low, charge now |
| 1.130 – 1.140 | 10% | Very low, can cause damage |
| 1.115 or less | 0% | Empty, likely damaged or failing |
Note: Temperature affects specific gravity. Hydrometers often have a thermometer and charts to correct readings if the battery is hotter or colder than 80°F (27°C). It’s best to test at normal room temperature.
What Uneven Specific Gravity Means
Like voltage, specific gravity readings should be close for all cells in all batteries. A difference of 0.050 or more between cells, especially if one cell is much lower, points to a problem.
- One Low Cell: If one cell in a battery has a much lower reading than the others in the same battery, that cell is likely bad. This battery needs replacing. A single bad cell kills the whole battery, and one bad battery hurts the whole set. This is a strong sign of failing golf cart battery.
- One Low Battery: If all cells in one battery are low, but other batteries are fine, that battery is weak. It needs replacing.
- All Batteries Low: If all readings across all batteries are low (but even), the batteries might just not be fully charged, or they are old and losing capacity. Recharge fully and test again. If they are still low after a full charge, they are worn out.
The hydrometer test is very helpful. It can find a bad cell even if the voltage reading for the whole battery isn’t terrible yet. It gives a real look inside the battery’s health. It’s a key golf cart battery tester tool for proper golf cart battery maintenance.
Method 3: The Load Test
A load test checks how well a battery can keep its voltage up when it’s working hard. Think of it like checking how strong your muscles are when lifting something heavy. A voltage test shows the battery’s pressure (like water in a pipe), but a load test shows its ability to deliver power (like how much water flows out when you open the tap). This is the golf cart battery load test.
Why Load Test?
A battery might show good voltage when no power is being used. But under load (when you step on the pedal), a weak battery’s voltage will drop a lot. This drop shows the battery cannot supply enough power. A load test is one of the best ways to find signs of failing golf cart battery, especially those that might still show decent voltage when resting.
Preparing for the Load Test
- Batteries should be fully charged before a load test.
- Put on your safety gear.
- You need a special battery load tester. These tools connect across the battery terminals. They draw a large amount of current for a short time. The tester has a meter that shows the voltage while the load is applied. Choose a load tester made for the size and type of batteries in your golf cart. A simple car battery load tester might not be right for deep-cycle golf cart batteries. Look for one designed for golf cart or deep-cycle batteries. A carbon pile load tester is a common type.
How to Do the Load Test
You will test each battery individually.
- Connect the load tester’s positive clamp to the positive (+) terminal of one battery.
- Connect the load tester’s negative clamp to the negative (-) terminal of the same battery.
- Make sure the connections are tight and clean.
- Follow the load tester’s instructions. Usually, you apply the load for a short time, like 10-15 seconds. Do not apply the load for too long, as it can hurt the battery.
- While the load is applied, watch the meter on the tester. Note the voltage reading during the load.
- Stop the test. Remove the clamps carefully. They might be warm.
- Write down the voltage reading under load for that battery.
- Let the battery rest for a few minutes before testing the next one.
- Repeat for every battery in the cart.
Interpreting Load Test Results
A healthy, fully charged battery should maintain a certain voltage when the load is applied. The exact voltage depends on the battery type, size, and the load applied by the tester. Check the load tester’s instructions or charts for expected values.
- Good Battery: The voltage drops when the load is applied but stays above a certain level (e.g., above 5.2V for a 6V battery, 6.8V for an 8V battery, 10.5V for a 12V battery, consult your tester/battery manual). The voltage should also recover quickly after the load is removed.
- Weak Battery: The voltage drops significantly and quickly when the load is applied. It might drop below the minimum acceptable level. It might also take a long time to recover voltage, or not recover fully.
- Bad Battery: The voltage drops very low, possibly to near zero, the moment the load is applied.
Like the voltage and hydrometer tests, compare the results for all batteries. If one battery drops much lower than the others under load, it is weak or bad. This is a strong indicator of failing golf cart battery. A load test is a very good golf cart battery tester tool to find a battery that is losing its power capacity.
Bringing the Test Results Together
You have done the golf cart battery voltage test, the golf cart battery hydrometer test (specific gravity), and the golf cart battery load test. Now, look at all your notes.
What the Results Tell You
- All Tests Look Good: Voltages are even and high after resting. Specific gravity readings are high and even in all cells. All batteries hold voltage well during a load test. Your batteries are in good shape. Keep up with regular golf cart battery maintenance.
- One Battery is Different: One battery has lower voltage, lower specific gravity readings (especially in one cell), and/or drops voltage much more during a load test than the others. This battery is likely bad or failing.
- Action: Replace the bad battery. It is usually best to replace batteries in sets (all 6V, all 8V, or all 12V together) because a new battery with old ones can cause the new one to fail faster. But if the other batteries are relatively new and healthy, sometimes replacing just the single bad one works for a while.
- All Batteries Show Low Readings: Voltages are low even after charging. Specific gravity readings are low across the board (but perhaps even). All batteries show weakness during the load test.
- Action: Your whole battery set is likely worn out. This is a common sign of failing golf cart battery when they are old. It’s time to replace the entire set.
- Uneven Readings Within One Battery’s Cells (Hydrometer): One cell in a battery has much lower specific gravity than the others in that same battery.
- Action: This battery has a bad cell. It needs to be replaced.
Using all three tests together gives you the best picture of your golf cart battery condition. The voltage test is quick. The hydrometer test looks inside the battery. The load test checks its working power. These tests help you spot signs of failing golf cart battery early.
Interpreting Battery Health
It is important to look at the trend over time. Keep a record of your test results. Lower voltage, lower specific gravity, and bigger voltage drops under load over time show that your batteries are getting old and losing capacity.
Factors affecting battery life:
* How often and how deep they are discharged.
* How well they are charged (using the right charger).
* Proper water levels (for flooded batteries).
* Temperature (very hot or very cold weather).
* Clean terminals.
* Age of the batteries (most last 4-8 years with good care).
Regular testing helps you predict when you might need new batteries. It is much better than having them die on you unexpectedly. It’s a key part of good golf cart battery maintenance.
Beyond the Tests: Golf Cart Battery Maintenance
Testing is not the only thing you should do. Good maintenance helps your batteries last longer and perform better.
Key Maintenance Steps
- Keep them Clean: Battery tops should be clean and dry. Dirt and acid build-up can cause power leaks. Use the baking soda and water mix to clean corrosion off terminals and battery tops. Rinse with clean water and dry thoroughly.
- Check Water Levels (Flooded Batteries): For batteries with removable caps, check the liquid level often (every month is good). Add only distilled water after charging if the level is low. The water should cover the plates by about half an inch. Never add acid. Overfilling is also bad.
- Keep Terminals Tight: Make sure the cables are tight on the battery posts. Loose cables cause poor connections, heat, and power loss. Do not overtighten, as this can break the posts.
- Charge Properly: Always use a charger designed for your specific golf cart and battery type. Follow charging instructions. Do not stop charging cycles early unless necessary. Avoid leaving batteries uncharged for long periods.
- Avoid Deep Discharge: Try not to run your batteries completely dead often. Deep discharges stress the batteries and shorten their life. Charge them when they are down 20-30% if possible.
- Store Properly: If you store your cart for a long time (like for winter), make sure batteries are fully charged first. Check them often (monthly) and top them up if needed. Store in a cool place if possible.
Good golf cart battery maintenance, along with regular testing, will help you get the most life and performance from your battery set.
Bringing It All Together
Testing your golf cart battery condition is not hard. It just takes some time and the right tools. Using a multimeter for a golf cart battery voltage test, a hydrometer for a golf cart battery specific gravity test, and a load tester for a golf cart battery load test gives you a full picture. These tools are simple golf cart battery tester tool types. Looking for signs of failing golf cart battery helps you know when to test. Regular checks of your golf cart battery charge level and health help prevent problems. Good golf cart battery maintenance makes your batteries last longer. By doing these things, you ensure your golf cart is ready to go when you need it. Keep your batteries healthy, and your cart will be reliable.
Frequently Asked Questions (FAQ)
Q: How often should I test my golf cart batteries?
A: It is a good idea to check voltage monthly, especially if you use the cart often. Do a full check including specific gravity and maybe a load test every 3-6 months.
Q: Can I test just one battery?
A: Yes, and you should test each battery individually. A single weak battery affects the whole set. Finding a weak one early is important.
Q: My voltage is high, but my cart runs slow. Why?
A: Voltage can look good when the battery is resting (surface charge). But under load (when driving), a weak battery’s voltage drops sharply. This is why a load test is important. A hydrometer test can also show if a cell is bad, even with decent voltage.
Q: What is the difference between a ‘deep cycle’ battery and a regular car battery?
A: Golf cart batteries are ‘deep cycle’. They are built to be discharged and recharged many times. Car batteries are for starting engines; they give a lot of power fast but are not made to be discharged deeply often. Using the wrong type in a golf cart will lead to quick failure.
Q: Do I need to add water to sealed or maintenance-free batteries?
A: No. Sealed batteries do not allow you to add water. You can only do this for flooded (wet cell) batteries with removable caps.
Q: How long do golf cart batteries usually last?
A: With good care and regular use, golf cart batteries typically last 4 to 8 years. How often you use them, how well you maintain them, and the climate all play a role.
Q: Is it okay to replace just one bad battery?
A: It is usually recommended to replace all batteries in a set at the same time. An old battery will make a new battery work harder, shortening the life of the new one. However, if the set is relatively new and one fails early due to a defect, replacing just the single battery might be okay, but check its voltage and specific gravity regularly compared to the others.
Q: My charger won’t turn off, or it turns off too soon. What does that mean?
A: This could mean the charger is bad, or there is a problem with the batteries. A bad battery (or cell) can confuse the charger. Test your batteries first to see if they are the problem.
Q: What temperature is best for testing specific gravity?
A: Specific gravity readings are most accurate around 80°F (27°C). Most hydrometers have a way to correct the reading if the battery is hotter or colder. Extreme temperatures can affect readings significantly. Always check your hydrometer’s instructions.