
Image Source: grantbrowngolf.com
Mastering How To Read Putting Greens In Golf Like A Pro
Reading putting greens well is a key part of golf. It means you can see how your golf ball will roll on the green. This includes noting the slope, speed, and grain of the grass. Many green reading techniques help you do this. AimPoint golf is one such method. It helps you see the right line for your putt. Learning to read putts effectively can greatly lower your scores. It helps you make more putts and avoid three-putts. Mastering this skill gives you a big edge on the course.
Grasping the Basics of Green Break
Reading a green is like solving a puzzle. You need to see how the ground slopes. You must also guess how fast the ball will roll. This helps you pick the right line for your putt. It all starts with the basic idea that gravity pulls the ball downhill.
Discernment of Slope and Undulation in Putting
The most vital part of reading a green is seeing its slope. Slopes are not always easy to spot. A green may look flat, but it often has a gentle tilt. Even a small tilt will move your ball.
You must look at the green from many spots. Walk around your ball and the hole. See the green from behind your ball. Look from the side. Also, look from the low side of the hole. This helps you find the true slope.
- High Side/Low Side: The ball will always break toward the low side. Find the lowest spot around your putt. That is where gravity will pull your ball.
- False Flats: Some greens look flat but are not. Use your feet to feel the slope. Stand tall and let your body sense the tilt.
- Catching Water: Think about where water would flow on the green. Water always runs downhill. This gives you a good hint of the slope.
Pondering Green Speed
Green speed is how fast your ball rolls. Fast greens make the ball break more. Slow greens make it break less. Many things change green speed. These include the type of grass, how short it is cut, and how much moisture is in the grass.
- Pace of Play: Pros often use a “Stimpmeter” to check green speed. You do not have one on the course. But you can feel it. Watch how your first putt rolls. See how other players’ putts roll.
- Weather’s Effect: Wet greens are slower. Dry greens are faster. Greens cut short are faster. Greens cut longer are slower. Wind can also change how fast your ball rolls.
- Ball Roll Test: Drop a ball near the hole. See if it rolls away. If it does, it shows you the slope and gives a hint about speed. This helps you judge the green.
Deciphering Grain on Greens
Grain is the direction the grass grows. It is like tiny little hairs on the green. If the grass grows toward the hole, your putt will be faster. If it grows against the hole, your putt will be slower.
- Shiny vs. Dull: Look at the color of the grass. If it looks shiny, the grain is with you. This makes your putt faster. If it looks dull, the grain is against you. This makes your putt slower.
- Shadow Play: When the sun is low, look for shadows. The grain often grows toward the setting sun.
- Hole’s Edge: Look closely at the edge of the hole. You might see tiny frayed bits of grass. These bits often point in the direction of the grain.
- Water Rule: Grain often grows toward a water source or a major collection area.
Grain can have a small effect on short putts. But it can change long putts a lot. Always check for grain on longer putts.
Mastering Diverse Green Reading Techniques
To read greens like a pro, you need good green reading techniques. No one way works for all putts. Pros use a mix of methods. They combine what they see with what they feel.
The Walk-Around Method for Putt Visualization Techniques
One common way to read a green is to walk around it. This lets you see the putt from all sides. It helps you build a full picture of the slope.
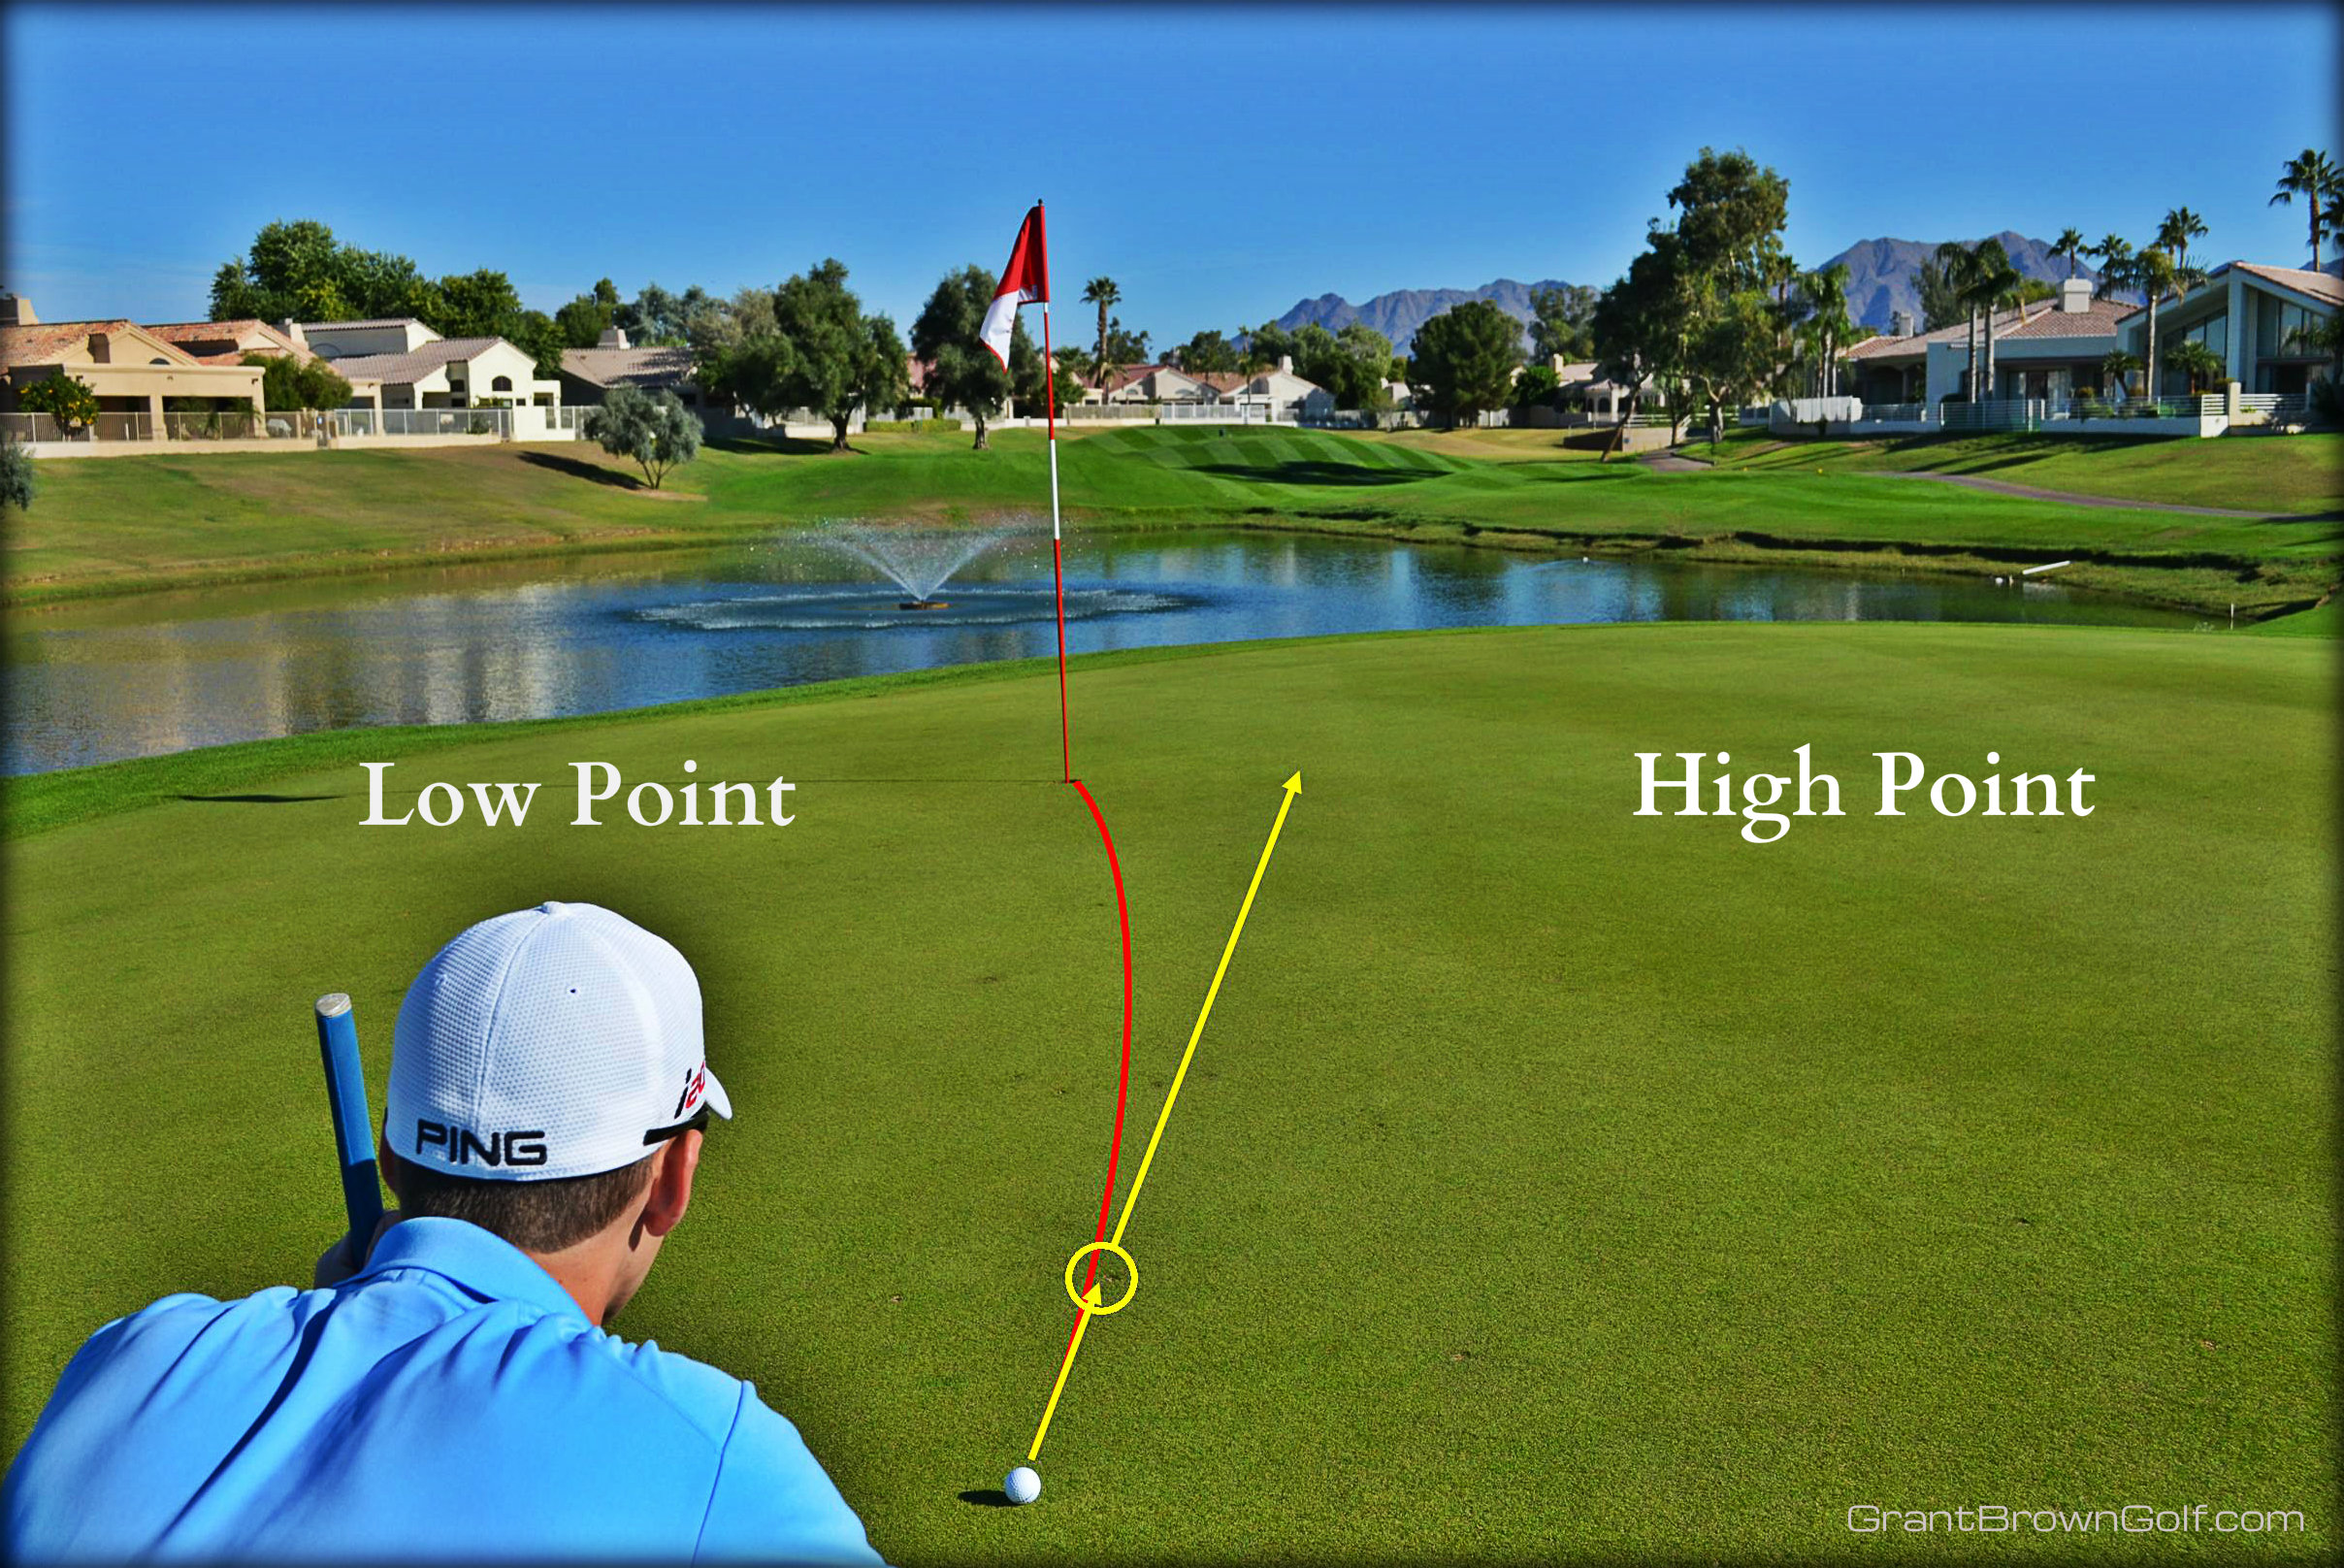
- Behind the Ball: First, stand behind your ball. Look at the path to the hole. Try to see the high point and low point. This gives you a first idea of the break.
- Behind the Hole: Next, walk to the other side of the hole. Look back at your ball. This view often shows you slopes you missed. It helps you see the whole picture.
- Low Side View: Go to the very lowest side of the putt. This is usually the best spot to see the true break. Gravity pulls the ball this way.
- Mid-Putt View: Sometimes, walk along the putt’s path. Stand halfway between your ball and the hole. See if the slope changes. This can help with tricky putts.
As you walk, try to picture your ball rolling. Imagine its speed and where it will turn. This putt visualization techniques helps your mind “feel” the shot before you hit it.
Reading from Different Angles
Each angle gives you new clues. Do not just stand behind your ball. That is a common mistake for amateur golfers.
- Below the Hole: This is often the best line to see the break. The low side of the hole usually reveals the greatest slope.
- Above the Hole: Looking downhill can hide the slope. It can make a big break look small.
- Side-to-Side: Look across the putt. If the hole is on a side slope, you will see a clear break.
Plumb Bobbing (A Quick Glance)
Plumb bobbing is a method where you hold your putter in front of your eye. You let it hang straight down. It can help you see if one side of the hole is higher than the other. But many pros do not use it. It can be hard to do right. It can also make you slow down play. Focus more on walking and seeing the slope with your eyes and feet.
Advanced Green Reading Techniques
Some pros use special systems to read greens. These systems are very precise. They take more time to learn. But they can give you a very clear line for your putt.
AimPoint Golf: A Detailed Look
What is AimPoint golf? AimPoint is a system that uses your feet and fingers to measure slope. It gives you an exact spot to aim your putt. Many pros use AimPoint now. It takes the guesswork out of reading greens.
Here is how AimPoint works:
- Find the Low Point: Stand halfway between your ball and the hole. Face the hole. Find the low point of the putt. This is where the putt will break the most.
- Feel the Slope: Stand with your feet spread wide. Point one foot at the ball and the other at the hole. Close your eyes. Feel the slope of the ground under your feet. This is how you judge the amount of slope.
- Use Your Fingers: Hold your hand out in front of you. Your thumb is up. Line up the low edge of the hole with your thumb. Based on how much slope you feel, hold up 1, 2, or 3 fingers. Each finger stands for a certain amount of break.
- 1 finger: Small slope, small break.
- 2 fingers: Medium slope, medium break.
- 3 fingers: Large slope, large break.
- Find Your Aim Point: Once you have your finger count, move your hand. Line up your fingers with the low edge of the hole. Look from the edge of your outside finger straight up. This is your AimPoint. This is where you should aim your putt.
AimPoint helps you see exactly how much break to play. It makes you trust your read. This means you can hit your putts with more belief.
Contour Mapping Golf Greens
Some players use special maps of golf greens. These maps show every slope and undulation. They are like a detailed drawing of the green’s surface.
- How They Work: These maps use lines, like those on a weather map. These lines show how much the green rises and falls. Lines that are close together mean a steep slope. Lines far apart mean a gentle slope.
- Benefits: Contour mapping golf greens helps you see slopes you might miss with your eyes. They are very useful for long putts or complex greens.
- When to Use: Some golf apps offer these maps. Pros use them in practice rounds. It is not allowed to use them during a rule-based golf round in most cases (check local rules). However, studying them before a round can help you learn the course.
Fine-Tuning Putting Break Analysis
Once you spot the break, you need to play the right amount. This is where practice comes in. You need to hit your ball with the right speed and line.
How to Spot the Break
It is not just about seeing the biggest slope. It is about seeing the path the ball will take.
- High Point of the Break: Find the point where the ball will start to turn. This is often called the “apex” of the break.
- Imaginary Line: Draw an imaginary line from your ball, through the high point, and to the hole. This is your true putting line.
- Starting Line: Where will your ball start? You must hit it on the high side of the hole. If you hit it too straight, it will break past the hole.
How Much Break to Play
This depends on three things:
- Slope: More slope means more break.
- Green Speed: Faster greens mean more break.
- Putt Speed: A putt hit too hard will break less. A putt hit too soft will break more.
Most golfers do not play enough break. They hit the ball too straight. They fear missing on the high side. But if you play enough break, you will make more putts. Your ball will fall into the hole from the high side. This is called “dying in the hole.”
| Slope Type | Green Speed (Example) | Break Amount | Key Tip |
|---|---|---|---|
| Slight Slope | Medium | Less than one cup outside the hole. | Aim just outside the edge of the hole. |
| Moderate Slope | Medium | One to two cups outside the hole. | Aim outside the hole by a bit more. |
| Steep Slope | Medium | Two cups or more outside the hole. | Aim well outside the hole; focus on speed. |
| Any Slope | Fast | More break than on medium greens. | Add extra break, especially for long putts. |
| Any Slope | Slow | Less break than on medium greens. | Hit it firmer; less break needed. |
Practice Drills for Break
You need to practice reading break. Find a sloped part of a practice green.
- Gate Drill: Set two tees a few inches wider than your putter head. Aim for the high side of the hole. Hit putts through the gate. This helps you start the ball on the right line.
- Break Gauge: Get a small device that shows you the slope of the green. You can use it to check your reads. This helps train your eyes.
- Clock Drill: Place balls around the hole like numbers on a clock. Putt each one. See how the ball breaks from different angles. This helps you get a feel for the whole green.
Reading Putts Effectively: Putting It All Together
Putting all these ideas together helps you read putts effectively. It makes your pre-putt routine strong. It builds your trust in your read.
Pre-Putt Routine: A Step-by-Step Guide
A good routine helps you make a strong read every time.
- Approach the Green: As you walk to the green, look at the overall shape. Note any big hills or valleys. Where do you think water would run?
- Survey from Behind the Ball: Once you are at your ball, stand behind it. Get low to the ground. Look at the path to the hole. See the high point.
- Walk Around the Hole: Walk to the low side of the hole. Look back at your ball. This view helps confirm your first read. You can also look from behind the hole.
- Feel the Slope with Your Feet: As you walk, pay attention to how the ground feels under your feet. Do you feel a tilt?
- Check for Grain: Before you set up, look at the grass color. Check the edge of the hole for frayed bits.
- Pick Your Aim Point: Decide where you will aim. This is the spot on the green that you want your ball to roll over first. It is not the hole itself.
- Visualize the Putt: Picture your ball rolling along the line you picked. See it turning with the break. See it falling into the hole.
- Address the Ball: Set up to the ball. Make sure your putter face points to your aim point. Trust your read. Then hit your putt.
Combining All Elements
All parts of green reading work together.
- Slope is King: Slope is the biggest factor. It affects the break the most.
- Speed is Queen: Green speed changes how much the slope affects the ball.
- Grain is a Helper: Grain has a smaller effect. But it can be key on long putts.
- AimPoint or Feel: Use a system like AimPoint for precision. Or trust your feel and practice. Both can work well.
Do not rush your read. Take your time. Be sure of your line before you hit the ball.
Golf Green Reading Tips for Better Scores
Here are some quick golf green reading tips to help you putt better.
- Read from the low side: This is often the best view to see the true break.
- Use your feet: Feel the slope as you walk. Your feet can tell you things your eyes miss.
- Remember the last putt: Pay attention to how your previous putt rolled. This helps you guess green speed.
- Watch others: See how other players’ putts break. This gives you hints for your own putt.
- Think about where water flows: This is a simple trick to find the overall slope of the green.
- Do not fear the break: Most golfers do not play enough break. Be brave. Aim outside the hole.
- Speed is crucial: The right speed makes your read look good. Too fast or too slow will throw off your line.
- Practice, practice, practice: The more you read greens, the better you get. Spend time on the practice green.
- Trust your first read: Often, your first thought about the break is right. Do not overthink it.
- Keep it simple: Do not try to find too many breaks. Find the main slope.
Frequently Asked Questions (FAQ)
Q1: What is the most important thing to look for when reading a green?
A1: The most important thing is the slope of the green. Gravity will always pull your ball downhill. Find the low side.
Q2: How does green speed affect the break of a putt?
A2: On faster greens, the ball rolls farther and has more time to break. So, you need to play more break on fast greens. On slower greens, the ball rolls less, so you need to play less break.
Q3: Is AimPoint golf allowed in golf tournaments?
A3: Yes, AimPoint golf is allowed. It is a system that uses your body and fingers. You are not using any outside devices. Many pros use it.
Q4: Can I use green contour maps during a round?
A4: Most golf rules do not allow you to use printed green contour maps during a round. But some apps or digital maps might be okay if they follow specific rules. Always check the local rules of your tournament or course. You can study them before your round though.
Q5: How do I tell if a green has grain?
A5: Look at the color of the grass. If it looks shiny, the grain is with you. If it looks dull, the grain is against you. Also, check the edges of the hole for frayed grass bits. They often point in the direction of the grain.
Q6: What is the biggest mistake golfers make when reading greens?
A6: The biggest mistake is not playing enough break. Most golfers hit their putts too straight. They do not aim far enough outside the hole.
Q7: How can I practice green reading at home?
A7: You cannot truly practice green reading at home without a real green. But you can practice putt visualization techniques. Close your eyes and imagine putts on different greens. Picture the break and the line. This helps train your mind.
Final Thoughts
Mastering how to read putting greens is a journey. It takes time, practice, and a keen eye. Start by looking for the slope. Then add in green speed and grain. Try different green reading techniques. Use putt visualization techniques. Learn from every putt you hit. Soon, you will be reading greens like a seasoned pro. This will help you make more putts. It will lower your scores. And it will make golf even more fun.