
Image Source: i.ytimg.com
DIY Pro Tips: How To Install A Golf Grip Flawlessly
Regripping your own golf clubs can save you money. It gives you a fresh feel for your game. Can you do it at home? Yes, you can. You do not need special skills. Many golfers do this simple task themselves.
What is golf grip solvent? It is a special liquid. It helps your new grip slide onto the shaft. It also makes the tape sticky. Can I use regular tape instead of double-sided grip tape? No, you should not. Regular tape does not hold the grip well. It is not made for golf grips. Double-sided grip tape is designed for this job. It has stickiness on both sides. This makes the grip stay put. Do I need a golf club vise? A golf club vise holds the club steady. It makes the job much easier. It helps you keep the club still. This stops the shaft from moving. It also prevents damage. It is a good idea to use one. How long is the drying time golf grips? Most grips need 24 hours to dry. Some might need a bit more. It depends on the grip and the solvent. Always check the instructions for your specific products. What causes air bubbles golf grip? Air bubbles happen if you do not use enough solvent. Or if you do not slide the grip on smoothly. They can also form if the tape is not flat. These bubbles trap air under the grip. This makes the grip feel uneven. It can make your hands sore. It can also cause the grip to move.
This guide will show you how to install a golf grip perfectly. You will learn each step. You will get great results.
Why Refresh Your Golf Grips?
Your golf grips are very important. They are the only part of the club you touch. They connect you to the club. Old grips hurt your game. They can become slick. This makes it hard to hold the club. Your hands might slip. You might squeeze the club too hard. This causes tension. Tension leads to bad shots.
New grips feel fresh. They give you a better hold. They help you control the club. You can swing more freely. This can improve your game. It can lower your scores. It also feels good to have new grips. It is like getting new shoes. It makes you feel ready to play.
- Better Feel: New grips give a soft, fresh feel.
- More Control: A firm grip stops slipping. You steer the club better.
- Less Hand Strain: Old grips make you grip harder. New grips let you hold lighter. This saves your hands.
- Improved Performance: Better feel and control mean better shots.
- Save Money: DIY golf regripping costs less than a pro.
Grips wear out. Dirt and oil from your hands build up. Heat and sun also harm them. Play often? Your grips wear out faster. Most golfers should change grips every 40 rounds. Or at least once a year. Even if you do not play often, grips still age.
Gather Your Gear: Essential Tools
Before you start, get everything ready. Having the right tools makes the job easy. It helps you get it right the first time. A complete golf grip installation kit often has many of these items.
Your Basic Tool List
Here is what you will need:
- New Golf Grips: Get the right size and type for you.
- Double-Sided Grip Tape: This is special tape. It has sticky on both sides. It holds the grip to the shaft.
- Golf Grip Solvent: This liquid makes the grip slick. It lets it slide onto the tape. It also activates the glue.
- Hook Blade or Utility Knife: For cutting off old grips. Be careful with sharp tools.
- Rubbing Alcohol or Mineral Spirits: For cleaning the shaft.
- Clean Rags or Paper Towels: For wiping and cleaning.
- Bucket or Tray: To catch extra solvent.
- Golf Club Vise: This holds your club still. It is very helpful.
- Rubber Vise Clamp: Protects your club shaft in the vise.
- Measuring Tape or Ruler: To cut tape to the right length.
Here is a table showing the tools and why you need them:
| Tool | Purpose | Key Info |
|---|---|---|
| New Golf Grips | Your replacement grips. | Choose the right size for your hands. |
| Double-Sided Grip Tape | Sticks the grip to the shaft. | Essential for a secure bond. Comes in rolls or pre-cut strips. |
| Golf Grip Solvent | Lubricates for sliding. Activates tape’s stickiness. | Use only golf grip solvent. Do not use other liquids. |
| Hook Blade / Utility Knife | Safely removing old grips. | Be very careful. Cut away from yourself. |
| Rubbing Alcohol / Mineral Spirits | Cleans old glue off the shaft. | Helps the new tape stick better. |
| Clean Rags / Paper Towels | Wiping, drying, cleaning. | Keep shaft and grips clean. |
| Bucket / Tray | Catches excess solvent. | Prevents messes. |
| Golf Club Vise | Holds the club firmly. | Stops club from moving. Makes work safer and easier. |
| Rubber Vise Clamp | Protects the club shaft from vise damage. | A must-have with a vise. |
| Measuring Tape / Ruler | Measures tape length. | Ensures tape matches grip length. |
Using a golf grip installation kit often simplifies things. These kits usually come with tape, solvent, and basic instructions. They are a great starting point for DIY golf regripping.
Step 1: Removing Your Old Golf Grip
This is the first actual step. It is very important to remove the old grip cleanly. If you do not, the new grip might not sit right. This part requires a bit of care.
Secure the Club in a Vise
First, put your golf club in the golf club vise.
Make sure the club is steady. Put the rubber vise clamp around the shaft. Place the clamp in the vise. Tighten the vise. Do not overtighten. You do not want to crush the shaft. The club should be firm. It should not move when you work. This makes removing old golf grip much safer.
Cut the Old Grip Off
Get your hook blade or utility knife. A hook blade is safer. It cuts away from the shaft. Cut along the length of the old grip. Start at the end where your hands go. Cut all the way to the other end. Angle the blade slightly. This helps it cut cleanly. Be careful not to cut the graphite shaft. Carbon fiber shafts can be damaged easily. Steel shafts are stronger. But still be careful.
Once you cut a line, the grip will peel open. Grab the edges. Pull the grip off the shaft. It might come off in pieces. That is fine. Just get all of it off.
Take Off the Old Grip Tape
After the grip is off, you will see old tape. This tape is sticky. It might be hard to remove. Start peeling it from one end. Pull slowly and steadily. If it tears, start a new peel. You want to get all of it off. Leftover tape makes bumps. These bumps will show through your new grip. Some tape might be very stubborn. You can use a bit of mineral spirits or rubbing alcohol. Put it on a rag. Wipe the stubborn tape. This helps loosen the glue.
Clean the Club Shaft
This is a very important part of removing old golf grip. After peeling the tape, clean the shaft. Use rubbing alcohol or mineral spirits. Put some on a clean rag. Wipe down the entire shaft. Get rid of all old glue. Remove any dirt. Make sure the shaft is super clean. A clean shaft helps the new tape stick well. It helps your new grip stay put. Let the shaft dry completely before moving on. A wet shaft will not hold the tape.
Step 2: Preparing Your Club Shaft
Once the shaft is clean, it is ready. This step is quick. It makes sure your work is perfect.
Check for Damage
Look at the shaft closely. Do you see any dents? Are there any cracks? This is especially important for graphite shafts. If you see damage, do not regrip it. Take it to a pro. A damaged shaft can break. This can be dangerous. Most shafts will be fine.
Dry the Shaft
Ensure the shaft is completely dry. No moisture should be left. Any wet spots will stop the tape from sticking. Use a dry rag. Wipe it down one last time. Feel it with your fingers. It should be smooth and dry.
Step 3: Applying New Grip Tape
Now, you will apply the new double-sided grip tape. This tape is the base for your new grip. It must be put on well.
Measure and Cut the Tape
First, measure your new grip. Lay it next to the tape roll. Cut the tape about an inch shorter than the grip. This is usually around 9 to 10 inches for most clubs. For putter grip installation, you might need longer tape. Putter grips are longer. Some grip tape comes in pre-cut strips. If so, just peel and use.
Apply the Tape Straight
Peel off one side of the tape’s paper backing. Start at the butt end of the shaft. This is the thicker end. Line up the tape. Press it down firmly. Work your way down the shaft. Make sure the tape is straight. It should go down the middle of the shaft. Try not to create wrinkles. Wrinkles cause air bubbles golf grip later. Overlap the tape slightly at the butt end. This helps secure the grip. It also provides a smooth finish.
You can wrap the tape in a spiral if you want. Some people prefer this. But a single straight strip works very well. For a spiral, wrap it tightly. Make sure there are no gaps. No part of the shaft should be bare where the grip will go.
Smooth the Tape
Once the tape is on, rub it down. Use your fingers. Press firmly along the whole strip. This helps the tape stick better. It pushes out any tiny air pockets. It also makes sure the edges are flat. This prepares the surface for the grip solvent.
Step 4: Activating Your Grip with Solvent
This is where the magic happens. The golf grip solvent helps your new grip slide on smoothly. It also activates the sticky side of the tape.
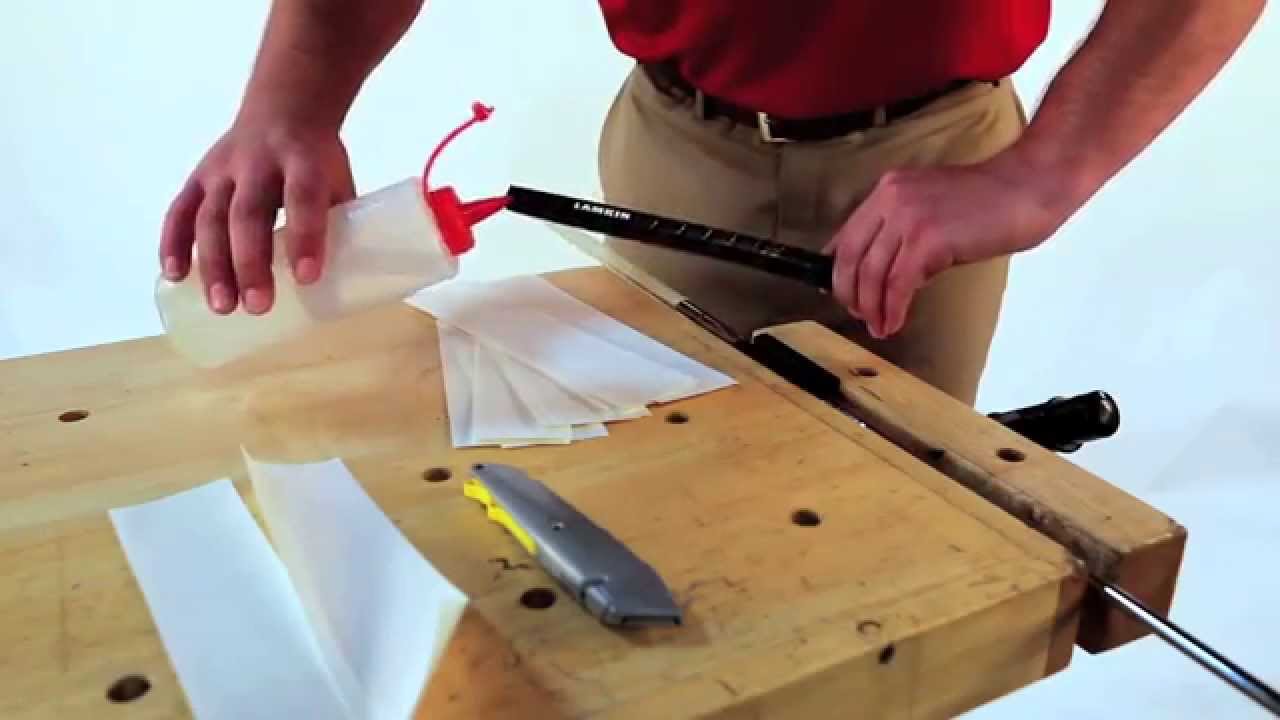
Pour Solvent into the Grip
Take your new grip. Cover the small hole at the end with your thumb. Pour a good amount of golf grip solvent into the grip. Fill about half to two-thirds of the grip. Do not be shy with the solvent. Too little solvent is a common mistake. It makes the grip hard to slide on. It can cause air bubbles golf grip.
Now, cover the open end of the grip with your other hand. Shake the grip back and forth. Roll the solvent around inside. Make sure the entire inside surface of the grip gets wet. You will feel the solvent moving. Keep doing this for about 10-15 seconds.
Pour Solvent onto the Tape
Pour the solvent out of the grip. Let it flow over the double-sided grip tape on the shaft. Make sure the entire tape surface is wet. You want it dripping. Some people put the solvent on the tape directly. You can do that too. But pouring from the grip ensures the inside of the grip is also wet. Catch the extra solvent in your bucket or tray. This keeps your work area clean. The more solvent, the better. It gives you more time. It makes the grip slide easier.
Do Not Delay
Once the solvent is on, work quickly. The solvent starts to evaporate. The tape starts to get sticky. You need to get the grip on before this happens. Be ready for the next step.
Step 5: Installing the New Golf Grip
This is the most exciting part. You will put the new grip on the club. This needs a smooth, quick motion. This is the heart of DIY golf regripping.
Get Ready to Slide
Hold the club steady in the golf club vise. Make sure the shaft is pointing up. Hold the grip with your dominant hand. The open end should be facing down. The narrow end (butt end) should be pointing up.
Slide the Grip On
Place the open end of the grip over the butt end of the shaft. Make sure it is straight. Now, push the grip down firmly and smoothly. Do not twist the grip. Just push straight down. Push it all the way on. You will feel it slide. It should slide easily if you used enough solvent. If it gets stuck, you might not have used enough solvent. Or you might have twisted it. Do not force it too hard. If it stops, you might need to add more solvent. Try to work quickly. Push until the end of the grip reaches the end of the shaft. The grip should fully cover the tape.
Check for Air Bubbles Golf Grip
Once the grip is on, look for any air bubbles golf grip. You might see small bumps. These are trapped air. To fix them, press down firmly on the grip. Work the air bubbles out. Push them towards the open end of the grip. Use your thumbs. Smooth out any bumps. You can gently roll the grip. This helps push the air out. Do this while the solvent is still wet.
Step 6: Aligning Your New Grip
This step is very important for your golf game. Proper aligning golf grip ensures your hands are in the right spot. It makes your club feel natural.
Align the Grip Logo
Most grips have a logo or a pattern. This logo usually goes straight up. It should line up with the clubface. For irons and wedges, the clubface is flat. It is easy to see. For woods, look at the scoring lines on the face. Line up the grip logo with these lines. Make sure the clubface is square. Put the club down on the ground. Check if the face is straight. Then align the grip.
Check Your Hands
Hold the club as you normally would. Your hands should feel comfortable. The grip should feel natural. Adjust the grip if needed. Do this right after installation. The solvent is still wet. You have a few minutes to make small turns. Turn the grip gently. Do not twist too hard. A slight turn can fix a small crookedness.
Look Down the Shaft
Stand over the club. Look down the shaft. See if the grip looks straight. It should not look twisted. A well-aligned grip helps your shot. It ensures your hands return to the same place each time. Consistency is key in golf.
Step 7: The Waiting Game: Drying Time for Golf Grips
You have put in all the hard work. Now, you must wait. This is the easiest step. It is also the most important one.
Let the Solvent Dry
After you install the grip and align it, leave the club alone. Do not touch it. Do not swing it. The solvent needs time to dry. It also needs time for the tape to bond. The stickiness needs to set. This process makes the grip secure.
Recommended Drying Time
Most golf grips need 24 hours of drying time golf grips. Some might need 12 hours. Others could need 48 hours. Check the solvent bottle or grip package. It will tell you the exact time. It is always better to wait longer. Waiting longer ensures the grip is fully set. If you use the club too soon, the grip might slip. It could twist. It might even come loose. This could ruin your hard work. It could also be dangerous.
Store Clubs Safely
During drying time golf grips, store your clubs. Lay them flat. Or hang them in a cool, dry place. Make sure the grips are not touching anything. Do not lean them against a wall. This could push the grip out of place. It could make it crooked. Keep them away from extreme heat. Heat can make the solvent dry too fast. It might not bond well.
Special Case: Putter Grip Installation
Putter grips are different. They are often larger. They have different shapes. But the steps for putter grip installation are mostly the same.
Longer Tape Needed
Putter grips are usually longer. So, you will need a longer piece of double-sided grip tape. Measure the putter grip. Cut the tape to match its length. Apply it as you would for other clubs. Make sure it is straight.
Different Alignment
Putter grips often have a flat top. Or a specific shape. This shape helps you feel the putter face. For putter grip installation, you usually align this flat top with the putter face. Make sure it is perfectly square. This helps you aim your putts. Some putter grips have a specific front and back. Follow the instructions that come with the grip. It will guide you on how to align it.
Patience is Key
Putter grips can be trickier. Their shape might make them harder to slide. Use plenty of golf grip solvent. Be firm but gentle when pushing. Take your time with alignment. A crooked putter grip can throw off your putting stroke.
Troubleshooting Common Grip Issues
Even with care, problems can happen. Here are some common issues and how to fix them.
Crooked Grips
If your grip is slightly crooked, act fast. If the solvent is still wet (within a few minutes), you can gently twist it. Adjust it until it is straight. If the solvent has dried, you will have to remove the grip. Then you start over. This is why checking alignment right away is key.
Air Bubbles Golf Grip
If you see air bubbles golf grip, try to push them out. Use your thumbs. Roll the grip. Work the air towards the open end of the grip. Do this while the solvent is wet. If the solvent has dried, the bubbles are stuck. You might need to live with them. Or you can remove the grip and start over. Prevention is best. Use enough solvent. Slide the grip on smoothly.
Grip Not Sliding On
This is usually a lack of solvent. Or the tape is not smooth. Or you are twisting. If it gets stuck halfway:
- Add more solvent: Try to squirt more solvent into the grip. Also, pour more over the tape.
- Push harder: Apply firm, steady pressure. Do not twist.
- Start over: If it is truly stuck, you might have to cut it off. Then clean the shaft and try again. It is better to re-do it than have a bad grip.
Keeping Your Grips Fresh
Once your new grips are on, take care of them. This makes them last longer.
- Clean Regularly: Wipe your grips with a damp cloth. Use mild soap. Do this often. This removes dirt and oils. Clean grips last longer. They also feel better.
- Store Properly: Keep your clubs in a cool, dry place. Avoid extreme heat or cold.
- Avoid Chemicals: Do not use harsh cleaners on your grips. They can damage the rubber.
Following these tips helps your DIY golf regripping last longer. You get more value from your work.
Frequently Asked Questions (FAQ)
Q1: How often should I replace my golf grips?
Most golfers should replace grips once a year. Or every 40 rounds played. If you play a lot, you might need to do it more often.
Q2: Can I use lighter fluid instead of golf grip solvent?
No. Lighter fluid is flammable. It can damage your grips. It also might not activate the tape properly. Only use golf grip solvent. It is designed for this job.
Q3: Is it hard to remove old golf grip?
It is not hard. It just takes some care. Using a hook blade makes it easier and safer. Make sure to get all the old tape off.
Q4: What if I cut a graphite shaft while removing the grip?
If you nick or cut a graphite shaft, stop. Do not use the club. Take it to a professional club fitter. A damaged graphite shaft can break. This can be dangerous.
Q5: Can I reuse old grip tape?
No. Always use new double-sided grip tape. Old tape will not stick well. It can make your new grip slip or twist.
Q6: What is the best way to clean my new grips?
Use warm water and a mild dish soap. Wet a brush or a cloth. Gently scrub the grips. Then rinse them clean. Let them air dry. Do this regularly.
Q7: Do different grip materials need different drying times?
Most rubber or synthetic grips follow the 24-hour drying time golf grips rule. Check your specific grip’s instructions. Some may vary slightly.
Q8: Can I do this outside?
Yes, you can. It is good to have fresh air. Make sure you are not in direct sunlight. Too much sun can dry the solvent too fast.
Conclusion
You now have all the knowledge. You can perform DIY golf regripping like a pro. Installing a golf grip flawlessly takes a bit of practice. But it is a very rewarding task. You save money. You get a fresh feel for your clubs. You improve your game. Remember to gather your tools. Be careful with sharp objects. Use plenty of golf grip solvent. Take your time with alignment. And wait for the proper drying time golf grips.
With these tips, your new grips will be perfect. Go out and enjoy your freshly regripped clubs!