
You can absolutely convert your golf cart to a lithium battery system! Many people are choosing to replace lead acid golf cart batteries with lithium for better performance. It is a worthwhile project for many cart owners, and this guide will show you how. The process is simpler than you might think, especially with a good plan and the right tools. We will walk you through each step. This change gives your golf cart many benefits. It makes your cart lighter, faster, and lets it go much farther. Get ready to upgrade your ride!
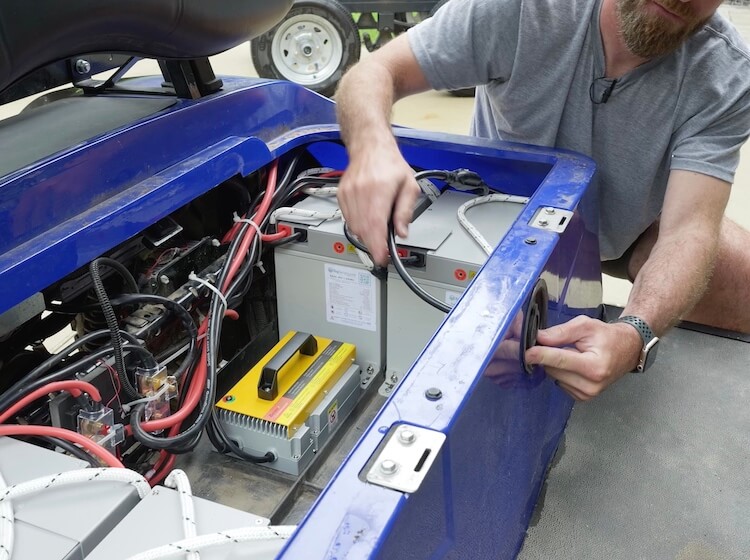
Image Source: rogueengineer.com
Grasping the Power of Lithium Batteries
Many golf cart owners want better power. They look for ways to make their carts run longer. The common choice is a golf cart lithium battery upgrade. Why is this upgrade so popular? Lithium batteries offer many big advantages over old lead-acid ones.
Think about the batteries you use now. They are likely heavy and need a lot of care. They also lose power as they get older. Lithium batteries fix these problems. They are a modern solution for any golf cart.
Key Benefits of a Lithium Golf Cart Conversion Kit
Switching to lithium batteries changes your golf cart for the better. Here are the top reasons why a golf cart lithium conversion kit is a smart choice:
- Lighter Weight: Lithium batteries weigh much less than lead-acid ones. This means your cart is lighter. A lighter cart puts less stress on the motor. It also helps your cart go faster and climb hills easier.
- Longer Lifespan: Lithium batteries last much longer. They can handle many more charges and discharges. This means you will buy new batteries less often. It saves you money in the long run.
- No Maintenance Needed: You do not need to add water to lithium batteries. They do not leak acid. This saves you time and keeps your battery area clean.
- Constant Power Output: Lithium batteries give full power until they are almost empty. Lead-acid batteries get weaker as they run low. Lithium gives you steady speed and hill-climbing power.
- Faster Charging Times: Lithium batteries charge much faster. You can often get a full charge in just a few hours. This means less waiting and more driving.
- Better Golf Cart Lithium Range Improvement: Because they are more efficient, lithium batteries often allow your cart to travel farther on one charge. This is a big plus for long days on the course or around your property.
- Environmentally Friendly: Lithium batteries are easier to recycle. They do not contain harmful lead.
For all these reasons, a golf cart lithium battery upgrade is a very smart move. It makes your cart better in many ways.
Deciding on Your Lithium Setup
Before you start, you need to pick the right lithium battery setup. This is a key step for any DIY golf cart lithium conversion. Not all batteries are the same. Your cart’s voltage is very important.
Confirming Your Cart’s Voltage
Most golf carts are either 36V or 48V. Some newer or custom carts might be 72V. You must match your new lithium battery voltage to your cart’s voltage. If your cart uses six 6V batteries, it is a 36V system (6×6=36). If it uses six 8V batteries, it is a 48V system (6×8=48). Four 12V batteries also make a 48V system (4×12=48).
Important: Never try to put a 48V lithium golf cart battery into a 36V cart. Or put a 36V battery into a 48V cart. This can damage your cart’s motor controller and other parts.
Opting for the Right Battery Type: LiFePO4
When we talk about lithium golf cart batteries, we almost always mean LiFePO4 batteries. LiFePO4 stands for Lithium Iron Phosphate. These batteries are the best choice for golf carts because they are:
- Very Safe: They are very stable. They do not catch fire or explode easily, even if damaged.
- Long-lasting: They offer a very long cycle life. This means they can be charged and discharged thousands of times.
- High Power: They deliver good power output.
- Wide Temperature Range: They work well in many different temperatures.
Avoid other types of lithium batteries like Li-ion (Lithium-ion) for golf cart use. LiFePO4 is the standard for safety and performance in this use.
How Many Batteries Do You Need?
You might use one large 48V lithium golf cart battery pack. Or you might use several smaller ones. Some kits come with one big battery that replaces all your old ones. Other kits use smaller 12V or 24V LiFePO4 golf cart batteries wired together.
For example, two 24V batteries in series make 48V. Four 12V batteries in series also make 48V. One large 48V pack is often simpler to install. It needs fewer connections. Smaller batteries can be easier to lift and fit.
No matter which option you choose, ensure the total voltage matches your cart. And make sure the Amp-hour (Ah) rating is good for your needs. A higher Ah rating means more range.
Assembling Your Lithium Golf Cart Conversion Kit
Once you know your voltage and battery type, it’s time to gather your parts. A complete golf cart lithium conversion kit usually includes everything you need. You can also buy parts separately if you prefer.
Essential Components for the Upgrade
Here is what you will need for your golf cart lithium battery upgrade:
- LiFePO4 Golf Cart Batteries: This is the main part. Choose the correct voltage and a good Amp-hour (Ah) rating. Many people pick a single 48V lithium golf cart battery to keep things simple.
- Battery Management System (BMS): This is super important. The BMS protects your battery. It balances cells, stops overcharging, and prevents over-discharging. Some batteries have a built-in BMS. If not, you need to buy one separately. We will talk more about golf cart BMS installation later.
- Golf Cart Lithium Charger: You cannot use your old lead-acid charger. Lithium batteries need a special charger. It must match your battery’s voltage and chemistry.
- Heavy-Duty Battery Cables: Your old cables might be fine. But it is a good idea to upgrade to new, thick cables. This ensures good power flow and safety.
- New Battery Tray or Mounting System: Lithium batteries are often different sizes than lead-acid ones. You might need to change your battery tray. Or you might need new straps or brackets to hold the battery securely.
- Battery Monitor/Gauge (Optional but Recommended): This shows you how much charge is left. It is often a big upgrade from the simple gauges on old carts.
- Voltage Reducer (Optional but Recommended for 48V systems with 12V accessories): If your cart has 12V lights or accessories and you are upgrading to 48V lithium, you need a voltage reducer. This changes the 48V power to 12V for your accessories.
- Tools: Wrenches, sockets, wire cutters, crimpers, a multimeter, safety glasses, gloves.
Table: Common Lithium Conversion Kit Contents
| Component | Purpose | Notes |
|---|---|---|
| LiFePO4 Battery Pack | Main power source for the golf cart. | Single large pack (e.g., 48V 100Ah) or multiple smaller batteries (e.g., four 12V 100Ah). |
| Battery Management System | Protects and optimizes battery health. | Often built into the battery pack itself. Essential for safe operation. |
| Lithium Charger | Charges the LiFePO4 battery safely and efficiently. | Must be specific for lithium chemistry (LiFePO4). Cannot use old lead-acid charger. |
| Heavy-Duty Cables | Connects batteries to each other and to the golf cart’s controller. | Ensure correct gauge (thickness) for your cart’s power needs. |
| Mounting Hardware | Secures the new lighter battery in place. | Straps, brackets, or a custom tray might be needed as lithium batteries are shaped differently. |
| State of Charge Meter | Displays remaining battery power. | Usually digital. Connects to the BMS or directly to the battery. Very helpful for golf cart lithium range improvement planning. |
| Voltage Reducer | Provides 12V power for accessories from a 36V/48V system. | Needed for lights, USB ports, stereos, etc., if your cart uses 12V accessories and your main battery is higher voltage. |
| Installation Manual | Step-by-step guide for installation. | Always follow the specific instructions from your kit manufacturer. |
Choose a reputable brand for your lithium golf cart conversion kit. Good quality parts make the process easier and safer. They also ensure better golf cart lithium range improvement and overall performance.
Pre-Conversion Preparation: Safety First
Before you touch anything, always put safety first. Working with batteries can be dangerous. Take your time and be careful.
Disconnecting the Old Batteries
- Wear Safety Gear: Put on safety glasses and thick gloves. Lead-acid batteries contain acid that can hurt you.
- Turn Off the Cart: Make sure the golf cart is off. Remove the key. Put the “tow/run” switch to “tow” mode if your cart has one. This cuts power to the motor.
- Find the Main Negative Cable: This cable usually connects from the last battery in the series to the cart’s main negative post (often on the motor controller). It is usually black.
- Disconnect the Main Negative Cable FIRST: Use a wrench to remove the nut on this terminal. Pull the cable away from the battery.
- Disconnect the Main Positive Cable NEXT: This cable connects from the first battery in the series to the cart’s main positive post. It is usually red. Disconnect this cable.
- Disconnect All Other Cables: Now, remove all the small cables that link the batteries together. Take a picture or draw a diagram first. This helps you remember how they were connected. Note which cables went to the charger port or other accessories.
- Remove the Old Batteries: Lead-acid batteries are very heavy. Get help if you need it. Lift them out carefully. Do not tilt them too much, as acid can spill.
- Dispose of Old Batteries Properly: Do not just throw them away. Take them to a recycling center that handles lead-acid batteries. Most auto parts stores will take them.
Cleaning the Battery Tray
Once the old batteries are out, clean the battery tray. Lead-acid batteries often leave behind a lot of corrosion and dirt.
- Wear Gloves and Eye Protection: Again, protect yourself from any leftover acid.
- Mix Baking Soda and Water: Make a paste with baking soda and water. Baking soda neutralizes battery acid.
- Scrub the Tray: Apply the paste to any corroded areas. Use a stiff brush to scrub away the dirt and corrosion.
- Rinse and Dry: Rinse the tray with clean water. Make sure it is completely dry before putting in the new batteries. A clean tray helps prevent future issues.
- Check for Damage: Look closely at the tray. Are there any cracks or rust spots? Repair or replace the tray if needed. Your new lighter lithium batteries will be less harsh on the tray. But a good base is still important.
This prep work is key. It sets you up for a smooth and safe golf cart lithium conversion.
Deciphering Golf Cart BMS Installation
The Battery Management System (BMS) is a super important part of your lithium setup. It acts like the brain of your battery pack. It keeps your LiFePO4 golf cart batteries safe and running well.
What a BMS Does
A BMS does several key jobs:
- Cell Balancing: It makes sure all the individual cells inside your battery pack have the same charge. This helps the battery last longer and perform better.
- Overcharge Protection: It stops the charger if the battery tries to take too much power. This prevents damage and overheating.
- Over-discharge Protection: It cuts off power if the battery goes too low. This keeps the battery from being damaged by being drained too much.
- Over-current Protection: It shuts down if too much power is drawn, like a short circuit.
- Temperature Monitoring: It watches the battery’s temperature. It shuts down if it gets too hot or too cold.
Some LiFePO4 golf cart batteries come with a BMS built inside. This is the simplest option. If your battery does not have an internal BMS, you will need an external one.
How to Connect an External BMS
If you have an external BMS, follow these general steps. Always check the specific instructions that come with your BMS. Each model can be a little different.
- Place the BMS: Find a safe, dry spot near your battery pack. Make sure it will not get wet or hit by anything.
- Connect Main Power Wires:
- Connect the main negative cable from the BMS to the main negative terminal of your battery pack.
- Connect the main positive cable from the BMS to the main positive terminal of your battery pack.
- The BMS usually has separate input (charging) and output (load) terminals. Make sure you connect these correctly.
- Connect Balance Wires: This is the most detailed part of golf cart BMS installation.
- The BMS comes with many small wires called balance leads. These connect to each individual cell or series of cells in your battery pack.
- Start from the lowest voltage point (usually the main negative terminal). Connect the first balance wire there.
- Then, connect the next balance wire to the next cell’s positive terminal, and so on.
- It is vital to connect these in the correct order. If you mess up, you could damage the BMS or the battery. Double-check your battery’s manual and the BMS wiring diagram.
- Connect Temperature Sensor (If Applicable): Some BMS units have a temperature sensor. Attach this sensor firmly to the battery pack.
- Connect to Cart Controller: The output of the BMS (your main power for the cart) will then go to your golf cart’s motor controller.
Pro Tip: If you are unsure about golf cart BMS installation, especially with balance wires, get help from someone who knows. It is better to be safe than sorry. A correctly installed BMS makes your lithium battery last a very long time.
Installing the 48V Lithium Golf Cart Battery
Now that the old batteries are out and the tray is clean, it is time to put in your new 48V lithium golf cart battery or battery pack. This is where your DIY golf cart lithium conversion starts to look real!
Placing the Battery
- Lift Carefully: Even though lithium batteries are lighter than lead-acid, a large 48V lithium golf cart battery can still be heavy. Lift it carefully into the battery tray.
- Positioning: Place the battery so that its terminals are easy to reach. Think about where your main positive and negative cables will run.
- Secure the Battery: This is very important. Lithium batteries are much smaller for their power. They might not fill the old battery tray.
- Use the new mounting hardware that came with your lithium golf cart conversion kit.
- This could be straps, brackets, or a custom-built frame.
- The battery must be held firmly in place. It should not move around when the cart drives over bumps. A loose battery can cause damage or short circuits.
Golf Cart Lithium Battery Wiring Diagram: Simplified Steps
Wiring is a key step. While I cannot show you a specific picture of a golf cart lithium battery wiring diagram, I can explain the general steps. Always refer to the diagram that came with your specific battery or kit.
General Wiring Principles:
- Series Connections: If you are using multiple smaller batteries (e.g., four 12V LiFePO4 batteries to make 48V), you connect them in series.
- This means connecting the positive (+) terminal of one battery to the negative (-) terminal of the next battery.
- You will be left with one free negative terminal on your first battery and one free positive terminal on your last battery. These are your main system terminals.
- Main Connections to the Cart:
- Main Negative: Connect a thick main negative cable from the negative output of your BMS (or directly from the battery’s main negative terminal if the BMS is internal) to the main negative post on your golf cart’s motor controller.
- Main Positive: Connect a thick main positive cable from the positive output of your BMS (or directly from the battery’s main positive terminal) to the main positive post on your golf cart’s motor controller.
- Accessory Connections:
- If you installed a voltage reducer for 12V accessories (like lights, horn, radio), connect its input to the main 48V battery terminals (or designated accessory terminals on your battery/BMS). Connect its 12V output to your cart’s 12V accessory wiring.
- Charge Port Connection:
- Connect the charge port wires from your cart to the charge input terminals on your BMS (or directly to the battery if the BMS handles charging internally). Ensure polarity is correct (positive to positive, negative to negative).
Key Wiring Rules:
- Use Proper Cable Gauge: Use cables that are thick enough for your cart’s power. Thinner cables can overheat. Your kit should include the right size.
- Clean Connections: Make sure all cable ends are clean and shiny. Tighten all nuts and bolts firmly. Loose connections can cause heat and power loss.
- Double-Check Polarity: Always connect positive to positive and negative to negative. Reversing polarity can cause serious damage. Use your multimeter to check voltages before connecting anything permanently.
- Insulate Connections: Cover any exposed metal parts of terminals with electrical tape or rubber boots. This prevents accidental short circuits.
Wiring can seem tricky. But taking it slow and following your specific golf cart lithium battery wiring diagram makes it safe.
Powering Up: Connecting Your Golf Cart Lithium Charger
Your new LiFePO4 golf cart batteries need a special charger. You cannot use the old charger that came with your lead-acid batteries.
Why a Dedicated Golf Cart Lithium Charger?
Lithium batteries charge differently. They need a charger that:
- Matches Voltage: A 48V lithium battery needs a 48V lithium charger.
- Follows a Specific Charge Profile: Lithium chargers use a “CC/CV” (Constant Current / Constant Voltage) method. This charges the battery quickly and then balances the cells. Lead-acid chargers use different stages that will not work or will damage your lithium battery.
- Works with the BMS: The charger and BMS work together. The BMS tells the charger when to stop.
Using the wrong charger is one of the quickest ways to damage a lithium battery.
Connecting and Using Your New Charger
- Connect the Charger: Plug your new golf cart lithium charger into your cart’s charge port.
- Plug into Wall Outlet: Then, plug the charger into a standard wall outlet.
- Monitor Charging: The charger will usually have indicator lights. It will show when it is charging and when it is full. Most modern lithium chargers are “smart” and will shut off when the battery is fully charged.
- Initial Charge: For the very first charge, it is good to let the battery charge completely. This helps the BMS balance the cells.
- Charger Placement: Keep the charger in a dry, well-ventilated area while it is working. Do not cover it up.
You will notice how much faster your cart charges now. This is a huge benefit of the golf cart lithium battery upgrade.
Post-Conversion Checks and First Ride
You have done all the hard work! Now it is time to check everything and take your first spin.
Pre-Ride Checks
Before you turn the key, do these important checks:
- All Connections Secure: Go over every single connection you made. Are all cables tight? Are all nuts tightened down? Are there any loose wires?
- Insulation: Are all exposed terminals covered? No bare wires should be touching anything.
- Battery Secure: Is your LiFePO4 golf cart battery pack held firmly in place? It should not wobble or shift.
- BMS Lights/Indicators: If your BMS has indicator lights, check them. Does it show everything is okay?
- Voltage Check: Use your multimeter to check the voltage at the main output terminals going to the cart. It should read around 48V (or 36V, depending on your system).
- Tow/Run Switch: Make sure your cart’s “tow/run” switch is set to “run” mode.
- Key In: Insert the key into the ignition.
The Moment of Truth: First Power Up
- Turn the Key: Turn the key to the “on” position.
- Listen: Do you hear any strange noises? Do you smell anything burning? (Hopefully not!)
- Check Gauges: If you installed a new battery gauge, does it show a full charge?
- Try Accessories: Test your lights, horn, and other 12V accessories. Do they work?
- Throttle Test: Slowly press the accelerator pedal. Does the cart move? Does it move smoothly?
The First Drive: Feeling the Golf Cart Lithium Range Improvement
Take your cart for a short test drive in a safe area.
- Notice the Power: You should feel more power. Your cart should accelerate faster.
- Listen to the Motor: Does the motor sound normal?
- Check Hill Climbing: If you have a small hill nearby, try going up it. You should notice a big difference in power.
- Monitor Battery Gauge: Keep an eye on your new battery gauge. See how it performs.
You will likely notice an immediate golf cart lithium range improvement. Your cart will feel more energetic, and it will keep that power even as the battery gets lower. This is a common and very satisfying result of a DIY golf cart lithium conversion.
Maintaining Your Lithium Golf Cart Battery
One of the best things about LiFePO4 golf cart batteries is how little maintenance they need. But there are still a few simple things you can do to ensure they last a very long time.
Simple Maintenance Tips
- Charge Regularly (But Not Excessively): For most use, it is best to charge your lithium battery after each use. You do not need to fully discharge it before charging. Unlike lead-acid, partially charging lithium does not hurt it.
- Avoid Extreme Temperatures: Try not to leave your golf cart in very hot or very cold places for long periods. While LiFePO4 batteries handle a wide range, extreme temperatures can still reduce their lifespan over many years. If you must store it in cold weather, make sure it is charged before storage. Most BMS units will prevent charging below freezing point.
- Do Not Over-Discharge: Your BMS will usually prevent this. But avoid running your battery down to 0% often. It is better for the battery to stop using it when it hits 10-20% charge.
- Keep Terminals Clean: Check your battery terminals every few months. Make sure they are clean and free of dirt or corrosion. This is far less of an issue with lithium than lead-acid, but good practice.
- Check Cable Connections: Occasionally, re-tighten the nuts on your battery cables. Vibrations from driving can sometimes loosen them over time.
- No Watering Needed: This is a huge benefit! Forget about checking water levels. Lithium batteries are sealed.
Long-Term Storage
If you plan to store your golf cart for a long time (e.g., over winter):
- Charge to 50-70%: Do not store a lithium battery at 100% full or 0% empty for long periods. Charge it to about 50-70% capacity.
- Disconnect the Battery: Disconnect the main positive battery cable to prevent any small drains from the cart.
- Store in a Moderate Temperature: Keep the cart and battery in a place where temperatures are not too hot or too cold.
Following these simple steps will ensure your golf cart lithium battery upgrade provides many years of trouble-free service.
DIY Golf Cart Lithium Conversion: Is It For You?
You have seen the steps. Now, consider if a DIY golf cart lithium conversion is the right path for you.
Advantages of Doing It Yourself
- Cost Savings: Doing the work yourself saves on labor costs. This can make the golf cart lithium battery upgrade much more affordable.
- Learning Experience: You learn a lot about your golf cart and how batteries work. This knowledge is valuable for future maintenance.
- Customization: You can choose the exact parts you want, rather than a pre-packaged solution.
- Satisfaction: There is a great feeling of accomplishment when you complete a big project like this yourself.
When to Seek Professional Help
While a DIY golf cart lithium conversion is very doable, it is not for everyone. You might want professional help if:
- You Are Not Comfortable with Electrical Work: If you have no experience with wires, volts, or amps, it can be risky.
- You Do Not Have the Right Tools: While basic tools are enough, some specific crimpers or diagnostic tools might be needed.
- Your Cart Is Unusual: If your golf cart is a very old model, a custom build, or has complex electronics, it might be harder.
- You Value Time Over Money: A professional can do the job quickly.
- You Are Worried About Warranty: Some professionals offer warranties on their work.
For most golf cart owners who are good with their hands and can follow instructions, a DIY golf cart lithium conversion is a rewarding project. The online community is very helpful. Many videos and forums can guide you too.
Considering the Cost: Replace Lead Acid Golf Cart Batteries with Lithium
The upfront cost to replace lead acid golf cart batteries with lithium is often higher. But it is important to look at the long-term value.
Initial Investment
- A quality golf cart lithium conversion kit, including the LiFePO4 golf cart batteries, BMS, and charger, can cost anywhere from $1,500 to $3,000+. This depends on the battery size (Ah rating) and features.
- Lead-acid batteries typically cost $600 to $1,200 for a full set.
So, the initial cost for lithium is higher.
Long-Term Savings and Value
Where lithium batteries really shine is in the long run:
- Lifespan: LiFePO4 batteries can last 8-10 years or even longer. Lead-acid batteries often need to be replaced every 3-5 years. This means you might buy 2-3 sets of lead-acid batteries for every one lithium battery.
- Maintenance: Lithium batteries need almost no maintenance. Lead-acid batteries require regular watering, cleaning, and checking. This saves time and money on supplies.
- Efficiency: Lithium batteries are more efficient at storing and delivering power. This can slightly reduce your electricity bill for charging.
- Performance: The improved speed, torque, and golf cart lithium range improvement add value to your cart. You get more out of each drive.
- Resale Value: A golf cart with a lithium battery upgrade often has higher resale value. It is seen as a modern, better-performing vehicle.
Table: Cost Comparison – Lithium vs. Lead-Acid (Estimated over 10 Years)
| Factor | Lead-Acid Batteries (e.g., 2 sets over 10 years) | LiFePO4 Lithium Battery (1 set over 10 years) | Savings with Lithium (Approx.) |
|---|---|---|---|
| Initial Battery Cost | $800 – $1,500 (per set) | $1,500 – $3,000 | |
| Replacement Cost | $800 – $1,500 (second set around year 5) | $0 (likely no replacement needed) | |
| Total Battery Cost | $1,600 – $3,000 | $1,500 – $3,000 | Up to $1,500 |
| Maintenance Costs | $100 – $200 (water, cleaning, corrosion) | $0 | $100 – $200 |
| Electricity Cost | Higher due to inefficiency | Lower due to efficiency | Small but noticeable |
| Performance Value | Decreases over time | Stays strong | High |
| Total Value | Lower | Much Higher | Significant |
While the initial investment is higher, the long-term benefits and savings often make the decision to replace lead acid golf cart batteries with lithium a wise financial choice.
Frequently Asked Questions (FAQ)
Here are some common questions about converting a golf cart to a lithium battery.
h4 Is a lithium golf cart conversion kit hard to install?
No, it is not usually very hard. Many kits are designed for DIYers. If you can follow instructions and use basic tools, you can do it. The hardest part is often just lifting the old, heavy lead-acid batteries out.
h4 How long does a golf cart lithium battery upgrade take?
Most DIY golf cart lithium conversion projects can be done in half a day to a full day. This depends on your skill level and how much preparation is needed.
h4 Do I need a new charger for my lithium golf cart battery?
Yes, absolutely. You must use a special golf cart lithium charger. Your old lead-acid charger will not work. It can damage your new lithium battery.
h4 Can I use any lithium battery for my golf cart?
No. You should use LiFePO4 golf cart batteries. These are specifically designed for golf carts. They are safe and durable for this kind of use. Make sure the voltage matches your cart (e.g., 48V lithium golf cart battery for a 48V cart).
h4 What is a BMS and why do I need it?
BMS stands for Battery Management System. It protects your battery from overcharging, over-discharging, and balances the cells. This helps your battery last longer and be safe. Most good lithium batteries come with a built-in BMS. If yours does not, you must buy one separately.
h4 Will a lithium conversion really improve my golf cart’s range?
Yes, a golf cart lithium range improvement is one of the biggest benefits. Lithium batteries are more efficient and lighter. This means your cart can go farther on a single charge. It also helps your cart maintain speed and power on hills.
h4 What happens if my golf cart lithium battery gets too cold?
LiFePO4 batteries perform well in cold. But they should not be charged below freezing (0°C or 32°F). Most BMS units will prevent charging in very cold conditions to protect the battery. If you store your cart in cold weather, keep the battery charged to about 50-70%.
h4 Will this golf cart lithium battery upgrade affect my cart’s speed?
Yes, it often increases speed slightly, especially on hills. The lighter weight of lithium batteries means less strain on the motor. The steady power output of lithium batteries also helps keep your speed up.
h4 Do I need to modify my motor or controller?
For most golf carts, no. The conversion is mainly about replacing the battery. Your existing motor and controller are usually fine with the new lithium power, as long as the voltage is the same. However, some advanced users might upgrade the controller for even more performance.
h4 How do I dispose of my old lead acid golf cart batteries?
Do not throw them in the trash. Take them to a battery recycling center. Many auto parts stores will accept old lead-acid batteries for recycling. This is important for the environment.
This ultimate guide should help you convert your golf cart to lithium. Enjoy your improved ride!