
Troubleshoot Your Cart: How To Check A Golf Cart Solenoid
Is your golf cart not moving? If your golf cart is dead, or you hear a click but it does not start, your solenoid might be the problem. Many times, a golf cart solenoid troubleshooting process will point to this key part. Testing your golf cart solenoid is a simple task you can do yourself. This guide will show you how to check a golf cart solenoid step by step. It will help you find out if a faulty solenoid is stopping your fun.
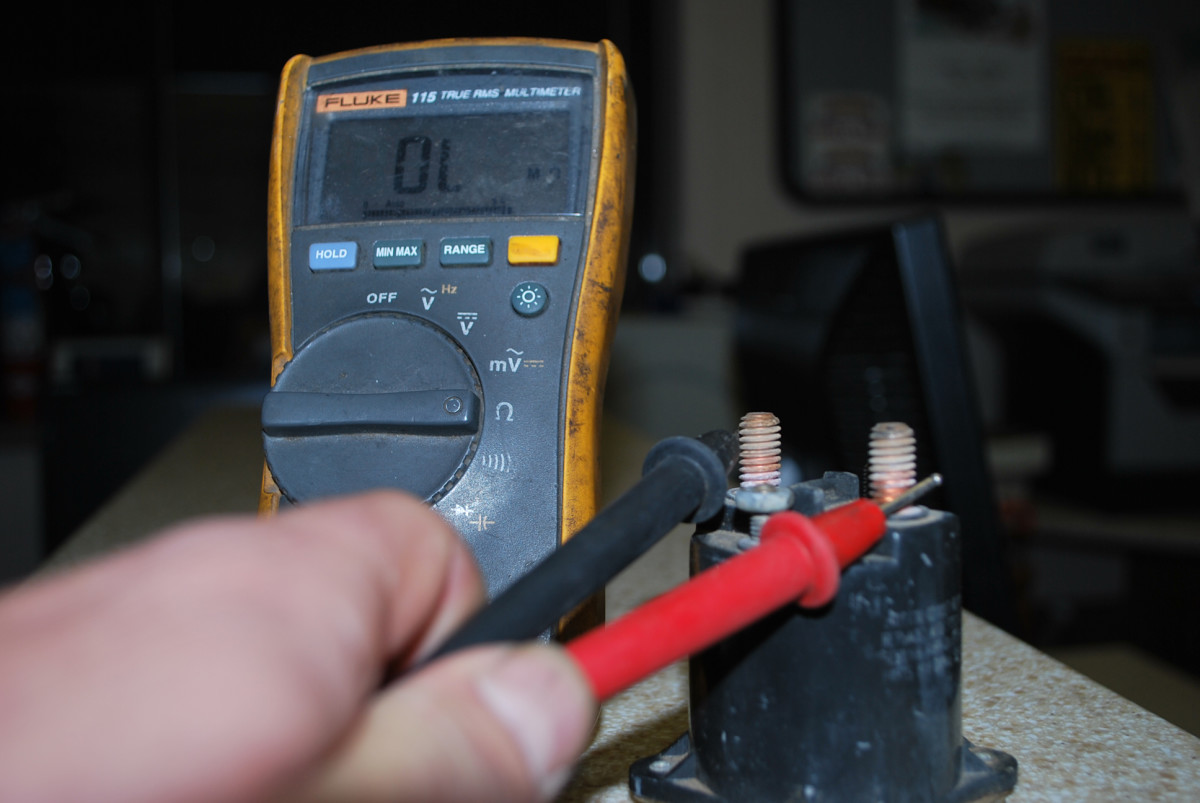
Image Source: images.saymedia-content.com
Grasping the Solenoid’s Role
What does a golf cart solenoid do? A golf cart solenoid acts like a powerful electrical switch. When you press the pedal, it sends a small electrical signal to the solenoid. The solenoid then closes a circuit. This lets a much larger flow of electricity go from your golf cart’s batteries to the motor. Think of it as a gatekeeper for power. It makes sure your golf cart only gets power when you want it to move. If this switch goes bad, power cannot reach the motor. This is why your golf cart might not move. This is a common starting point for any golf cart not moving solenoid test.
Golf carts, especially electric ones, depend on this part. The solenoid is crucial. Without it, the high-power flow needed to spin the motor stays shut off. It keeps things safe. It also makes sure your cart starts when you tell it to.
Signs of a Bad Solenoid
Knowing the symptoms of a bad golf cart solenoid is key. Your golf cart will often give you hints when this part is failing. Catching these signs early can save you frustration.
Here are common signs that your solenoid might be failing:
- No Click, No Start: This is the most direct sign. When you press the pedal, you should hear a clear “click” sound from the solenoid. If you hear nothing, the solenoid is likely not getting power or it is faulty. The golf cart will not move.
- Golf Cart Solenoid Click No Start: You hear the click, but the cart does not move. This means the solenoid coil is working, but the main contacts inside might be bad. It is clicking but not letting power through. This is a very common issue.
- Slow or Weak Start: The cart might try to move, but it is very slow. It might sputter. This can mean the solenoid is not fully sending power. Its contacts might be worn.
- Intermittent Start: Sometimes it works, sometimes it does not. This is a tricky sign. It can point to loose wires or a solenoid that is just starting to fail.
- Constant Click: If the solenoid clicks repeatedly when you press the pedal, it might not be holding its connection. This can be due to low battery power or a bad solenoid itself.
- Hot Solenoid: A solenoid that is very hot to the touch can mean it is working too hard. It might be trying to make a bad connection work. This can harm other parts too.
- No Power to Motor: This is the end result. If the solenoid is bad, power from the batteries cannot reach the motor. Your cart stays still.
These signs are important clues. They help you decide if you need to test golf cart solenoid with multimeter tools.
Getting Ready: Tools and Safety
Before you start any work, get your tools ready. Safety must always come first. Working with golf cart batteries means dealing with high power.
Tools You Will Need:
- Multimeter: This is a must-have tool. You will use it to check voltage and resistance. It helps you test golf cart solenoid with multimeter settings.
- Wrench Set or Socket Set: You will need these to remove battery cables and solenoid nuts.
- Wire Brush or Battery Terminal Cleaner: Good for cleaning dirty battery posts.
- Jumper Wires (or small, short wire): Used for a quick bypass test.
- Safety Glasses: Protect your eyes from sparks or battery acid.
- Rubber Gloves: Offer extra protection.
- Rags: For cleaning.
- Pen and Paper: To write down your test results.
Safety First:
- Disconnect Battery: Always disconnect the main negative battery cable first. This stops all power flow. It is the most important safety step.
- Wear Safety Gear: Always wear safety glasses and rubber gloves.
- No Metal Objects: Do not let metal tools touch battery terminals at the same time. This can cause severe sparks or even an explosion.
- Work in a Dry Area: Water and electricity do not mix.
- Be Aware of Voltage: Golf carts often run on 36V or 48V systems. This is enough to cause a shock. Treat it with respect.
Once you have your tools and have taken safety steps, you are ready to begin.
How To Check A Golf Cart Solenoid: Step-by-Step Testing
This section will guide you through the full golf cart solenoid troubleshooting process. We will use your multimeter for most checks. Remember to write down your readings.
Step 1: Visual Inspection
Before grabbing your multimeter, look at the solenoid.
- Location: Find the solenoid. It is usually a small, cylinder-shaped part. It has two large terminals and two small terminals. It is often near the battery pack.
- Check Connections: Look at all wires connected to the solenoid. Are they tight? Are they clean? Loose or corroded wires can stop power flow. This can seem like a bad solenoid.
- Look for Damage: Is the solenoid casing cracked? Are there signs of burning? Any visible damage often means the solenoid is bad.
If you find loose wires, tighten them. Clean any corrosion. Then, try to start the cart again. If it still does not work, move to the next steps.
Step 2: Test Voltage to the Solenoid’s Small Terminals (Control Circuit)
This test checks if the solenoid is getting the signal to activate. This is part of diagnosing golf cart solenoid problems.
- Reconnect Battery: Connect your main negative battery cable.
- Set Multimeter: Turn your multimeter to DC Volts (VDC). Set it to a range higher than your cart’s voltage (e.g., 50V or 100V for a 36V or 48V cart).
- Find Small Terminals: These are the two smaller posts on the solenoid. They usually have thinner wires. One is for the “control” signal, the other is ground.
- Connect Multimeter: Put the red (positive) lead of your multimeter on one small terminal. Put the black (negative) lead on the other small terminal.
- Activate Cart: Turn the key on. Put the cart in forward or reverse. Press the accelerator pedal fully.
- Read Voltage:
- Expected Reading: You should see a voltage reading close to your cart’s total battery voltage (e.g., 36V or 48V).
- What it Means:
- Voltage Present: If you get the correct voltage, the control circuit (key switch, F&R switch, pedal switch) is working. The solenoid is getting the signal.
- No Voltage (or very low): This means the solenoid is not getting the signal. The problem is before the solenoid. Check your key switch, F&R switch, and pedal switch. Your solenoid might be good.
Step 3: Listen for the “Click” (Activation Test)
This is a simple but important test. It tells you if the solenoid’s coil is working.
- Ready to Listen: Make sure your cart is in a quiet area.
- Activate Cart: Turn the key on, select forward/reverse, and press the accelerator pedal.
- Listen:
- Clear “Click”: If you hear a loud, clear click, the solenoid’s coil is likely working. The problem might be with the main contacts inside. This is where “golf cart solenoid click no start” issues come from.
- No Click: If you hear no click, or a very weak click, the solenoid coil might be bad. Or, it is not getting enough power to its small terminals (refer to Step 2).
- Rapid Clicking: This can mean low battery voltage or a bad solenoid.
Step 4: Test Voltage Across the Solenoid’s Large Terminals (Main Power Circuit)
This is a crucial test for the main contacts. It shows if power is flowing through the solenoid. This is a key part of the continuity test golf cart solenoid check.
- Keep Battery Connected: The main negative battery cable should still be connected.
- Set Multimeter: Keep your multimeter on DC Volts.
- Locate Large Terminals: These are the two big posts on the solenoid. One connects to the main battery positive. The other connects to the motor or controller.
- Initial Reading (Before Activation):
- Place the red lead on one large terminal and the black lead on the other.
- Expected Reading: You should see a voltage reading close to your cart’s total battery voltage (e.g., 36V or 48V). This means power is reaching the solenoid from the battery.
- Activated Reading (During Activation):
- Keep the multimeter leads on the large terminals.
- Turn the key on, select F/R, and press the accelerator pedal fully.
- Expected Reading: The voltage should drop to near zero (0-2 Volts).
- What it Means:
- Voltage Drops to Near Zero: This is good! It means the solenoid closed its internal switch. Power is flowing through it. If the cart still does not move, the problem is after the solenoid (e.g., motor, controller).
- Voltage Stays High (e.g., 36V or 48V): This means the solenoid is not closing the circuit. Even if it clicks, it is not letting power through. The solenoid is bad and needs replacing. This is often the case with a “golf cart solenoid click no start” issue.
Step 5: Solenoid Resistance Check Golf Cart (Coil Resistance Test)
This test checks the health of the solenoid’s internal coil. This is a specific test for the “golf cart solenoid troubleshooting” process.
- Disconnect Solenoid: IMPORTANT: Disconnect all four wires from the solenoid terminals. You want to test the solenoid by itself.
- Set Multimeter: Turn your multimeter to Ohms (Ω). Choose a low range, like 200Ω or 2kΩ.
- Test Small Terminals: Place one multimeter lead on each of the small terminals.
- Read Resistance:
- Expected Reading: The resistance should be in the range of 100-200 Ohms. The exact value varies by solenoid model. You can often find this in your cart’s service manual.
- What it Means:
- Within Range: The coil is likely good.
- Zero Ohms (0Ω): This means the coil is shorted. It is bad.
- “OL” or Infinite Resistance (no reading): This means the coil is open (broken). It is bad.
Table 1: Solenoid Test Result Summary
| Test Step | Location on Solenoid | Multimeter Setting | Condition of Cart | Expected Reading | What it Means “`
Table 2: Potential Solenoid Test Results and What They Mean
| Test Step | Golf Cart Not Moving Golf cart solenoid troubleshooting is crucial for anyone relying on these powerful electric vehicles, which can suffer from symptoms of a bad golf cart solenoid, causing the click of the golf cart solenoid no start issue, necessitating specific diagnostic checks like the continuity test golf cart solenoid, a solenoid resistance check golf cart, and a full golf cart not moving solenoid test.
A golf cart solenoid is a basic part of an electric golf cart’s power system. It works like a main switch. When you press the gas pedal, a small electrical signal goes to the solenoid. This tells the solenoid to close a big circuit. This lets a large amount of power from the batteries go to the motor. If this part fails, the cart will not move. It is often the first thing people check when a golf cart does not start.
Figuring Out Solenoid Failures
Knowing the signs of a bad golf cart solenoid is the first step in fixing your cart. These signs often tell you if the solenoid is going bad.
Common signs that your solenoid might be faulty:
- No Click, No Start: This is a clear sign. When you push the pedal, you should hear a strong “click” sound from the solenoid. If you hear nothing, the solenoid is probably not getting power or it is broken. Your cart will not move.
- Golf Cart Solenoid Click No Start: You hear the click, but the cart stays still. This means the solenoid’s small part (the coil) is working. But the main inside parts (contacts) are worn out. They click but do not let power through. This is a very common problem.
- Slow or Weak Start: The cart might try to move slowly. It might act weak. This can mean the solenoid is not sending full power. Its contacts might be old.
- Starts Some Times, Not Others: This is tricky. It could mean loose wires. Or it could be a solenoid that is just starting to fail.
- Constant Clicking: If the solenoid clicks many times when you press the pedal, it might not be holding its connection. This can happen if the batteries are low. It can also mean a bad solenoid.
- Hot Solenoid: A solenoid that feels very hot when you touch it might be working too hard. It tries to fix a bad connection. This can also harm other parts.
- No Power to Motor: This is the final problem. If the solenoid is bad, power from the batteries cannot get to the motor. Your cart will not move.
These signs are helpful clues. They guide you to test golf cart solenoid with multimeter tools. They help you start your golf cart solenoid troubleshooting.
Getting Ready: Tools and Safety Steps
Before you start any work, get your tools. Safety is most important. Working with golf cart batteries means dealing with strong electricity.
Tools You Will Need:
- Multimeter: This tool is a must-have. You will use it to check power (voltage) and resistance. It helps you test golf cart solenoid with multimeter settings.
- Wrenches or Socket Set: You need these to take off battery wires and solenoid nuts.
- Wire Brush or Battery Cleaner: Good for cleaning dirty battery posts.
- Jumper Wires (or a short, thick wire): Used for a quick test to bypass golf cart solenoid.
- Safety Glasses: Wear these to keep your eyes safe from sparks or battery acid.
- Rubber Gloves: They give you more protection.
- Rags: For cleaning.
- Pen and Paper: Write down your test results. This helps you diagnose golf cart solenoid problems.
Safety Is Always First:
- Disconnect Battery: Always take off the main negative battery cable first. This stops all power. It is the most important safety step.
- Wear Safety Gear: Always wear your safety glasses and rubber gloves.
- No Metal Objects: Do not let metal tools touch battery ends at the same time. This can cause big sparks. It could even cause a battery explosion.
- Work in a Dry Place: Water and electricity are dangerous together.
- Be Careful with Voltage: Golf carts use 36V or 48V power. This is enough to hurt you. Be careful with it.
Once you have your tools and have taken safety steps, you can start.
Steps to Check a Golf Cart Solenoid
This guide will show you how to check a golf cart solenoid. We will use your multimeter for most checks. Always write down what you find. This helps with golf cart solenoid troubleshooting.
Step 1: Look at the Solenoid (Visual Check)
Before using your multimeter, just look at the solenoid.
- Where It Is: Find the solenoid. It looks like a small, round or tube-shaped part. It has two big posts and two small posts. It is often close to the battery pack.
- Check Wires: Look at all the wires connected to the solenoid. Are they tight? Are they clean? Loose or rusty wires can stop power. This might look like a bad solenoid.
- Check for Damage: Is the solenoid broken or cracked? Are there signs of burning? Any damage you can see often means the solenoid is bad.
If wires are loose, tighten them. Clean any rust. Then, try to start the cart. If it still does not work, go to the next steps.
Step 2: Test Power to the Solenoid’s Small Terminals (Control Circuit)
This test checks if the solenoid is getting the signal to turn on. This helps diagnose golf cart solenoid problems.
- Connect Battery: Put your main negative battery cable back on.
- Set Multimeter: Turn your multimeter to DC Volts (VDC). Set it to a number higher than your cart’s voltage. For example, use 50V or 100V for a 36V or 48V cart.
- Find Small Terminals: These are the two smaller posts on the solenoid. They usually have thinner wires. One is for the “on” signal. The other is for ground.
- Connect Multimeter: Put the red (positive) wire of your multimeter on one small terminal. Put the black (negative) wire on the other small terminal.
- Turn Cart On: Turn the key on. Put the cart in forward or reverse. Push the gas pedal all the way down.
- Read the Power:
- What you should see: You should see a reading close to your cart’s total battery voltage. For example, 36V or 48V.
- What this means:
- Power is There: If you get the right voltage, the “on” system (key switch, direction switch, pedal switch) is working. The solenoid is getting the signal.
- No Power (or very low): This means the solenoid is not getting the signal. The problem is before the solenoid. Check your key switch, forward/reverse switch, and pedal switch. Your solenoid might be fine.
Step 3: Listen for the “Click” (Activation Test)
This test is simple but important. It tells you if the solenoid’s coil is working.
- Be Quiet: Make sure your cart is in a quiet place.
- Turn Cart On: Turn the key on. Put the cart in forward or reverse. Push the gas pedal.
- Listen:
- Loud “Click”: If you hear a clear, loud click, the solenoid’s coil is likely working. The problem might be with the main contacts inside. This is often why you get “golf cart solenoid click no start” issues.
- No Click: If you hear no click, or a weak click, the solenoid coil might be bad. Or, it is not getting enough power to its small terminals (look back at Step 2).
- Fast Clicking: This can mean low battery power. It can also mean a bad solenoid.
Step 4: Test Power Across the Solenoid’s Big Terminals (Main Power)
This is a very important test for the main parts inside the solenoid. It shows if power is flowing through the solenoid. This is a key part of the continuity test golf cart solenoid check.
- Keep Battery Connected: The main negative battery cable should still be connected.
- Set Multimeter: Keep your multimeter on DC Volts.
- Find Big Terminals: These are the two large posts on the solenoid. One connects to the main battery positive. The other connects to the motor or controller.
- First Reading (Before Solenoid Turns On):
- Put the red lead on one big terminal and the black lead on the other.
- What you should see: You should see a reading close to your cart’s total battery voltage. For example, 36V or 48V. This means power is reaching the solenoid from the battery.
- Second Reading (While Solenoid Is On):
- Keep the multimeter leads on the big terminals.
- Turn the key on, put the cart in F/R, and push the gas pedal all the way down.
- What you should see: The voltage should drop to almost zero (0-2 Volts).
- What this means:
- Power Drops to Near Zero: This is good! It means the solenoid has closed its inside switch. Power is flowing through it. If the cart still does not move, the problem is after the solenoid (like the motor or controller).
- Power Stays High (e.g., 36V or 48V): This means the solenoid is not closing the circuit. Even if it clicks, it is not letting power through. The solenoid is bad. It needs to be replaced. This is often the cause of a “golf cart solenoid click no start” problem.
Step 5: Solenoid Resistance Check Golf Cart (Coil Resistance Test)
This test checks how healthy the solenoid’s inside coil is. This is a specific test for the golf cart solenoid troubleshooting process.
- Disconnect Solenoid: IMPORTANT: Take off all four wires from the solenoid posts. You want to test the solenoid by itself.
- Set Multimeter: Turn your multimeter to Ohms (Ω). Pick a low range, like 200Ω or 2kΩ.
- Test Small Terminals: Put one multimeter lead on each of the small terminals.
- Read Resistance:
- What you should see: The resistance should be between 100 and 200 Ohms. The exact number can change based on the solenoid. You can often find this number in your cart’s book.
- What this means:
- Within Range: The coil is likely good.
- Zero Ohms (0Ω): This means the coil has a short circuit. It is bad.
- “OL” or No Reading: This means the coil is broken (open circuit). It is bad.
Table 1: Quick Solenoid Test Results
| Test Step | What to Check | Multimeter Setting | Result If Good | Result If Bad |
|---|---|---|---|---|
| Visual Check | Overall | N/A | No visible corrosion or damage | Bad connections, burn marks |
| Small Terminal Voltage | Small terminals | VDC | Same as cart voltage | Below cart voltage or 0V |
| Big Terminal Voltage (No Ped.) | Large terminals | VDC | Same as cart voltage | Below cart voltage or 0V |
| Big Terminal Voltage (Pedal Down) | Large terminals | VDC | Close to 0V | High voltage (e.g., 36V/48V) |
| Coil Resistance | Small terminals (unwired) | Ohms (Ω) | 100-200Ω | 0Ω or “OL” |
Bypassing the Solenoid for Diagnosis
WARNING: This is a diagnostic step only. It can be dangerous. Do not drive the cart with the solenoid bypassed. Use only for a very quick test.
You can bypass golf cart solenoid if you want to be sure it is the problem. This means you will give power to the motor directly. This skips the solenoid.
- Disconnect Main Battery: Unhook the main negative battery cable first.
- Get a Jumper Wire: Use a heavy-duty jumper wire. Make sure it can handle high power. Using thin wires can cause fires.
- Connect the Big Terminals: Put one end of the jumper wire on one of the large terminals of the solenoid. Put the other end on the other large terminal. This connects the battery power directly to the motor.
- Reconnect Main Battery: Hook up the main negative battery cable again.
- Test (Briefly!): Try to push the accelerator pedal.
- Cart Moves: If the cart moves, the solenoid is bad. It means everything else (motor, controller, batteries) is working.
- Cart Still Doesn’t Move: If the cart does not move, the problem is not the solenoid. Unhook the battery right away. Then remove the jumper wire.
Again, be very careful with this step. Only use it for a quick test. It is not a way to fix the cart.
When the Solenoid Is Bad: Next Steps
If your tests show that the solenoid is bad, you need to replace it. Electric golf cart solenoid repair usually means getting a new one. Solenoids are not really made to be repaired inside.
Replacing the Solenoid:
- Safety First: Disconnect the main negative battery cable.
- Take Pictures: Take photos of how all wires are connected. This helps when you put the new one in.
- Unscrew Wires: Use your wrench to take off the nuts and wires from all four terminals. Keep track of which wire goes where.
- Remove Solenoid: Take off the old solenoid from its mount.
- Install New Solenoid: Put the new solenoid in place.
- Connect Wires: Connect the wires to the new solenoid. Use your pictures to make sure they go to the right posts. Make sure all connections are tight and clean.
- Reconnect Battery: Hook up the main negative battery cable.
- Test Cart: Try to start your golf cart. It should now work!
Other Issues That Look Like a Bad Solenoid
Sometimes, your golf cart might not start, and it seems like the solenoid. But other parts can cause similar problems. Knowing these can help you diagnose golf cart solenoid problems correctly.
- Weak or Dead Batteries: If your batteries are low on power, the solenoid might click weakly or not at all. It might not get enough power to close its main contacts. Always check your battery charge first. This is a common cause for a golf cart not moving solenoid test to seem like a failure.
- Corroded Battery Cables/Terminals: Dirty or rusty battery connections can stop power. Clean all battery posts and cable ends.
- Faulty Key Switch: The key switch sends the first signal to the solenoid. If it is bad, the solenoid will not get the signal to click.
- Bad Forward/Reverse Switch: Similar to the key switch, if this switch does not work, the solenoid might not get the signal.
- Accelerator (Pedal) Switch: This switch is under the pedal. It tells the solenoid to turn on when you press the pedal. If it is bad, the solenoid will not click.
- Controller Issues: The controller is the “brain” of an electric golf cart. If it is bad, it might not send the signal to the solenoid. Or it might not handle the power after the solenoid.
- Motor Problems: If the motor itself is bad, the cart will not move even if the solenoid is working. You might hear the solenoid click, but no movement.
- Charger Problems: A charger that is not working right can lead to undercharged batteries. This, in turn, can look like a solenoid problem.
Always check these other parts if the solenoid tests good.
Keeping Your Solenoid Healthy
A little care can help your solenoid last longer.
- Keep Connections Clean: Check battery terminals and solenoid connections often. Keep them clean and tight. Use a wire brush.
- Charge Batteries Well: Make sure your batteries are always fully charged. Low power makes the solenoid work harder. This can make it fail sooner.
- Avoid Overloading: Do not carry too much weight in your cart. Do not drive it too hard up hills. This puts extra strain on all electrical parts, including the solenoid.
- Regular Checks: From time to time, just look at your solenoid. Make sure it is not getting too hot. Make sure wires are secure.
By following these tips, you can help avoid common golf cart solenoid troubleshooting issues.
Final Thoughts on Solenoid Checks
Checking your golf cart solenoid is a basic task. It helps keep your cart running well. By using a multimeter and following these steps, you can find out if your solenoid is faulty. This saves you time and money. Remember to always work safely. If you find your solenoid is bad, replacing it is often the best fix. With a little care, your golf cart will be ready for the course again.
Frequently Asked Questions (FAQ)
Q1: My golf cart solenoid clicks but won’t start. What does that mean?
A1: This usually means the solenoid’s coil is working (making the click). But the main electrical contacts inside are not letting power through. The solenoid is getting the signal, but it cannot complete the circuit to the motor. You will likely need to replace the solenoid.
Q2: Can I just bypass golf cart solenoid permanently?
A2: No, you should not bypass the solenoid permanently. The solenoid is a safety switch. It controls the high current to the motor. Bypassing it can be very dangerous. It can lead to fires or damage to the motor or controller. Only bypass it for a very quick diagnostic test.
Q3: How do I test golf cart solenoid with multimeter for beginners?
A3: Start by setting your multimeter to DC Volts. Test the small terminals while pressing the pedal (should show battery voltage). Then, test the large terminals. With the pedal up, you should see battery voltage. With the pedal down, it should drop to near zero if the solenoid is good.
Q4: What are the main symptoms of a bad golf cart solenoid?
A4: The most common signs are: no click when you press the pedal, a click but no movement (golf cart solenoid click no start), or a very weak or slow start. Sometimes, the solenoid might also feel very hot to the touch.
Q5: What should a solenoid resistance check golf cart show on the multimeter?
A5: When testing the resistance of the solenoid’s small terminals (coil) with all wires disconnected, your multimeter should read between 100 and 200 Ohms. If it reads 0 Ohms or “OL” (Open Line/Infinite), the coil is bad.
Q6: What is a continuity test golf cart solenoid?
A6: A continuity test for a solenoid is usually done by checking the voltage drop across its large terminals. When the solenoid activates (clicks), power should flow through it. The voltage reading across the large terminals should drop to near zero. If it stays high, the solenoid is not letting power through.
Q7: How do I diagnose golf cart solenoid problems if my cart is not moving?
A7: First, check battery charge. Then, visually inspect the solenoid wires. Next, use a multimeter to check for power at the small terminals (control circuit) when the pedal is pressed. Then, check the voltage across the large terminals with the pedal pressed. If the voltage across the large terminals does not drop to near zero, the solenoid is likely bad. If it does drop, the problem is elsewhere. This covers the golf cart not moving solenoid test.
Q8: Is electric golf cart solenoid repair possible, or do I always replace it?
A8: In most cases, you replace a bad golf cart solenoid. They are sealed units. It is not common to open them up and repair the internal parts. Replacing it is usually the most reliable and safest option.