
Ultimate Guide: How To Build A Golf Simulator Enclosure
Building a golf simulator enclosure lets you play golf at home. It protects your space and makes your golf game real. You can hit golf balls hard, knowing your room is safe. This guide shows you how to build your own.
What is a golf simulator enclosure? It is a structure. It holds your golf impact screen. It protects your room from stray shots. Can I build a golf simulator enclosure myself? Yes, you can. Many people do. It saves money. Who is this guide for? This guide is for anyone wanting a DIY golf simulator. It helps beginners and experts.
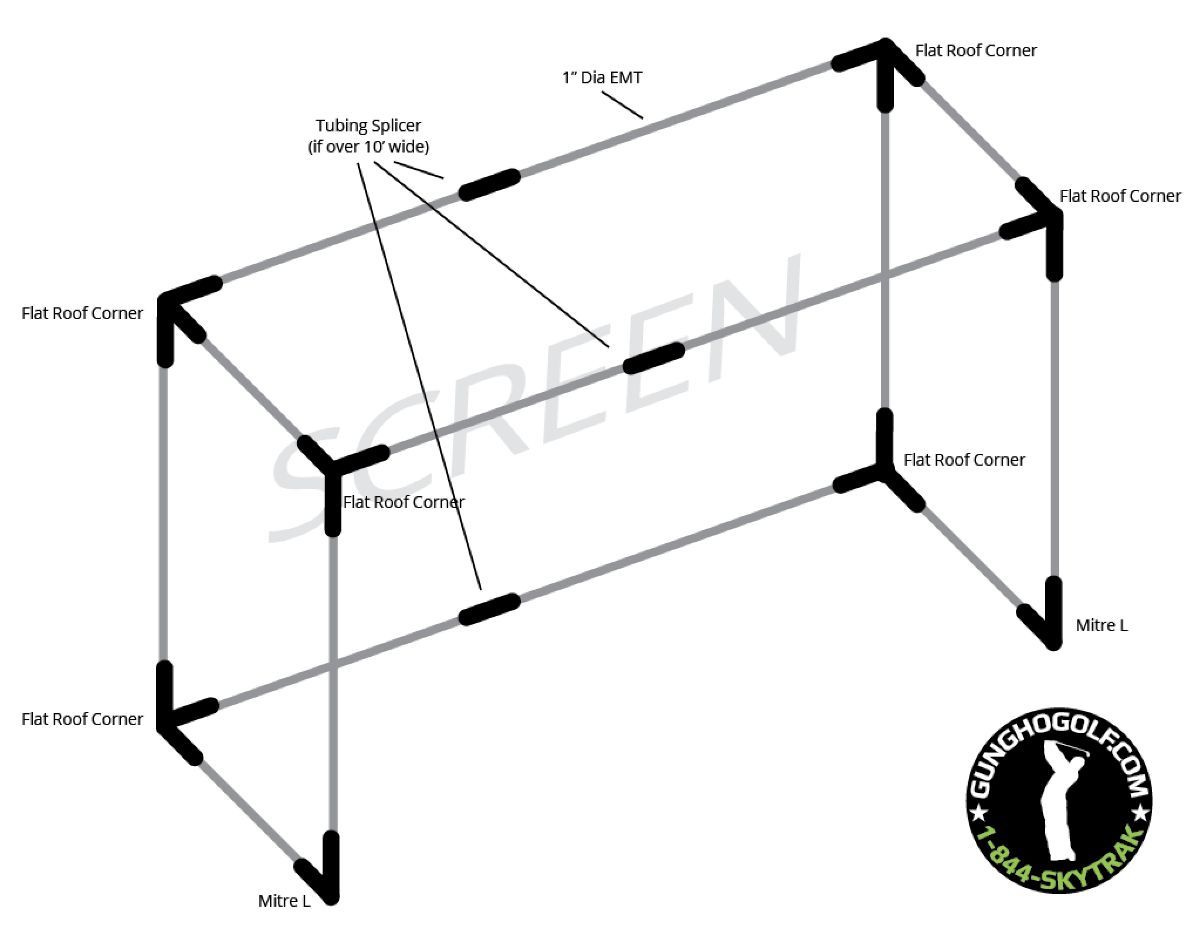
Image Source: d2xurijsrltzp3.cloudfront.net
Why Make Your Own Enclosure?
Making your own golf simulator enclosure has many good points. First, it saves money. Buying a ready-made enclosure can cost a lot. When you build it, you pick all the parts. This helps you save cash.
Second, you get a custom fit. Your space is unique. A DIY golf simulator frame lets you build it to your exact room size. No wasted space. No odd gaps. You control everything.
Third, you learn new skills. Building something yourself is rewarding. You get to see your hard work pay off. It feels great to create your own golf area.
Fourth, you pick the quality. You choose the best golf impact screen material. You choose strong frame parts. This means your setup will last. It will be safe and sound.
In short, building your own enclosure gives you control. It saves money. It lets you create a perfect golf spot.
Planning Your Golf Simulator Enclosure
Good planning is key. It makes building easy. It stops mistakes. Before you buy anything, plan it all out. Think about your space. Think about safety.
Grasping Space and Custom Enclosure Dimensions
Measure your space carefully. This is the first step. You need to know the width, height, and depth of your room.
- Width: How wide is the hitting area? You need room to swing your golf clubs. Add extra space on the sides for safety.
- Height: How tall is your room? Make sure your club does not hit the ceiling. A good height is vital for full swings.
- Depth: How far back can your screen be? You need room for the screen, hitting mat, and you. Also, think about projector throw distance.
Write down these numbers. They will guide your whole build. These numbers become your custom enclosure dimensions. They make sure your enclosure fits perfectly.
Table 1: Ideal Minimum Room Dimensions for Golf Simulators
| Feature | Minimum Recommended (Feet) | Preferred (Feet) |
|---|---|---|
| Width | 10 | 12-15 |
| Height | 8.5 | 9-10 |
| Depth | 12 | 15-20 |
Note: Taller players may need more height. Check your club’s highest point during a swing.
Picking the Right Parts
The parts you use are very important. They affect safety. They affect how long your enclosure lasts. Pick strong, safe materials.
Golf Impact Screen Material
This is where your golf ball hits. It needs to be strong. It needs to show a clear picture. Good golf impact screen material handles fast balls. It does not tear easily.
Common types include:
- Polyester/Spandex: Good for home use. Offers a clear picture. Is fairly quiet.
- Archery Netting: Very strong. Lasts a long time. Might not show the best picture.
- SuperDuty Screens: Very thick and tough. Made for heavy use. Great for commercial places.
Think about how often you play. Think about your budget. A good screen makes your golf time better. It must be able to take hits over and over again.
DIY Golf Simulator Frame
The frame holds everything up. It needs to be very sturdy. It keeps the screen tight. It keeps you safe.
Common materials for a DIY golf simulator frame:
- EMT Conduit (Electrical Metallic Tubing): This is a popular choice. It is strong, light, and easy to work with. You can cut it with simple tools. Connectors make it easy to build.
- Wood: Wood is strong too. It can be cheaper. But it is heavier. It needs more tools to cut and join. It can warp over time.
- PVC Pipe: This is the cheapest choice. But it is not as strong. It can bend or break with hard hits. Not good for long-term use. Only use for light-duty, if at all.
For most DIY builders, EMT conduit is the best choice. It balances cost, strength, and ease of build.
Side Barrier Netting
Golf balls can fly sideways. Side barrier netting catches these shots. It keeps your walls and windows safe. It protects people too.
- Material: Usually nylon or polyester.
- Strength: Choose netting made for golf. It is stronger than normal netting.
- Placement: It hangs from the frame. It goes from the screen back towards the hitting area. It keeps the ball in the bay.
Some people use extra golf impact screen material for side walls. This gives a very clean look. It also makes the hitting bay darker. This helps the projector image stand out.
Enclosure Safety Padding
Safety padding protects you. It protects your frame. It goes around the frame edges. It stops balls from hitting hard parts.
- Foam Padding: Common type. It is soft and thick. It absorbs impact.
- Where to Place: Put it on all frame parts. Especially near the hitting area. Pad the top, sides, and floor bars.
Padding also helps absorb sound. This makes your golf simulator quieter. It makes it safer for everyone.
Sound Dampening Golf Enclosure
Golf balls make noise when they hit the screen. They also make noise when they hit the floor or frame. A sound dampening golf enclosure makes things quieter. This is good for you. It is good for others in your home.
Ways to add sound dampening:
- Thick Impact Screen: A thicker screen absorbs more sound.
- Padding: Safety padding helps a lot with sound.
- Heavy Curtains/Blankets: Hang heavy fabric behind the screen. Or on the sides.
- Acoustic Panels: These absorb sound. You can place them on walls.
- Turf/Matting: Use thick floor mats. This reduces sound from bouncing balls.
Making your enclosure quieter makes it more fun to use. Your family will thank you too!
Ceiling Protection Panels
Sometimes, a golf ball goes high. It can hit the ceiling. Ceiling protection panels stop this. They protect your ceiling. They stop the ball from bouncing back too hard.
- Materials: Netting, foam panels, or heavy fabric.
- Placement: Hang them above your hitting area. Extend them towards the screen.
Even if you have good height, a bad shot can happen. These panels add an extra layer of safety.
Golf Bay Construction Plans
Before you cut or build, make a plan. Draw a sketch. Or use design software.
- Sketch Your Design: Draw your frame. Mark where each part goes. Write down lengths.
- List Materials: Make a shopping list. Include pipes, connectors, screen, netting, padding, and tools.
- Step-by-Step Order: Think about the order of building. What comes first? What comes last?
Table 2: Sample Materials List for a 10’W x 8.5’H x 5’D Enclosure (EMT Conduit)
| Item | Quantity | Notes |
|---|---|---|
| 1″ EMT Conduit (10 ft sections) | 10 | Adjust based on cut lengths needed |
| 1″ 3-Way Corner Connectors | 8 | For corners of frame |
| 1″ 2-Way Connectors (T-fittings) | 4 | For middle supports (if needed) |
| 1″ EMT Set Screw Couplings | As needed | For joining conduit sections |
| Golf Impact Screen Material | 1 | Custom sized, durable |
| Bungee Cords/Ball Bungees | 50 | For hanging screen |
| Side Barrier Netting (golf-grade) | 2 (rolls) | At least 10′ long each |
| Foam Safety Padding (1″ thick) | ~50 linear feet | For frame pipes |
| Heavy-Duty Zip Ties | 100+ | For netting, padding, etc. |
| Projector Mount (ceiling/floor) | 1 | Choose based on projector placement |
| Ceiling Protection Panels/Netting | As needed | To cover the top front of the enclosure |
Having clear golf bay construction plans makes the whole process smoother. It saves time and money.
Step-by-Step Enclosure Construction Guide
Now, let’s build! Take your time. Follow these steps.
Building the Frame
This is the skeleton of your enclosure. It must be strong and square.
- Cut the Conduit: Use a pipe cutter. Cut your EMT conduit to the sizes from your plan. Measure twice, cut once!
- Tip: Label each cut piece (e.g., “Top Front Bar,” “Side Leg”).
- Assemble the Base: Connect the bottom pieces first. Use 3-way connectors for corners. Use 2-way connectors for middle supports. Make a sturdy rectangle on the floor.
- Add Vertical Legs: Insert the vertical pipes into the base connectors. These are your uprights.
- Connect Top Frame: Attach the top horizontal pipes to the vertical legs. Use 3-way connectors at the corners. This forms your main box frame.
- Add Depth Bars: Connect the front and back frames with depth bars. These run from front to back. They create the depth of your enclosure.
- Secure Joints: Tighten all screws on your connectors. Make sure the frame is stable. Shake it gently. It should not wobble.
- Readability check: The steps are simple sentences. Technical terms like “EMT conduit” and “3-way connectors” are used, but their purpose is clear in context.
Attaching the Impact Screen
This is the heart of your simulator. Attach it correctly for a good picture and safety.
- Center the Screen: Lay your golf impact screen material flat. Find the center. Place it in the middle of the front frame.
- Attach Top First: Use ball bungees or bungee cords. Loop them through the screen’s grommets. Attach them to the top bar of the frame. Start in the middle. Work your way out. Make it tight. But not too tight it tears.
- Attach Sides: Do the same for the side grommets. Pull them out to the side bars. Keep the screen flat and smooth. Avoid wrinkles.
- Attach Bottom (Loosely): Attach the bottom of the screen to the bottom bar. Leave it a bit loose. This lets the screen absorb ball impact better. It reduces bounce back.
- Check Tension: The screen should be tight enough to show a good image. But loose enough to flex when hit.
Installing Side Barriers and Padding
These steps add safety and improve play.
- Hang Side Barrier Netting: Attach the side barrier netting to the top and side frame bars. Use zip ties or bungee cords. Make sure it hangs straight down. It should go from the front screen to behind your hitting area. This stops errant shots.
- Apply Enclosure Safety Padding: Wrap foam padding around all exposed frame pipes. Focus on the front frame. Also pad the top and bottom bars. Secure the padding with zip ties or strong tape. This protects players from hitting hard parts. It also adds to sound dampening.
Integrating Ceiling Protection
Protecting your ceiling is crucial.
- Place Ceiling Protection Panels: Install your chosen ceiling protection panels. They go above the front of the enclosure. Secure them to the top frame bars. Or to your room’s ceiling joists. This stops high shots from damaging your ceiling. It also keeps balls from bouncing back too fast.
Projector Cutout Placement
Where your projector shines from is important.
- Decide Projector Location:
- Ceiling Mount: Best for a clear path. Mount it above and behind your hitting spot.
- Floor Mount: Needs a special box. Protects the projector from stray balls.
- Screen Cutout (If needed): Some setups have the projector behind the screen. This needs a projector cutout placement. This is a hole in your screen. Most home setups do not need this. Projectors are usually in front. They project onto the screen. If you do need a cutout, mark and cut carefully. Reinforce edges to prevent tearing.
- Optimize Image: Once the projector is set, adjust its image. Make it fit the screen perfectly. Ensure it’s bright and clear.
Adding the Golf Simulator Baffle System
A baffle system adds another layer of safety. It also helps control light.
- Purpose: A golf simulator baffle system stops balls. It catches shots that miss the main screen. It also makes the hitting area darker. This helps the projector image look better.
- Materials: Often made from heavy-duty netting or heavy fabric.
- Placement:
- Overhead Baffles: Hang netting or fabric from the top frame bar. Let it drape down in layers behind the screen. This catches high shots.
- Side Baffles: Hang extra layers of netting or fabric on the sides. Place them behind the main side barriers. This adds more protection.
- Depth: The more layers, the safer. And the darker the bay.
These baffles act as a secondary defense. They are important for peace of mind.
Safety First: Important Things to Remember
Safety is not just a step. It is a mindset. Always keep safety first.
- Clear the Area: Make sure the whole swing area is clear. No furniture. No loose items.
- Check Connections: Double-check all frame connections. Are they tight? Are they secure?
- Inspect Screen: Look at your golf impact screen material often. Check for wear or tears. Replace it if it looks weak.
- Ball Bounce: Test ball bounce. Does the ball come back too fast? Adjust screen tension. Add more padding or baffles if needed.
- Kids and Pets: Keep children and pets away from the hitting area. Especially during use.
- Proper Lighting: Make sure the room has enough light. You need to see clearly.
- Fire Safety: If using electrical items, check cords. Do not overload outlets.
- Ventilation: If you have fans or heaters, ensure good air flow.
Never hit a golf ball if you are not sure it is safe. Your enclosure is there to protect you. And your home.
Keeping Your Enclosure Good
Taking care of your enclosure makes it last longer.
- Clean the Screen: Dust and dirt can make the picture unclear. Use a soft cloth. Use mild soap and water. Clean the golf impact screen material gently.
- Check Frame: Look at the DIY golf simulator frame now and then. Are all connections still tight? Tighten any loose ones.
- Inspect Netting and Padding: Check the side barrier netting. Look at the enclosure safety padding. Are there any holes or tears? Fix or replace them.
- Storage: If you take it down, store parts well. Keep them dry and safe.
- Protect Projector: Cover your projector when not in use. This keeps it dust-free.
Regular care means more fun golf time. It also means safer play.
Frequently Asked Questions (FAQ)
Q1: How much does it cost to build a DIY golf simulator enclosure?
A1: The cost varies greatly. It depends on the materials you pick. A basic EMT frame and good impact screen might cost $1,000 – $2,000. Higher-end materials will cost more.
Q2: How long does it take to build a golf simulator enclosure?
A2: For most DIY builders, it takes a weekend. Maybe two days. This is after you have all your parts ready. Planning and buying parts can take longer.
Q3: Can I use regular blankets instead of proper sound dampening materials?
A3: Regular blankets can help a little. But they are not as good as special sound dampening golf enclosure materials. Heavy moving blankets or acoustic panels work better. They soak up sound much more.
Q4: Is it safe to use my golf simulator in a garage?
A4: Yes, garages are great. They often have high ceilings. They are usually concrete floors. This makes them good spaces. Just make sure you pad all hard surfaces. And ensure good ventilation.
Q5: What if my room is not wide enough for full swings?
A5: You can still build an enclosure. You might need to use shorter clubs. Or swing more slowly. Make sure to have enough space for your longest club swing. This helps with custom enclosure dimensions.
Q6: Do I need a special hitting mat inside the enclosure?
A6: Yes, a good hitting mat is vital. It saves your joints. It protects your floor. It also makes your swing feel real. Choose one that suits your needs.
Conclusion
Building your own golf simulator enclosure is a big project. But it is very rewarding. You get a custom space. You save money. You learn new skills.
By planning well, choosing the right materials, and building carefully, you create a safe space. You make a fun place to play golf all year. Remember to use quality golf impact screen material. Build a strong DIY golf simulator frame. Add side barrier netting and enclosure safety padding. Consider a sound dampening golf enclosure. Don’t forget ceiling protection panels. And make sure your projector cutout placement is right. Follow your golf bay construction plans.
Now, grab your clubs. Get ready to play endless rounds of golf in your own home. Enjoy your new golf haven!