
Simple Steps: How To Align Golf Cart For Optimal Ride
A golf cart that pulls to one side, has uneven tire wear, or a steering wheel that isn’t straight needs an alignment. You can often do a basic golf cart alignment at home. This guide will show you how to check and adjust your golf cart’s wheels. We will cover key terms like golf cart toe-in toe-out, how to adjust golf cart tie rods, and offer tips for a golf cart crooked steering wheel fix. Proper golf cart wheel alignment helps your ride feel smooth. It also saves your tires from wearing out too fast. Let’s make your golf cart ride better.
A golf cart is more than just a way to get around the course. It’s a fun ride for many places. Think of neighborhoods, farms, or big properties. A smooth ride makes a big difference. When your golf cart does not drive straight, it feels off. It can also cause problems with your tires. Your tires might wear out quickly. This costs you money and time. This is where golf cart alignment comes in. It helps your cart drive straight. It makes the ride much better.
Proper golf cart front end alignment is very important. It keeps your cart moving correctly. It also saves your tires. A golf cart’s front wheels should point straight ahead. If they do not, it affects how the cart drives. It also affects how long your tires last. A bad alignment can make your tires wear on one side. This means you buy new tires sooner. It can also make steering harder. Your cart might pull to one side. This makes driving less safe and fun.
Comprehending Alignment: Key Terms
Before you start any DIY golf cart alignment, you need to know some key words. These words describe how your wheels sit. They explain how wheels point. Knowing these helps you fix your cart right. Let’s look at the main ones: Toe, Camber, and Caster.
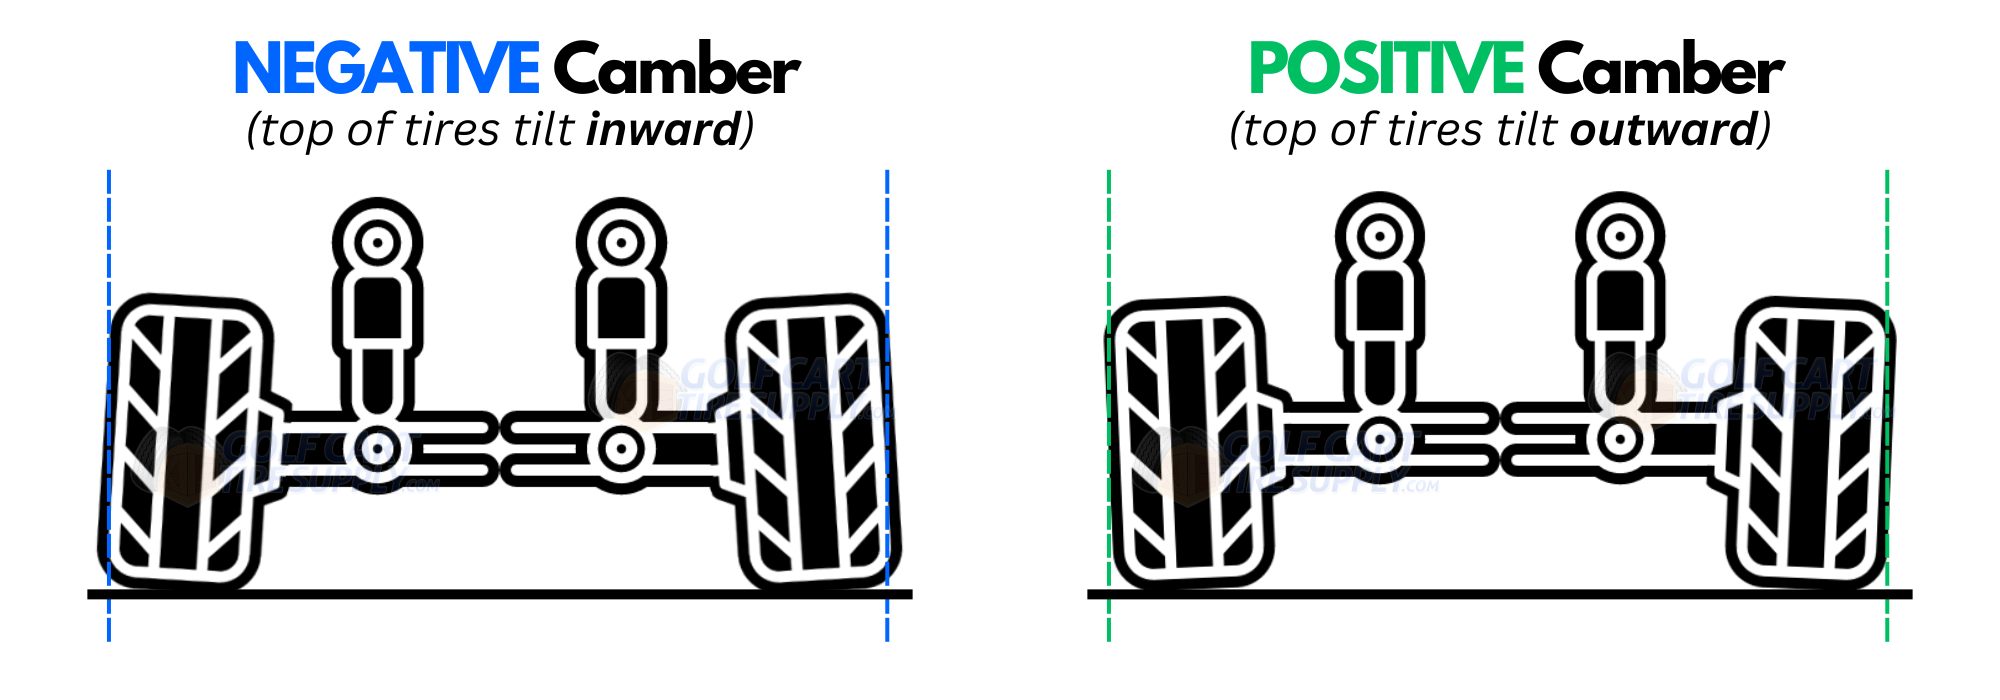
Image Source: cdn2.bigcommerce.com
Toe-in and Toe-out
This is the most common adjustment for golf carts. It is also the easiest to do yourself. Toe looks at how your front wheels point when you look down on them. Imagine your cart from above.
- Toe-in: The front edges of your wheels point slightly inward. They point towards each other. Like your feet if they were pigeon-toed.
- Toe-out: The front edges of your wheels point slightly outward. They point away from each other. Like your feet if they were duck-footed.
- Zero Toe: The wheels point straight ahead. They are perfectly parallel.
Most golf carts need a little toe-in. This helps them track straight. It makes the steering stable. If your toe setting is off, your tires will wear badly. You will see wear on the inside or outside edge. This is a clear sign you need golf cart toe-in toe-out adjustment. This is key for golf cart tire wear alignment issues.
Camber
Camber looks at how your wheels tilt when you look at your cart from the front.
- Positive Camber: The top of the wheel tilts outward. It leans away from the cart.
- Negative Camber: The top of the wheel tilts inward. It leans towards the cart.
- Zero Camber: The wheel stands straight up and down. It is perfectly vertical.
Camber is less common to adjust on a golf cart. Most golf carts have a fixed camber. You usually cannot change it without special parts. If your camber is wrong, it might mean bent parts. Or it could be worn parts in your golf cart suspension alignment. This is often a job for a pro.
Caster
Caster looks at the angle of your steering pivot. Imagine a line from the top to the bottom of your wheel’s steering axis. Caster is how much this line leans.
- Positive Caster: The top of the steering axis leans back. It leans towards the rear of the cart. This helps the steering feel stable. It makes the wheels want to return to straight. Think of the front wheel of a bicycle.
- Negative Caster: The top of the steering axis leans forward. It leans towards the front of the cart.
- Zero Caster: The steering axis is straight up and down.
Like camber, caster is rarely adjustable on a golf cart. It’s usually part of the cart’s design. Problems with caster often point to bent parts. Or it could be worn suspension parts. These are also things a pro should check.
For DIY golf cart alignment, your main focus will be on the “toe.” This is because it is easy to adjust. It also causes most driving and tire wear problems.
Signs Your Golf Cart Needs Alignment
How do you know if your golf cart needs a check-up? Your cart will tell you. Look for these signs. They point to a need for golf cart wheel alignment.
- Uneven Tire Wear: This is the most common sign. Look at your front tires. If one side of the tire (inside or outside) is much more worn than the other, your toe is off. This is a clear golf cart tire wear alignment problem.
- Steering Pulls to One Side: Does your cart drift right or left when you want to go straight? You have to hold the steering wheel firmly to keep it straight. This means the alignment is off.
- Crooked Steering Wheel: Is your steering wheel not straight when you drive straight? If the cart goes straight but the wheel is turned, your steering needs adjustment. This is a golf cart crooked steering wheel fix you can do.
- Loose Steering: Does your steering feel sloppy? Is there a lot of play? While alignment might not be the main cause, a bad alignment can make it worse. It can hide worn parts.
- Vibrations or Shakes: Do you feel shaking in the steering wheel or cart? This can mean many things. But bad alignment can be one cause.
- Cart Wanders: Does your cart feel like it’s hard to keep in a straight line? You constantly have to correct the steering. This is a sign of bad alignment.
If you see any of these signs, it is time to check your golf cart’s alignment. Acting fast saves your tires. It also makes your ride safer and more fun.
Tools You Need for DIY Alignment
You do not need many special golf cart alignment tools. Most items you might already have. Here is a list of what you will need:
- Tape Measure: A good quality, long tape measure is key. It needs to be very accurate.
- Marker or Chalk: To mark your tires.
- Wrenches: To loosen and tighten the tie rod lock nuts. You will likely need a few sizes. An adjustable wrench might work too.
- Pliers: To help hold the tie rod.
- Jack and Jack Stands (Optional but helpful): To lift the front of the cart safely. This helps to check for loose parts. Do not work under a cart held only by a jack.
- Level Surface: A flat garage floor or driveway is a must. This is crucial for accurate measurements.
- Someone to Help (Optional): An extra set of hands can make measuring easier.
- Pencil and Paper: To write down your measurements.
Preparing Your Golf Cart for Alignment
Before you start any golf cart front end alignment work, you need to get your cart ready. This makes sure your measurements are correct. It also keeps you safe.
- Park on a Flat Surface: Find a very flat, level spot. Your garage or driveway is perfect. An uneven surface will give you wrong readings.
- Ensure Proper Tire Pressure: Check all your tires. Make sure they are inflated to the maker’s suggested pressure. This info is often on the tire sidewall. Or it is in your cart’s owner’s manual. Wrong tire pressure will throw off your measurements.
- Check for Worn Parts: This step is very important. You cannot align a cart with loose or worn parts.
- Grab a front wheel: Hold the tire at 3 and 9 o’clock (like hands on a clock). Try to push and pull it side to side.
- Grab the wheel again: Hold it at 12 and 6 o’clock. Try to push and pull it up and down.
- Feel for play: If you feel any movement, it means parts are loose. These could be:
- Wheel bearings
- Ball joints
- Tie rod ends
- Kingpin bushings
- Fix any loose parts first: You must fix these parts before alignment. Trying to align a cart with worn parts is useless. It is like building on shaky ground. Loose parts cause a poor ride. They also lead to more uneven tire wear.
- Put the Cart in Neutral: Or make sure the parking brake is off. You might need to roll the cart a bit to settle the suspension.
- Remove Any Heavy Loads: Take out any extra weight from the cart. This includes golf clubs, tools, or heavy bags. The cart should be at its normal operating weight.
Once your cart is ready, you can move on to measuring.
The Step-by-Step DIY Alignment Process
This section focuses on how to check and adjust your golf cart’s toe. This is the main part of DIY golf cart alignment. It’s often all you need for better handling and tire wear.
Checking Toe-in and Toe-out
This is where your tape measure comes in. You will measure the distance between the front and back of your tires.
-
Mark Your Tires:
- Take your chalk or marker. Go to the front of a tire.
- Spin the wheel until the marked spot is at the very front, about axle height.
- Make a clear mark on the tread or sidewall. Do this on both front tires. Try to make the marks at the same height.
- Roll the cart forward slowly. Do not turn the steering wheel. Roll it until the marks are at the very back of the tires. They should be at axle height again.
-
Measure the Front Distance:
- Get your tape measure.
- Place the end of the tape on the front mark of one tire.
- Pull the tape across to the front mark of the other tire.
- Measure the exact distance between the two marks. Keep the tape straight and level. This is your “front measurement.” Write it down.
-
Measure the Rear Distance:
- Now, roll the cart backward. Do not turn the steering wheel. Roll it until the marks are at the very back of the tires again. They should be at axle height.
- Measure the exact distance between the two marks at the back of the tires. Keep the tape straight and level. This is your “rear measurement.” Write it down.
-
Calculate the Toe:
- Toe-in: If your “rear measurement” is larger than your “front measurement,” you have toe-in.
- Toe-out: If your “front measurement” is larger than your “rear measurement,” you have toe-out.
- Zero Toe: If both measurements are the same, you have zero toe.
What are ideal measurements? Most golf carts need a slight toe-in. A common rule of thumb is 1/8 to 1/4 inch of toe-in. This means the rear measurement should be 1/8 to 1/4 inch greater than the front measurement. Some carts may need 1/16 inch or even 0. If you are unsure, check your cart’s owner’s manual. Or look up your specific golf cart model online.
Example:
* Front measurement: 45 inches
* Rear measurement: 45 1/4 inches
* This shows 1/4 inch of toe-in. This is often good.Example 2:
* Front measurement: 46 inches
* Rear measurement: 45 inches
* This shows 1 inch of toe-out. This is bad and needs fixing.Table of Common Toe Specifications for Golf Carts (General Guidelines)
| Golf Cart Make/Model (General) | Recommended Toe Setting | Notes |
|---|---|---|
| EZ-GO (Most Models) | 1/8″ to 1/4″ Toe-in | Helps with straight tracking and stability. |
| Club Car (Most Models) | 1/8″ to 1/4″ Toe-in | Can vary slightly by specific model. |
| Yamaha (Most Models) | 1/8″ to 1/4″ Toe-in | Check manual for exact specs. |
| Older/Lifted Carts | Often 1/8″ to 3/16″ | May need less toe-in if heavily modified. |
| General Rule of Thumb | 1/8″ to 1/4″ Toe-in | For most standard golf carts. |
Always check your specific golf cart’s manual for precise alignment settings. These are general guidelines.
Adjusting Golf Cart Tie Rods for Proper Toe
Now that you know your toe setting, you can adjust it. This is where you will be adjusting golf cart tie rods. The tie rods connect your steering box to the front wheels. They control how the wheels point.
- Locate the Tie Rods: Look behind your front wheels. You will see a rod running from the steering assembly to each wheel. There are two tie rods. Each has a threaded end that screws into a tie rod end.
- Loosen the Lock Nuts: Each tie rod end has a lock nut. This nut keeps the tie rod from spinning. You need to loosen these nuts first. Use your wrench. You will likely need two wrenches. One to hold the tie rod and one to loosen the nut. Or one to hold the tie rod end. Loosen the lock nuts on both sides of the cart. They might be tight.
-
Adjusting the Tie Rods:
- To increase toe-in (or decrease toe-out): You need to make the tie rods shorter. To do this, spin the tie rod itself. You can usually twist it by hand once the lock nuts are loose. Turn the tie rod so the tie rod ends move closer together. This will pull the front of the wheels inward.
- To decrease toe-in (or increase toe-out): You need to make the tie rods longer. Spin the tie rod so the tie rod ends move further apart. This will push the front of the wheels outward.
Important Tip: Make small adjustments. Turn each tie rod about half a turn at a time. Then, re-measure your toe. It’s often best to adjust both tie rods an equal amount. This helps keep your steering wheel straight. For example, if you shorten the driver’s side tie rod by 1/4 inch, try to shorten the passenger side by 1/4 inch too. This helps with golf cart steering adjustment.
-
Roll the Cart: After each adjustment, roll the cart a few feet forward and backward. This helps the suspension settle. It allows the wheels to find their natural position. Then, re-measure your front and rear distances.
-
Repeat Until Correct: Keep adjusting and measuring until your toe is within the desired range (e.g., 1/8 to 1/4 inch toe-in). This takes patience. But getting it right is worth it.
-
Tighten the Lock Nuts: Once your toe is perfect, hold the tie rod so it does not spin. Tighten the lock nuts very tightly. If they are loose, your alignment will go out of whack quickly.
Centering Your Steering Wheel
Sometimes, after adjusting the toe, your golf cart crooked steering wheel fix is needed. The cart might go straight, but the steering wheel is turned. This means the steering wheel is off-center. This is also part of golf cart steering adjustment.
- Drive the Cart: Drive your cart on a flat, straight road. Let go of the steering wheel (safely, for a moment). See which way the cart goes and how the steering wheel sits.
-
Adjusting for a Crooked Steering Wheel:
- If the steering wheel is off to the left, you need to make the tie rod on the right side of the cart shorter. You also need to make the tie rod on the left side of the cart longer. Do this in equal amounts.
- If the steering wheel is off to the right, you need to make the tie rod on the left side of the cart shorter. You also need to make the tie rod on the right side of the cart longer. Do this in equal amounts.
How to do it:
* Loosen both tie rod lock nuts again.
* To make the steering wheel straight, you need to make one side of the tie rod longer and the other side shorter. You do this by turning the tie rod. For example, if you turn the driver’s side tie rod one full turn to shorten it, you need to turn the passenger’s side tie rod one full turn to lengthen it. This will move the steering wheel without changing the overall toe.
* Make small, equal turns. Then, tighten the lock nuts.
* Drive the cart again to check the steering wheel position. Repeat until the steering wheel is straight when the cart is going straight.
This method adjusts the steering wheel’s position without changing your carefully set toe. It’s a fine-tuning step.
Briefly Addressing Camber and Caster
As noted before, adjusting camber and caster on a golf cart is often not a DIY task. Most golf carts have fixed settings for these. If you have extreme tire wear on the inside or outside that toe adjustment does not fix, it could be camber. If your steering feels very heavy, too light, or does not self-center, it could be caster.
-
Camber problems often mean:
- Bent spindle
- Worn kingpin bushings
- Bent axle
- Sagging suspension (related to golf cart suspension alignment)
-
Caster problems often mean:
- Bent frame
- Bent axle
- Worn bushings
These issues usually need new parts. Or they need special tools to fix. If you suspect these are your problems, it’s best to see a professional golf cart mechanic. They have the right tools and knowledge. They can check your golf cart front end alignment fully.
Testing and Fine-Tuning
After you think you have everything set, do a final check.
- Re-measure Toe: Always do a final toe measurement. Make sure it is still in the correct range.
- Test Drive: Take your golf cart for a good test drive.
- Drive on a flat, straight road. Does the cart go straight?
- Is the steering wheel straight when the cart is going straight?
- Does it feel better? Is the steering stable?
- Do you feel any strange pulls or vibrations?
If it is not perfect, go back and make small adjustments. It might take a few tries to get it just right. Patience is key. Remember, small changes have big effects.
When to Seek Professional Help
While DIY golf cart alignment is possible, there are times when you should call a pro.
- Persistent Problems: You have tried to align it many times. But the cart still pulls, or the tires wear badly.
- Bent or Worn Parts: You find bent axles, spindles, or very loose components. These need more than a simple adjustment. They need to be replaced.
- Camber or Caster Issues: If you suspect problems with these angles, a pro has the right tools. They can diagnose and fix these complex issues. This relates to full golf cart suspension alignment.
- Lifted Carts: If your golf cart has a lift kit, it can change alignment needs. Some lift kits need special alignment tools or methods. Pros are best for these.
- Safety Concerns: If you are unsure or feel unsafe, do not guess. A mechanic can ensure your cart is safe to drive.
A professional can perform a full golf cart wheel alignment. They use machines that measure angles very precisely. This ensures everything is perfect.
Benefits of Proper Golf Cart Alignment
Taking the time to align your golf cart brings many good things.
- Longer Tire Life: This is a big one. Even wear means your tires last much longer. You save money on new tires. This is the goal of golf cart tire wear alignment.
- Smoother Ride: Your cart will drive straight. It will feel more stable. No more fighting the steering wheel.
- Better Handling: The cart will respond better to your steering. It will feel safer and easier to control.
- Improved Fuel/Battery Life: When your wheels point straight, the cart rolls with less effort. This means your gas engine works less. Or your electric motor uses less battery power. You get more range.
- Increased Safety: A cart that drives straight is a safer cart. You have better control in emergencies.
- More Enjoyable Driving: A well-aligned cart is a pleasure to drive. It takes away stress and makes every trip better.
Frequently Asked Questions (FAQ)
Q1: How often should I align my golf cart?
A1: You should check your golf cart’s alignment once a year. Or check it every time you see signs of bad alignment. For example, uneven tire wear or the cart pulling to one side. If you hit a large bump or pothole, check it soon after.
Q2: Can I adjust camber and caster on my golf cart?
A2: Most standard golf carts do not allow you to adjust camber or caster easily. These settings are usually fixed by design. If you have camber or caster issues, it often means you have bent or worn suspension parts. These need professional repair.
Q3: What happens if I don’t align my golf cart?
A3: If you do not align your golf cart, your tires will wear out unevenly and quickly. Your cart will also be harder to steer. It might pull to one side, making it less safe. Your ride will also be less comfortable.
Q4: Do lifted golf carts need different alignment?
A4: Yes, lifted golf carts often need different alignment settings. Lift kits change the geometry of the suspension. This affects toe, camber, and caster. Some lift kits come with parts to allow for more adjustment. It’s often best to have a professional align a lifted cart.
Q5: What is the most important alignment setting for golf carts?
A5: For most golf carts, the most important setting you can adjust is the “toe.” Correct toe setting fixes most tire wear problems and steering issues. This is because it is the most common and easiest to adjust setting.
Q6: Can worn kingpin bushings affect alignment?
A6: Yes, worn kingpin bushings can greatly affect your golf cart’s alignment. They can cause play in the steering. They can also lead to camber changes and uneven tire wear. You must fix worn parts like these before doing an alignment.
Q7: How tight should the tie rod lock nuts be?
A7: The tie rod lock nuts should be very tight. This prevents the tie rod from spinning and losing your alignment. Use the correct size wrench. Torque specs vary by cart. If unsure, tighten them firmly.
Taking the time to do a simple golf cart alignment is a smart move. It saves you money. It makes your cart safer. And it makes every ride more enjoyable. By following these steps, you can keep your golf cart riding smoothly for years to come.