
Image Source: i.ytimg.com
Extending Life: How To Test Batteries On A Golf Cart Accurately
Keeping your golf cart running strong needs good batteries. So, how do you test batteries on a golf cart? You can check them using a few key methods. These include a golf cart battery voltage test, a deep cycle battery hydrometer test, and a golf cart battery load test. A multimeter golf cart battery check helps with voltage tests. This guide will show you how to do all these tests. It will help you find any problems early. This way, you can keep your cart on the green for many years.
Why Battery Health Matters Greatly
Your golf cart needs healthy batteries to move. Batteries power the motor. They also run lights and other parts. Good batteries give your cart full power. They allow it to go far. Bad batteries mean less power. Your cart might slow down. It might not go as far. Or it might stop completely. Testing your batteries often saves you money. It stops small issues from becoming big, costly problems.
Essential Tools for Battery Checks
You need the right tools to test batteries well. Using the correct tools makes testing easy and safe. Here are the main tools you will need:
- Digital Multimeter: This tool checks voltage. It is easy to use. It gives quick readings.
- Battery Hydrometer: This tool checks the liquid inside the battery. It measures specific gravity. This tells you the battery’s charge level. It also shows bad cells.
- Carbon Pile Load Tester: This device puts a “load” on the battery. It makes the battery work hard. This shows how well it holds power under stress. It is very important for finding weak batteries.
- Safety Gear: Always wear safety glasses. Use rubber gloves. Batteries have acid. Acid can hurt your skin and eyes.
- Battery Terminal Brush: Use this to clean battery posts. Clean posts give good readings.
- Distilled Water: You will need this if your battery water is low. Never use tap water.
- Wrenches: For tightening battery cables. Make sure they are snug.
Preparing for Battery Testing Safely
Before you start any tests, do some important steps. These steps keep you safe. They also make sure your test results are true.
Safety First: Crucial Steps
- Turn Off the Cart: Make sure the golf cart is off. Take out the key.
- Park on Flat Ground: Make sure the cart cannot roll.
- Wear Safety Gear: Put on your safety glasses and rubber gloves.
- Avoid Metal Tools: Do not let metal tools touch battery terminals. This can cause sparks. It can also cause a short circuit. A short can be dangerous. It can hurt you or damage the battery.
- No Smoking or Sparks: Batteries make hydrogen gas. This gas can explode. Keep flames and sparks away.
- Work in a Well-Ventilated Spot: Make sure there is fresh air. This helps remove any harmful gases.
Battery Readying for Testing
- Charge Batteries Fully: All tests need a full charge. Charge your golf cart for 12-16 hours. Use your regular charger. This makes sure the batteries are at their best.
- Let Them Rest: After charging, let the batteries rest. Wait 8-12 hours. This lets the voltage settle. It gives a more true reading. Testing right after charging can give high, false readings.
- Clean Battery Terminals: Look at the battery posts. Are they dirty or rusty? Use a battery terminal brush. Clean any dirt or corrosion. Dirty posts can stop good readings. They can also stop power flow. Make sure all cables are tight. Loose cables can cause problems.
Key Methods for Testing Golf Cart Batteries
Now you are ready to test. We will cover the three main ways to check your golf cart batteries. Each test gives you different, important information.
Method 1: Golf Cart Battery Voltage Test
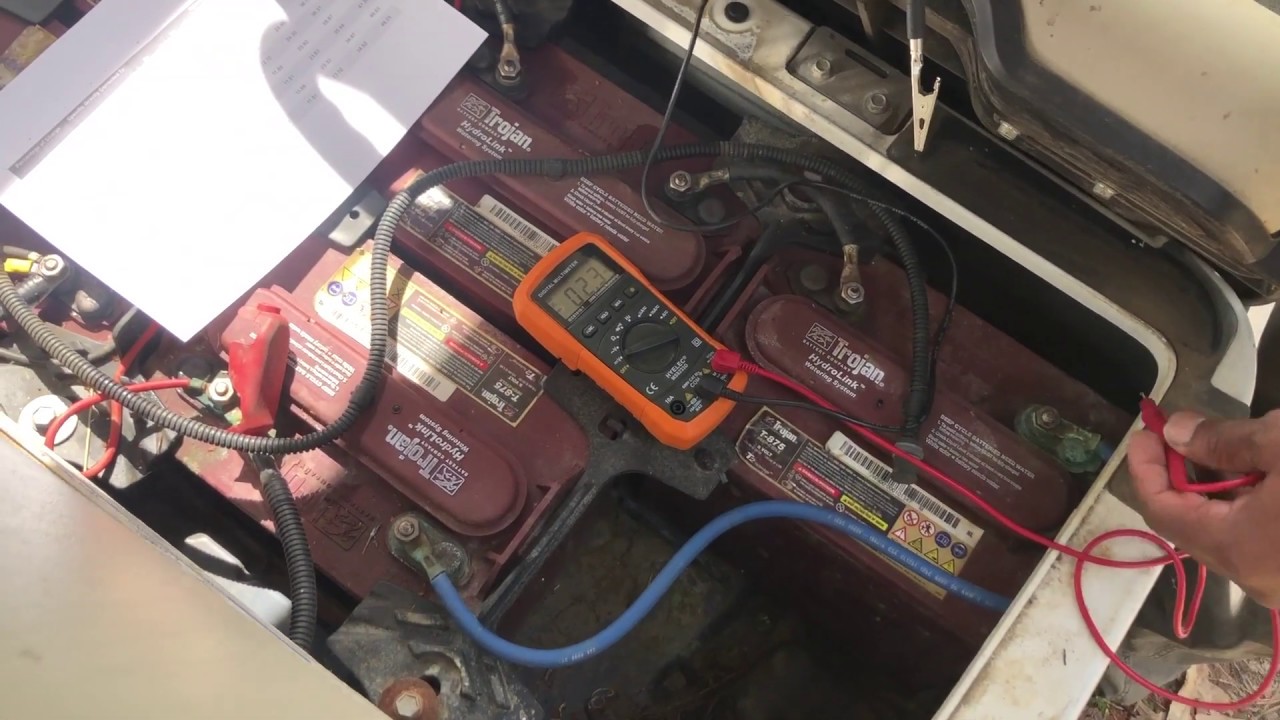
This is the first test you should do. It tells you the overall charge level of each battery. You use a digital multimeter for this.
How to Use a Multimeter for Battery Voltage Check
- Set Your Multimeter: Turn your multimeter dial to DC Volts (VDC). Choose a range like 20V. This covers the voltage of a single golf cart battery (usually 6V, 8V, or 12V).
- Connect Leads: Touch the red probe to the positive (+) terminal of one battery. Touch the black probe to the negative (-) terminal of the same battery.
- Read the Voltage: Look at the screen. Write down the number. This is the static voltage.
- Test Each Battery: Do this for every single battery in your golf cart. Do not just test the whole bank. Each battery needs its own check.
Interpreting Static Voltage Readings
A fully charged golf cart battery has a certain voltage. This voltage drops as the battery loses charge. Here is a table to help you read your results for common battery types:
Table 1: Golf Cart Battery Static Voltage Chart (Resting Voltage)
| Battery Type | 100% Charged | 75% Charged | 50% Charged | 25% Charged | Discharged |
|---|---|---|---|---|---|
| 6-Volt | 6.37V | 6.27V | 6.15V | 6.00V | 5.80V |
| 8-Volt | 8.49V | 8.36V | 8.20V | 8.00V | 7.70V |
| 12-Volt | 12.73V | 12.50V | 12.30V | 12.00V | 11.50V |
Note: These are resting voltages after the battery has sat for at least 8 hours post-charge.
If any battery reads much lower than others, it could be weak. This test is a good first step. But it does not tell the whole story. A battery can show good voltage but fail under work.
Method 2: Deep Cycle Battery Hydrometer Test
This test is one of the best ways to check your deep cycle battery health. It measures the density of the acid inside each battery cell. This density is called “specific gravity reading golf cart batteries.” Each golf cart battery has multiple cells, usually three for a 6V battery (two volts per cell).
What a Hydrometer Does
A hydrometer is a simple tool. It has a glass tube and a float. You suck battery acid into the tube. The float tells you the acid’s density. Denser acid means more charge.
Steps for Hydrometer Testing
- Safety First: Again, wear safety glasses and gloves.
- Remove Cell Caps: Carefully take off the caps on each battery cell.
- Check Water Levels (How to check golf cart battery water): Look inside each cell. The water level should be just above the plates. If it is low, add distilled water. Add it after testing, or if the battery is fully charged, add it before. Always add distilled water. Never use tap water. Tap water has minerals that hurt batteries.
- Draw Electrolyte: Squeeze the bulb of the hydrometer. Put the tip into a cell. Release the bulb to draw enough liquid. The float should move freely.
- Read the Float: Hold the hydrometer straight up. Read the specific gravity where the liquid meets the float. Make sure to read it at eye level.
- Record Readings: Write down the reading for each cell of each battery.
- Return Electrolyte: Gently squeeze the bulb to put the liquid back into the cell.
- Rinse Hydrometer: Rinse the hydrometer with clean water after testing all batteries. This removes acid.
- Replace Caps: Put all cell caps back on tightly.
Interpreting Specific Gravity Readings
Specific gravity readings tell you the battery’s state of charge and cell health.
Table 2: Golf Cart Battery Specific Gravity Chart
| State of Charge | Specific Gravity |
|---|---|
| 100% Charged | 1.277 – 1.280 |
| 75% Charged | 1.230 |
| 50% Charged | 1.190 |
| 25% Charged | 1.150 |
| Discharged | 1.110 or lower |
Note: Readings are for a temperature of 80°F (26.7°C). Adjust readings if temperature is very different.
Deciphering Hydrometer Results
- Good Health: All cells in a battery should have readings very close to each other. A difference of 0.050 or more between cells means a problem.
- Weak Cell: If one cell has a much lower reading, that cell is weak. This often means the whole battery is bad. A battery with one bad cell usually needs to be replaced. You cannot fix a bad cell.
- Low Overall Readings: If all cells in a battery are low, but consistent, the battery might just need a full charge. If they are still low after a full charge, the battery may be worn out.
Method 3: Golf Cart Battery Load Test
The voltage test tells you how much charge a battery has. The hydrometer tells you cell health. But neither tells you how well a battery performs under actual use. That is where the golf cart battery load test comes in. This test puts a heavy drain on the battery, just like driving uphill.
How to Perform a Load Test
You need a carbon pile load tester for this. These testers are big. They look like car battery testers. They have a big dial or digital screen.
- Connect the Load Tester:
- Connect the positive clamp of the load tester to the positive (+) terminal of one battery.
- Connect the negative clamp to the negative (-) terminal of the same battery.
- Apply the Load:
- Follow the tester’s directions. For a golf cart battery, you usually apply a load equal to half the battery’s Cold Cranking Amps (CCA) or a similar rating. If your battery does not list CCA, a common rule is to apply 3 times its Amp-Hour (Ah) rating for 15 seconds. For example, a 200 Ah battery might get a 600 amp load. Check your battery’s spec sheet for exact load values.
- Hold the load for about 10-15 seconds.
- Watch the Voltage: While the load is applied, watch the multimeter. The battery voltage will drop. It should not drop too much.
- Record the Drop: Write down the voltage reading while the load is on.
- Test Each Battery: Repeat for every battery in your bank.
Interpreting Load Test Results
- Healthy Battery: A good battery will hold its voltage well. For a 6V battery, it should not drop below 4.8-5.0V under load. For an 8V, it should stay above 6.4-6.7V. For a 12V, it should stay above 9.6-10.0V. These are general guidelines.
- Weak Battery: If a battery’s voltage drops sharply (below the recommended levels) or continues to drop quickly during the 10-15 seconds, it is weak. It cannot hold a charge under work. This battery needs replacement.
- Failed Battery: If a battery drops to almost zero voltage or shows extreme weakness, it is likely completely dead.
The load test is very important. It finds batteries that look fine on a voltage test but fail when used. This helps you catch problems before they leave you stranded.
Deciphering All Your Test Results
You have done all the tests. Now, put all the information together.
- All Good: All batteries show good static voltage, consistent specific gravity readings across all cells, and pass the load test. Your battery bank is healthy.
- One Bad Apple: One battery shows low voltage, a weak cell (low specific gravity), or fails the load test. This one battery is the problem. You often need to replace the whole set. Mixing old and new batteries is not good. It can make the new ones fail faster.
- Multiple Weak Batteries: Several batteries show signs of weakness. It is likely time for a full battery bank replacement.
- Consistent Low Readings: All batteries show consistently low voltage and specific gravity, but the cells are balanced. This could mean a charger problem or simply that the batteries are very old and cannot hold a full charge anymore.
Troubleshooting Golf Cart Battery Problems
Even with good testing, problems can happen. Here are common issues and how to deal with them.
Symptoms of Dying Golf Cart Batteries
Knowing these signs can help you act fast:
- Shorter Run Time: Your golf cart does not go as far on a full charge.
- Slower Speed: The cart feels sluggish. It may struggle on hills.
- Dim Lights/Weak Horn: Accessories do not work as well.
- Takes Longer to Charge: The charger stays on for very long times.
- Gets Hot When Charging: Batteries or charger feel very hot.
- Strong Rotten Egg Smell: This means batteries are overcharging or gassing badly. This is dangerous.
- Physical Damage: Swollen battery cases, cracked tops, or lots of corrosion.
Basic Troubleshooting Golf Cart Battery Problems
If your cart acts up, check these things first:
- Loose Cables: Make sure all battery cables are tight. A loose cable stops power flow.
- Corroded Terminals: Clean any green or white buildup on battery posts. Use a battery terminal brush.
- Water Levels: Check how to check golf cart battery water again. If it is low, add distilled water.
- Single Bad Battery: If one battery shows bad readings, it drags down the whole golf cart battery bank health.
- Charger Issue: Make sure your charger works right. This is covered next.
Crucial Battery Maintenance Tips
Good care makes batteries last longer. Regular checks and simple steps save you money.
- Check Water Levels Often: How to check golf cart battery water is simple. Do it once a month, especially in hot weather. Always add distilled water. Never overfill. Fill to just cover the plates.
- Keep Terminals Clean: Clean corrosion as soon as you see it. Use a brush and a mix of baking soda and water. Then rinse and dry.
- Charge Properly: Always charge your batteries after every use. Do not let them sit discharged. Do not overcharge them either. Your charger should turn off automatically.
- Avoid Deep Discharges: Try not to run your batteries completely dead. This harms them.
- Store Properly: If you store your cart for winter, charge batteries fully. Keep them charged. Check them every month.
- Equalization Charge: Some chargers have an “equalize” setting. This is a controlled overcharge. It helps balance cells and mix the acid. Do this a few times a year. Check your battery maker’s advice.
Testing Golf Cart Battery Charger Output
A good charger is key to healthy batteries. If your charger is faulty, your batteries will not charge correctly. They can fail early.
How to Test Your Charger
- Safety First: Make sure your cart is off. Put on safety gear.
- Connect Charger to Cart: Plug your golf cart charger into the cart.
- Plug Charger into Wall: Plug the charger into an AC outlet.
- Set Multimeter: Set your digital multimeter to DC Volts. Choose a range higher than your golf cart’s total voltage (e.g., 60V for a 48V cart).
- Test Total Battery Bank: Place the red multimeter probe on the main positive (+) terminal of your battery bank. This is usually the positive terminal of the first battery in the series. Place the black probe on the main negative (-) terminal of your battery bank. This is usually the negative terminal of the last battery in the series.
- Read Charger Output: When the charger is working, it should show a voltage higher than the total nominal voltage of your battery bank. For example, a 48V cart should show the charger putting out around 54V-60V. This voltage should slowly drop as the batteries charge.
- Check for Charge Cycle: Watch the charger. Does it turn on? Does it go through its full cycle? Does it shut off when batteries are full? If it does not start charging, stops too early, or never stops, it has a problem.
Charger Issues and Solutions
- No Output: Check the charger’s fuse or circuit breaker. Check the power cord. If it still gives no output, it might be broken.
- Low Output: If the charger output voltage is too low, it will not fully charge your batteries.
- No Shut-Off: If the charger never turns off, it will overcharge your batteries. This boils the water out. It damages them greatly. This is very dangerous.
- Intermittent Charging: If the charger starts and stops, check its connections. The charger itself might be faulty.
A bad charger can kill good batteries fast. Make sure your charger is working as it should.
Assessing Overall Golf Cart Battery Bank Health
To truly know your golf cart battery bank health, you need to look at all the test results together. Do not just look at one battery. Look at the whole set.
- Consistent Readings Across All Batteries: This is the best sign. All batteries should have similar voltage readings, similar specific gravity across all cells within each battery, and perform similarly on the load test. Small differences are normal. Big differences are not.
- Identifying the Weak Link: Often, one battery starts to fail first. This single weak battery acts like a bottleneck. It limits the performance of the whole bank. Even if other batteries are okay, the weak one will make the entire cart feel sluggish. It will also make the other batteries work harder. This causes them to wear out faster.
- Age and Usage: Batteries have a life span. Most golf cart batteries last 4-6 years. Heavy use or poor maintenance shortens this. Even if tests look okay, old batteries might be nearing the end.
- Total Voltage Check: While you test each battery, you can also test the full bank voltage. Connect the multimeter to the main positive and negative posts of the entire bank. For a 36V system, a full charge should be around 38.2V. For a 48V system, it should be about 50.9V. This gives an overall picture. But it does not tell you if one battery is bad. You need to check each one.
Remember, golf cart battery banks are usually wired in series. This means the weakest battery affects the performance of the whole system. A single weak battery can make your entire cart feel old and slow. It is often best to replace all batteries at once if one goes bad. This keeps your bank balanced.
When to Replace Your Golf Cart Batteries
Knowing when to replace batteries saves you hassle. Do not wait until you are stuck on the course.
- Failing Tests: If one or more batteries consistently fail the voltage, hydrometer, or load tests, it is time.
- Short Range: If your cart’s range is much shorter than it used to be.
- Long Charge Times/Overheating: If batteries take forever to charge or get very hot.
- Age: If your batteries are over 5-7 years old, they are likely nearing their end, even with good care.
- Physical Damage: Swelling, leaks, or cracks are clear signs.
Conclusion
Keeping your golf cart running well means taking care of its batteries. Knowing how to test batteries on a golf cart accurately is a skill every owner should learn. By doing regular golf cart battery voltage tests, deep cycle battery hydrometer tests, and golf cart battery load tests, you can find problems early. Using a multimeter golf cart battery check for voltage and paying attention to specific gravity reading golf cart batteries gives you clear data.
Watching for symptoms of dying golf cart batteries, knowing how to check golf cart battery water, and performing troubleshooting golf cart battery problems steps will extend your battery life. Do not forget to test your golf cart battery charger output. All these steps contribute to overall golf cart battery bank health. Take good care of your batteries. They will take good care of you on the golf course.
Frequently Asked Questions (FAQ)
Q1: How often should I test my golf cart batteries?
A: You should test your golf cart batteries at least every 3-6 months. If you use your cart often or in hot weather, test them more often. A quick voltage check can be done monthly.
Q2: Can one bad battery ruin the whole set?
A: Yes, one bad battery can harm the entire set. Golf cart batteries are usually wired in a series. This means the weakest battery limits the power for all of them. It also makes the good batteries work harder. This can make them fail sooner.
Q3: What is the best way to clean battery corrosion?
A: Mix baking soda with water to make a paste. Put the paste on the corroded areas. Let it sit for a few minutes. It will bubble. Then, scrub with a battery terminal brush. Rinse with clean water and dry completely.
Q4: Is it safe to add tap water to my golf cart batteries?
A: No, never add tap water to your golf cart batteries. Tap water has minerals and chemicals. These can harm the battery plates and shorten battery life. Always use distilled water.
Q5: My golf cart batteries smell like rotten eggs. What does that mean?
A: A rotten egg smell means sulfur gas. This is a sign of overcharging or severe battery issues. It means the batteries are getting too hot. This is very dangerous. Stop charging and check your charger right away. Test your batteries. If they are swollen or hot, be careful.