
Image Source: www.thysol.com.au
How To Tape Golf Elbow: Relieve Pain & Get Back to Your Game
Do you feel pain on the inside of your elbow? Does it hurt when you swing a golf club or lift things? If so, you might have golf elbow. This problem is also called medial epicondylitis. It causes pain where forearm tendons attach to a bony bump on the inside of your elbow. Yes, you can tape golf elbow. Taping helps ease pain and supports your arm. It can help you play golf or do daily tasks with less discomfort. This guide will show you how to use various elbow pain relief taping methods. You will learn about golfer’s elbow taping techniques. We will cover self-taping for golfer’s elbow pain.
Grasping Golf Elbow: What It Is
Golf elbow is a common pain. It hurts on the inside of your elbow. This spot is called the medial epicondyle. It is where tendons of your forearm muscles attach to the bone. These muscles help you grip things and turn your wrist.
What Causes Golf Elbow?
Golf elbow often comes from overuse. It happens when you repeat certain motions. These motions involve your wrist and fingers. They can cause small tears in the tendons. Over time, these tears can lead to pain and swelling.
Here are common causes:
- Golf: Poor swing form can strain the inner elbow. Hitting down on the ball can also cause it.
- Other Sports: Sports like baseball, bowling, or throwing can cause it. Racket sports can also be a cause.
- Work Tasks: Jobs with repetitive hand or arm moves can hurt. Carpenters, plumbers, and assembly line workers are at risk.
- Hobbies: Knitting, gardening, or painting can bring it on. Any activity with repetitive hand use can be a factor.
- Heavy Lifting: Lifting heavy objects can put stress on the tendons.
- Weak Muscles: Weak forearm muscles offer less support. This makes tendons work harder.
What Are the Signs of Golf Elbow?
The main sign is pain. It is on the inside of your elbow. The pain can spread down your forearm. It might even go into your wrist.
Look for these signs:
- Pain on the inside of your elbow: This is the most common sign. It hurts to touch the area.
- Pain with certain moves: It hurts when you swing a club. It also hurts when you grip things. Turning your wrist or lifting can also cause pain.
- Weak grip: You might find it hard to hold objects tightly.
- Numbness or tingling: Sometimes, you might feel numbness. This can go into your fingers, especially the ring and pinky fingers. This is less common.
- Stiffness: Your elbow might feel stiff. This is often worse in the morning.
If you have these signs, taping might help. But it is always smart to see a doctor. A doctor can tell you for sure what is wrong.
Why Tape Golf Elbow? The Benefits of Taping
Taping your elbow offers many good things. It can help you feel better. It can also help you get back to your activities. Taping is a popular way to manage pain. It helps many athletes and active people.
Here are the main benefits of taping:
- Pain Relief: Tape can lift the skin slightly. This may reduce pressure on sore spots. It can also block some pain signals. Many people find it helps ease the ache.
- Support and Stability: Tape acts like an extra layer of muscle. It supports your forearm muscles. This helps them work without strain. It can limit painful movements. This gives your elbow a chance to heal.
- Improved Blood Flow: Kinesiology tape can gently lift the skin. This can create more space. It may help blood flow better to the area. Good blood flow helps healing. It brings needed nutrients.
- Reduced Swelling: Better blood flow can also help move fluid. This can reduce swelling around the painful tendons.
- Proprioception Boost: This is about knowing where your body is in space. Tape gives your brain extra feedback. It makes you more aware of your arm’s position. This helps you avoid bad movements. It can improve your form.
- Muscle Re-education: Tape can gently pull or push muscles. This can help them work in a better way. It can make weak muscles stronger. It can relax tight muscles.
- Alternative to Braces: Taping can be a golf elbow brace alternative. It offers support without being bulky. It lets you move more freely than some braces. This is great for sports.
- Psychological Comfort: Knowing your elbow is supported can give you confidence. It helps you feel more secure. This can make you less afraid to move.
Taping is a great part of epicondylitis pain management tape methods. It helps you manage your pain. It also supports your recovery.
Types of Tape for Golf Elbow
When taping for golf elbow, you have choices. The two main types are kinesiology tape and athletic tape. Each has its own uses.
Kinesiology Tape for Golf Elbow (KT Tape)
Kinesiology tape, often called KT Tape, is flexible. It stretches. It is made to mimic skin. It moves with your body.
- How it Works: It lifts the skin. This can improve blood flow. It can reduce swelling. It also gives sensory feedback. This helps with pain. It helps muscles work better.
- Feel: It is thin and light. It feels like a second skin. You can wear it for several days. It is waterproof.
- Support Level: Offers gentle support. It helps muscles work. It does not limit movement much. It helps with pain and healing.
- Best for: Pain relief. Reducing swelling. Improving muscle function. Good for mild to moderate pain. Good for long-term wear during activity. This is popular for medial epicondylitis KT tape application.
Athletic Tape for Elbow Support Golf
Athletic tape, often called white tape or sports tape, is rigid. It does not stretch.
- How it Works: It gives strong support. It limits movement. It can stabilize joints. It stops specific motions that cause pain.
- Feel: It is thick and stiff. It feels restrictive. It is usually worn for shorter times. It is not waterproof.
- Support Level: Offers firm support. It restricts movement. This is good for stopping re-injury. It stabilizes the joint.
- Best for: Strong support. Preventing specific painful movements. Acute injury protection. Good for sports where firm bracing is needed. This is key for forearm tendonitis strapping tutorial needs.
Here is a quick look at the differences:
| Feature | Kinesiology Tape (KT Tape) | Athletic Tape |
|---|---|---|
| Stretch | Yes, highly elastic | No, rigid |
| Support | Gentle, supports muscle function, aids healing | Firm, restricts movement, stabilizes joint |
| Wear Time | 3-5 days | A few hours (during activity) |
| Comfort | Very comfortable, like a second skin | Can feel bulky, restrictive |
| Waterproof | Yes, often water-resistant | No, gets wet and loses grip |
| Purpose | Pain relief, swelling reduction, muscle support | Strong stabilization, preventing specific moves |
Choose the tape that fits your needs. Kinesiology tape for golf elbow is great for daily wear. Athletic tape is good for intense activity.
Getting Ready: Before You Tape
Before you start taping, a little prep goes a long way. Proper prep ensures the tape sticks well. It also helps avoid skin problems.
Here is what you need to do:
- Clean Skin: Wash your arm and elbow. Use soap and water. Make sure there is no dirt, sweat, or lotion. Tape sticks best to clean skin.
- Dry Skin: Dry your skin completely. Tape will not stick to wet skin. You can pat it dry.
- Remove Hair: If you have a lot of hair on your arm, shave it. Hair can make tape not stick well. It can also hurt when you take the tape off.
- Gather Your Tools:
- Your chosen tape: Kinesiology tape or athletic tape.
- Sharp scissors: To cut the tape cleanly.
- Skin prep spray (optional): This can make tape stick better. It helps in sweaty conditions.
- Alcohol wipes (optional): To clean oily skin before taping.
- Position Your Arm: Place your arm in a relaxed, slightly bent position. This makes it easier to apply tape. For golf elbow, your elbow should be bent around 10-20 degrees. Your palm should face up or be neutral.
- Check for Injuries: Do not tape over cuts, rashes, or open wounds. If your skin is irritated, wait for it to heal.
Taking these steps will help your taping job be more effective. It will also be more comfortable.
Taping Techniques for Golfer’s Elbow
Now, let us get to the core part: how to tape your golf elbow. We will cover golfer’s elbow taping techniques for both kinesiology tape and athletic tape. These are detailed forearm tendonitis strapping tutorial methods. They aim to provide elbow pain relief taping methods.
Before you start, remember: Always apply tape to clean, dry skin. Do not stretch the ends of the tape.
Kinesiology Tape for Golf Elbow (Medial Epicondylitis KT Tape Application)
Kinesiology tape is good for pain relief and support. It allows full movement. These methods use kinesiology tape for golf elbow.
Technique 1: Simple Pain Relief Strip
This method helps ease pain over the sore spot.
- What you need: One strip of kinesiology tape, about 8-10 inches long. Round the corners of the tape. This stops it from peeling.
- Steps:
- Prep: Sit with your arm relaxed. Bend your elbow slightly (about 10-20 degrees). Turn your palm up a bit.
- Find the Pain: Feel for the bony bump on the inside of your elbow. This is your medial epicondyle. This is usually where it hurts most.
- First Anchor: Tear the backing paper at one end of the tape (about 2 inches). Place this end on your forearm. Put it about 2-3 inches below the elbow crease. Do not stretch this anchor.
- Apply with Stretch: Slowly peel the rest of the backing. Gently stretch the tape about 50-75%. This is a medium stretch. Apply it over the painful bony spot. Continue up toward your bicep. The tape should follow the path of your inner forearm muscles.
- Second Anchor: Lay the last 2 inches of the tape down without any stretch. This goes above your elbow.
- Rub: Rub the tape firmly to activate the glue. This helps it stick.
Technique 2: Forearm Support Strip
This technique gives more support to the forearm muscles. It helps them work better.
- What you need: One strip of kinesiology tape, about 10-12 inches long. Round the corners.
- Steps:
- Prep: Keep your arm in the same position as Technique 1. Elbow slightly bent. Palm up.
- First Anchor: Anchor the tape on the inside of your forearm. Place it about 4-5 inches below your elbow. Do not stretch this part.
- Apply with Light Stretch: Peel the backing. Apply a light stretch (15-25%) to the tape. Run the tape up the inside of your forearm. It should go over the main part of the forearm muscles. These are the ones that control wrist flexion (bending your wrist down).
- Over the Elbow: Continue the tape over the medial epicondyle (the painful spot). Keep the light stretch.
- Second Anchor: Finish the tape on the inside of your bicep. Lay the last 2 inches down with no stretch.
- Rub: Rub the tape firmly to activate the glue.
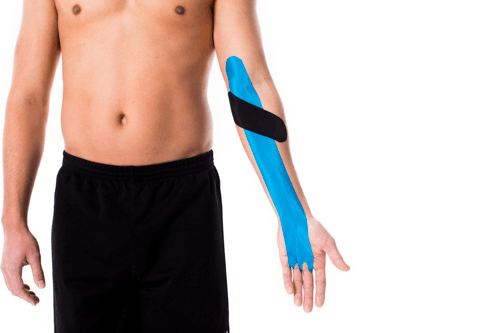
Technique 3: Comprehensive Elbow Support (Fan Method)
This method uses multiple strips for wider pain relief and support. It’s a great medial epicondylitis KT tape application.
- What you need: One long strip (about 10-12 inches) and two shorter strips (about 6-8 inches each). Round all corners.
- Steps:
- Prep: Arm in a slightly bent position. Palm up.
- Base Anchor: Take the long strip. Anchor one end (about 2 inches, no stretch) on your inner forearm, about 3-4 inches below the elbow crease.
- Apply Over Pain: With a light stretch (15-25%), run the tape directly over the medial epicondyle. Continue up the inner bicep. Lay the end down with no stretch. This is your main support strip.
- First Short Strip (Fan 1): Take a shorter strip. Find the middle of this strip. Place the middle directly over the painful spot (medial epicondyle) with no stretch. This forms the “anchor” for the fan.
- Fan Out: Peel the backing from one side of this short strip. Apply it with light stretch, fanning it slightly outwards from the main strip, towards your forearm.
- Second Short Strip (Fan 2): Peel the backing from the other side of the short strip. Apply it with light stretch, fanning it slightly inwards from the main strip, towards your bicep.
- Second Short Strip (Perpendicular): Take the second shorter strip. Find its middle. Place this middle directly over the most painful spot on your inner elbow, perpendicular (crossing) to the first long strip. No stretch in the middle.
- Fan Out Again: Peel the backing from one side. Apply with light stretch, fanning it down towards your forearm. Repeat for the other side, fanning it up towards your bicep.
- Rub: Rub all tape strips firmly to activate the glue.
These kinesiology tape methods help with pain and function. They allow for great movement.
Athletic Tape for Elbow Support Golf (Forearm Tendonitis Strapping Tutorial)
Athletic tape provides more rigid support. It helps limit painful movements. It is useful for golf elbow brace alternative needs.
Technique 1: Basic Support Wrap
This wrap provides simple, effective support to the forearm.
- What you need: Athletic tape (1.5 inches wide).
- Steps:
- Prep: Sit with your arm bent at a 90-degree angle. Your palm should face your body.
- First Anchor: Start by wrapping the tape around your forearm. Place it about 2-3 inches below your elbow crease. Wrap it 1-2 times. Do not wrap too tight. It should be snug but not cut off blood flow. Overlap each wrap slightly.
- Focus on Pain: As you wrap, make sure the tape crosses over the area of most pain on the inside of your elbow.
- Secure: Finish the wrap. Tear the tape. Press it down firmly.
- Check Circulation: Wiggle your fingers. Make sure they do not feel numb or tingly. The tape should not be too tight.
Technique 2: Figure-Eight Wrap for Enhanced Support
This wrap gives more specific support. It can help limit wrist movements that cause pain. This is a common forearm tendonitis strapping tutorial.
- What you need: Athletic tape (1.5 inches wide).
- Steps:
- Prep: Arm bent at 90 degrees. Palm facing your body.
- First Anchor (Forearm): Start by wrapping the tape around your upper forearm. Place it 2-3 inches below your elbow. Wrap it once or twice. This is your first anchor point.
- Angle Up: From the forearm anchor, angle the tape up. Go across the inside of your elbow. Cross directly over the medial epicondyle (the painful spot).
- Around Bicep: Continue the tape around the lower part of your bicep. Wrap it once or twice. This forms your second anchor point.
- Figure-Eight: Now, bring the tape back down. Cross it again over the medial epicondyle. Angle it back down to the forearm anchor.
- Repeat: Repeat the figure-eight pattern 2-3 more times. Each pass should overlap the previous one. This adds layers of support. Adjust the tension for comfort and support.
- Secure: Finish the tape on one of the anchor points (forearm or bicep). Tear the tape. Press it down firmly.
- Check Circulation: Check your fingers and hand for any numbness or tingling. Ensure good circulation.
Self-Taping for Golfer’s Elbow Pain
Taping your own elbow can be tricky. But it is doable with practice.
Here are tips for self-taping for golfer’s elbow pain:
- Use a Mirror: A mirror can help you see what you are doing. This is especially true for the back of your arm.
- Pre-cut Strips: Cut your tape strips to length before you start. Round the corners. This makes applying easier.
- Practice: Try a few times without pain. Get a feel for the tension.
- Start Slow: Do not rush. Take your time to place the tape right.
- Relax Your Arm: Keep your arm relaxed. This helps the tape lay smooth.
- Ask for Help: If you struggle, ask a friend or family member for help.
- Know Your Pain: Pay attention to where the pain is. Tape over that spot.
Remember, taping is one part of recovery. It should not be used in place of proper medical advice.
Tips for Effective Taping
Taping right makes a big difference. Follow these tips for the best results.
- Get the Right Tension:
- Kinesiology Tape: Use light to medium stretch. Too much stretch can cause skin problems. Not enough stretch makes it less effective.
- Light Stretch (15-25%): For pain relief, muscle support.
- Medium Stretch (50-75%): For more direct pain relief, over a painful spot.
- Athletic Tape: Apply firmly but not too tight. It should support, not cut off blood flow. Test by wiggling fingers. They should stay pink.
- Kinesiology Tape: Use light to medium stretch. Too much stretch can cause skin problems. Not enough stretch makes it less effective.
- Round the Corners: Always round the corners of your tape strips. This helps prevent peeling. It makes the tape last longer.
- No Stretch at Ends: Lay the first and last 1-2 inches of tape down with no stretch. These are called anchors. This helps the tape stick better and reduces skin irritation.
- Rub It In: After applying, rub the tape firmly. This creates heat. It activates the adhesive. It helps the tape stick to your skin.
- Wear Time:
- Kinesiology Tape: Can be worn for 3-5 days. It is waterproof. You can shower with it.
- Athletic Tape: Wear only during activity. Take it off after a few hours. It is not waterproof and can cause skin irritation if left on too long.
- Removal: Take tape off carefully. Peel it back slowly, in the direction of hair growth. Press your skin down as you peel. This helps avoid skin irritation. You can use baby oil to help loosen the adhesive.
- Listen to Your Body: If the tape hurts or causes itching, remove it. Your skin might be sensitive. Or the tape might be too tight.
By following these tips, you can make your taping more effective. It will also be more comfortable.
When Not to Tape: Important Warnings
While taping helps many people, it is not for everyone. There are times when you should not tape your elbow. It is important to know these times.
- Open Wounds or Cuts: Never tape over broken skin. This includes cuts, scrapes, or blisters. Taping over them can cause infection. It can also delay healing.
- Rashes or Skin Irritation: Do not tape if you have a rash, eczema, or any skin irritation in the area. The tape can make it worse.
- Allergies to Adhesive: Some people are allergic to tape glue. If you get itching, redness, or bumps, remove the tape right away. Try a small test patch first if you are unsure.
- Poor Circulation: If you have problems with blood flow, talk to your doctor. Taping might reduce circulation further.
- Diabetes: People with diabetes need to be careful with skin. Check with your doctor before taping. Poor circulation is a concern.
- Deep Vein Thrombosis (DVT): Do not tape if you have DVT. Taping can affect blood flow.
- Severe Swelling: If your elbow is very swollen or hot, see a doctor. Taping might not be the right first step. It could hide a more serious issue.
- Numbness or Tingling: If taping causes numbness, tingling, or increased pain, remove it immediately. It might be too tight. Or it might be pressing on a nerve.
- Undiagnosed Pain: If you do not know why your elbow hurts, see a doctor first. Taping might hide a more serious problem.
Taping is a helpful tool. But it should be used wisely. If in doubt, talk to a healthcare professional. They can tell you if taping is safe for you.
Beyond Taping: A Holistic Approach to Recovery
Taping is a great way to manage golf elbow pain. It helps you get back to your game. But it is just one piece of the puzzle. For full recovery, you need a broader plan. This plan includes rest, exercise, and sometimes other help.
Here is a holistic approach to healing your golf elbow:
- Rest and Modify Activity: This is key. Stop or cut back on activities that cause pain. This gives your tendons time to heal. If you cannot stop, change how you do the activity. For golf, work on your swing mechanics.
- Ice Therapy: Apply ice to your inner elbow for 15-20 minutes. Do this several times a day. Ice helps reduce pain and swelling.
- Stretching: Gentle stretches help improve flexibility. They can ease tension in your forearm muscles.
- Wrist Flexor Stretch: Extend your arm straight out. Palm faces up. Use your other hand to gently pull your fingers down towards your body. Hold for 30 seconds.
- Wrist Extensor Stretch: Extend your arm straight out. Palm faces down. Use your other hand to gently pull your fingers down towards your body. Hold for 30 seconds.
- Strengthening Exercises: Once pain lessons, start gentle strengthening. Build up slowly. Focus on forearm muscles.
- Wrist Curls: Hold a light weight (or soup can). Rest your forearm on a table. Palm up. Slowly curl your wrist up and down.
- Reverse Wrist Curls: Same setup. Palm down. Slowly lift your hand up and down.
- Grip Squeezes: Squeeze a tennis ball or soft stress ball. Hold for 5 seconds. Release.
- Ergonomic Adjustments: Look at your daily tasks. Are you gripping things too hard? Is your computer setup right? Adjust tools or habits to ease strain.
- Professional Help:
- Physical Therapist: A physical therapist can give you a custom exercise plan. They can also do manual therapy. They show you proper form.
- Doctor/Sports Medicine Specialist: They can confirm your diagnosis. They might suggest other treatments. These include injections or special procedures.
- Golf Pro: If golf is the cause, work with a golf pro. They can fix your swing. This prevents future injuries.
- Golf Elbow Brace Alternative: Besides tape, consider other options. A counterforce brace (often called a tennis elbow brace, but works for golf elbow too) wraps around the forearm. It puts pressure on the muscles. This helps lessen the pull on the tendons. It can be a good golf elbow brace alternative for ongoing support.
- Anti-Inflammatory Medication: Over-the-counter pain relievers (like ibuprofen) can help with pain and swelling. Use them as directed.
By combining taping with these steps, you give your elbow the best chance to heal fully. This helps prevent golf elbow injuries with tape and other care.
Preventing Golf Elbow Injuries with Tape and Good Habits
Preventing golf elbow is better than treating it. Taping can play a role in prevention. But good habits are key.
Here are ways to prevent golf elbow injuries with tape and smart practices:
- Warm-Up Properly: Before any activity, warm up your arm muscles. Do light cardio. Do dynamic stretches for your arms and shoulders.
- Stretch Regularly: Stretch your forearm muscles daily. Even if you do not have pain. This keeps them flexible.
- Strengthen Your Forearms: Build strong forearm muscles. They can better handle stress. Use light weights. Do wrist curls and reverse curls.
- Use Proper Technique:
- Golf Swing: Work with a golf pro. Learn a smooth swing. Avoid chopping down at the ball. Make sure your grip is not too tight.
- Other Sports/Activities: Learn the right way to do your sport or job tasks. Avoid bad form.
- Gradual Increase in Activity: Do not do too much too soon. Build up your activity levels slowly. This lets your body adapt.
- Take Breaks: If your activity involves repetitive hand or arm moves, take breaks. Rest your arm. Stretch often.
- Use Proper Equipment:
- Golf Clubs: Make sure your golf clubs fit you. This includes grip size and shaft flexibility.
- Tools: Use ergonomic tools if possible.
- Listen to Your Body: If you feel even a little pain, stop or slow down. Do not push through pain. Pain is a warning sign.
- Proactive Taping: If you know you will do an activity that stresses your elbow, apply tape beforehand. This can offer support. It can give feedback to your muscles. Use kinesiology tape for golf elbow as a preventive measure. It can support your muscles without limiting movement. It helps prevent golf elbow injuries with tape by reminding muscles to work correctly.
By taking these steps, you can greatly reduce your risk of getting golf elbow. Stay active, but stay smart!
Conclusion
Golf elbow can be a real pain, especially if you love to stay active. But taping offers a great way to ease discomfort and get you back in the game. Whether you choose the gentle support of kinesiology tape for golf elbow or the firm hold of athletic tape for elbow support golf, knowing the right golfer’s elbow taping techniques is powerful.
Remember, self-taping for golfer’s elbow pain is doable with practice. It can be a useful golf elbow brace alternative. But taping is only part of a bigger plan. Combine it with rest, stretches, and strengthening. Always listen to your body. See a doctor if pain continues or gets worse. With smart care and consistent effort, you can overcome golf elbow. You can enjoy your activities with less pain.
Frequently Asked Questions (FAQ)
Q1: How long can I leave the tape on my golf elbow?
A1: It depends on the type of tape. Kinesiology tape for golf elbow can stay on for 3 to 5 days. You can even shower with it. Athletic tape should only be worn for a few hours. Take it off after your activity or workout.
Q2: Can taping cure my golf elbow?
A2: Taping helps manage the pain and supports the elbow. It does not “cure” golf elbow on its own. For full healing, you also need rest, stretches, and strengthening exercises. It is part of epicondylitis pain management tape methods.
Q3: Is taping better than a brace for golf elbow?
A3: It depends on your needs. Taping, especially with kinesiology tape, allows more freedom of movement. It feels less bulky. A brace offers more rigid support. Some people find tape more comfortable for sports. It can be a good golf elbow brace alternative.
Q4: What if taping causes my skin to itch or get red?
A4: Remove the tape right away if you feel itching or see redness. You might be allergic to the adhesive. Or the tape might be too tight. Try a different brand of tape. Make sure your skin is clean and dry before applying.
Q5: Can I tape my golf elbow if I am still playing golf?
A5: Yes, many golfers tape their elbow to play. Taping provides support and pain relief. It can help you keep playing while you heal. Focus on good form and rest after your round. It is part of preventing golf elbow injuries with tape while staying active.