
How do you read a golf green for putting? Reading a golf green for putting involves a careful look at its slope, shape, and grass direction to figure out how the ball will roll. You need to see the high and low spots, feel how fast the green is, and decide where to aim to make the ball go into the hole. This guide will help you see the green like a pro.
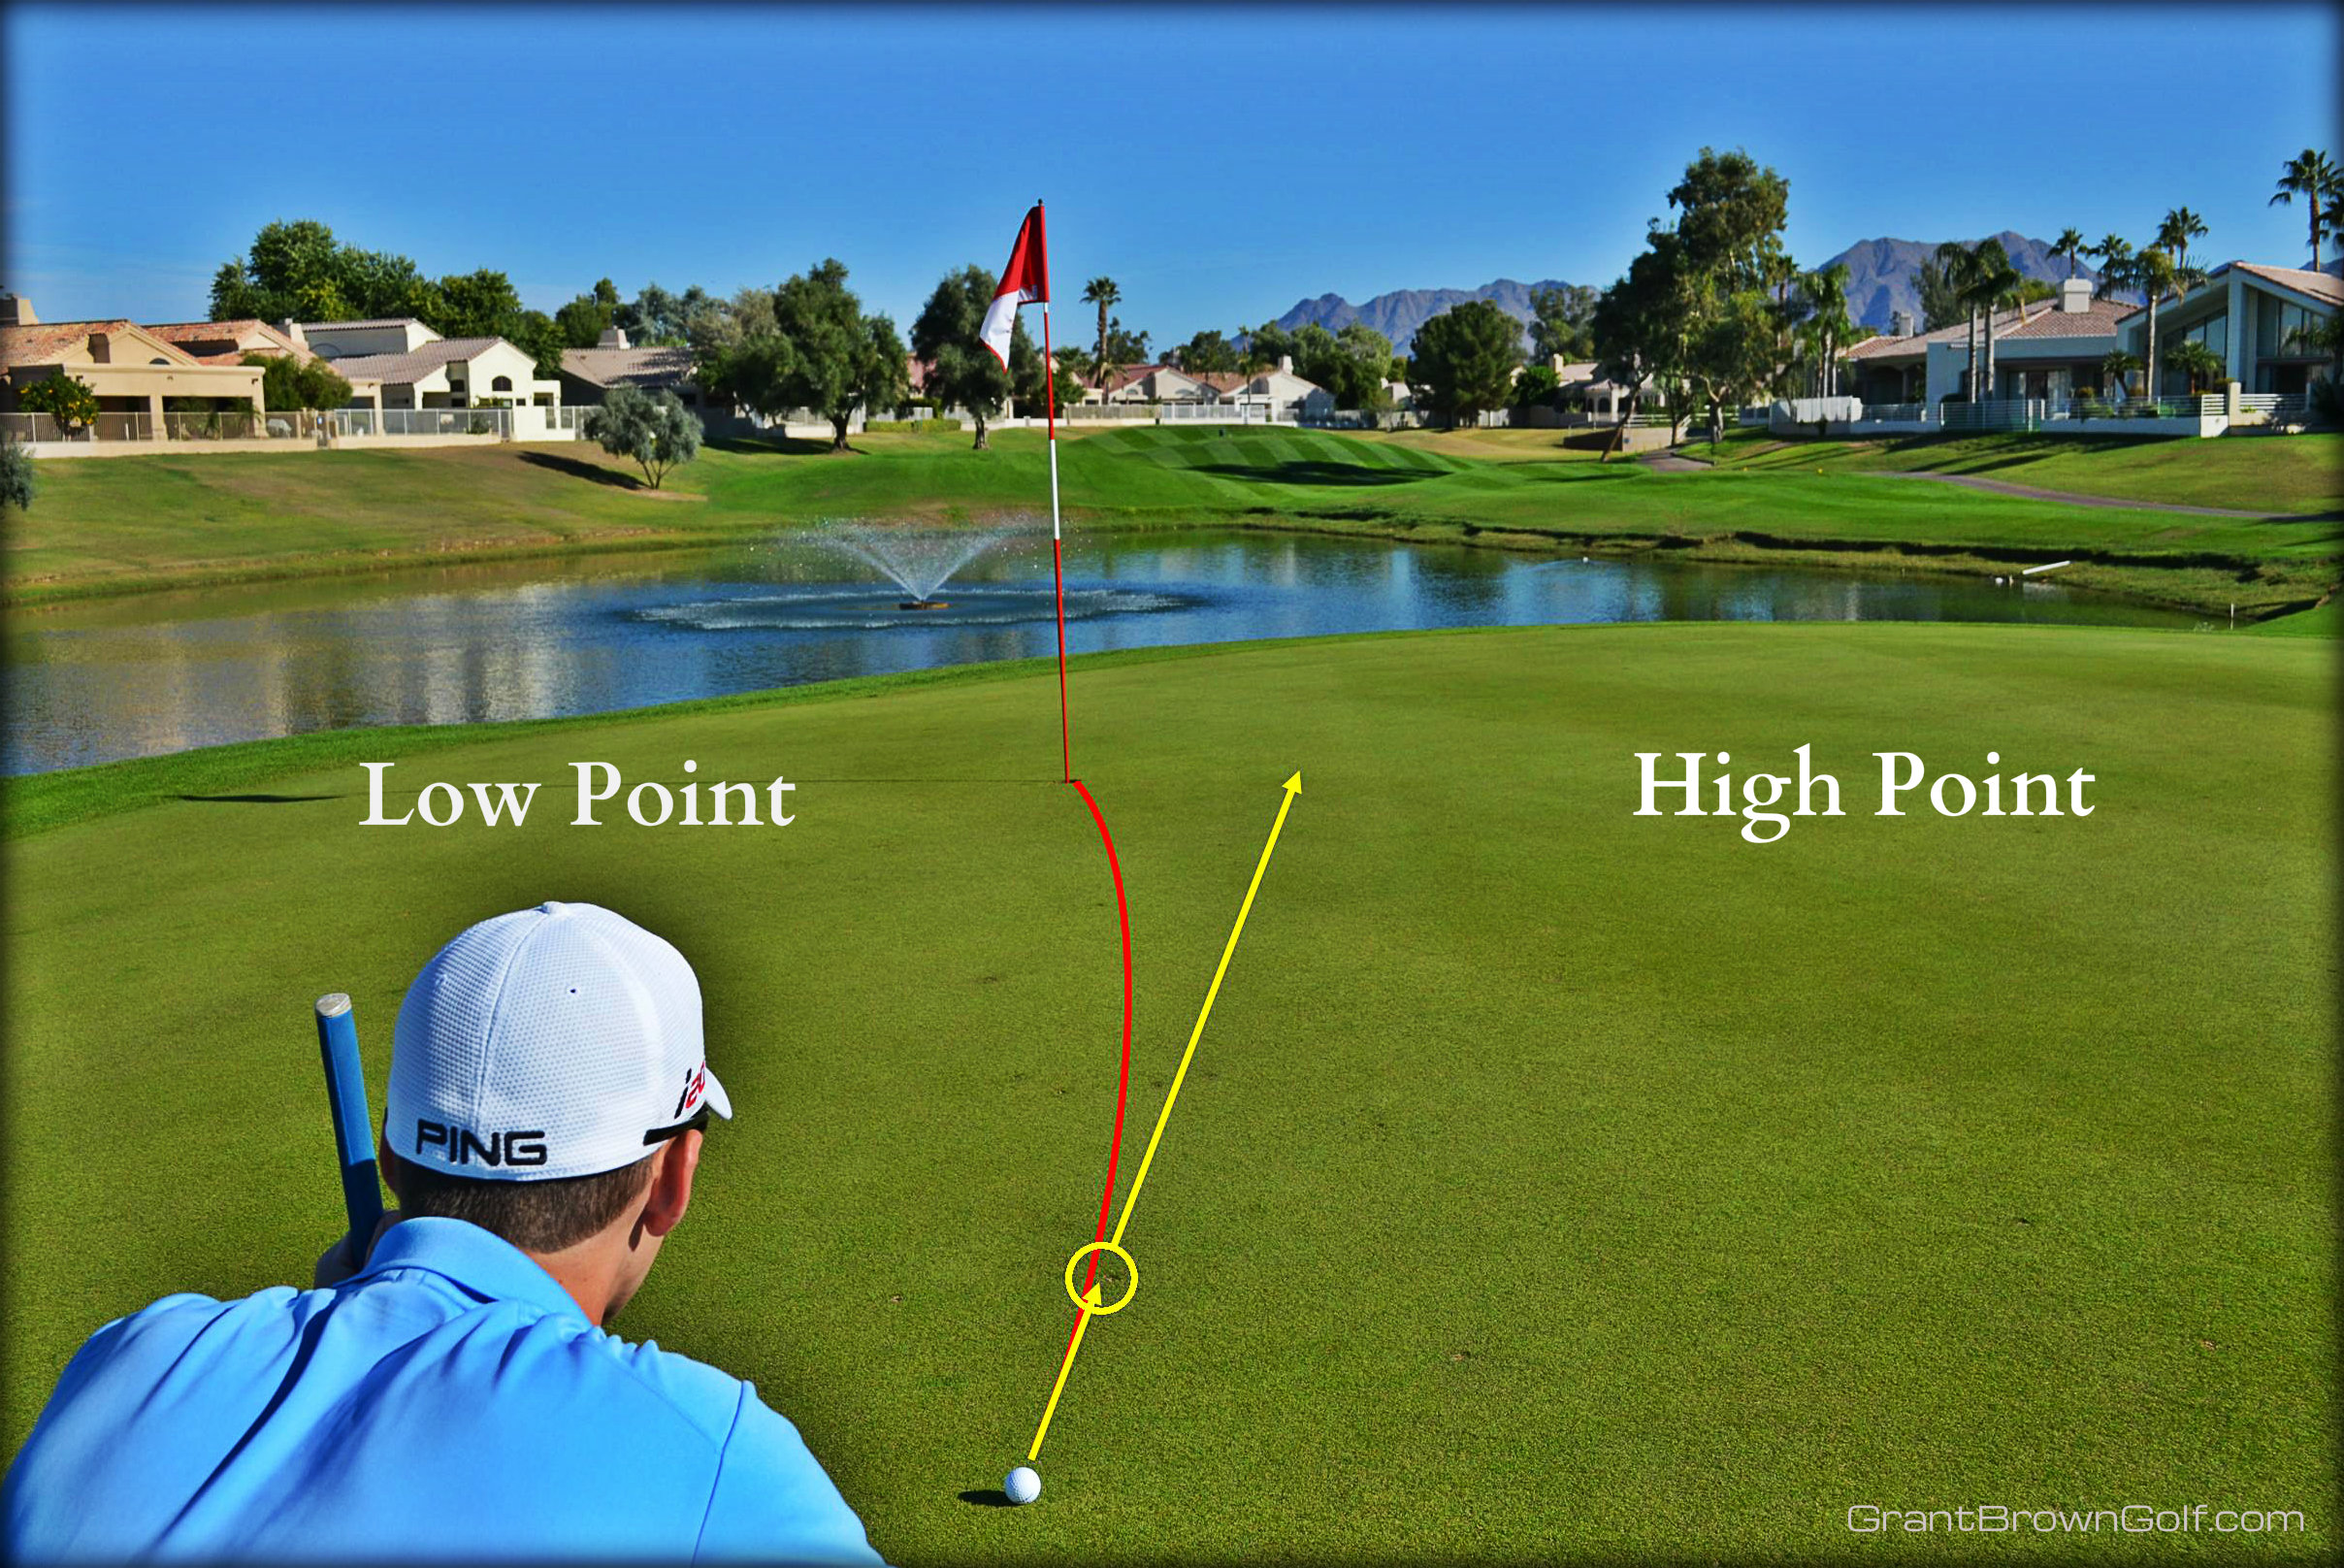
Image Source: grantbrowngolf.com
The Green’s First Impression: Seeing the Whole Picture
When you walk onto a putting green, do not rush. Take a moment to look around. Your first look at the green can tell you a lot. Think of it like reading a map. You want to see the big hills and valleys first.
Observe the Area Around the Green:
The green is part of a bigger area. Water naturally flows downhill. If you see water hazards or bunkers, notice where they are. Greens often slope towards these low points. Look at the land around the green. If the course is built on a hillside, the green will likely slope down the hill. This big picture view gives you clues about the overall putting green slope.
- Look from afar: Before you even step on the green, try to see its shape from the fairway or rough.
- Walk around the hole: When you walk to your ball, walk a wide path around the hole. This helps you see the green from all sides.
- Eyes at ground level: Crouch down to get your eyes closer to the ground. This makes slopes look bigger and easier to spot.
Feel the Slope with Your Feet:
Your feet can also tell you about the green’s tilt. As you walk, pay attention to how your body feels. Do you lean forward or backward? Is one leg working harder than the other? This feel is a good way to find the main slope.
- Walk slowly: Take your time walking.
- Notice pressure: Feel if more weight is on your toes or heels.
- Trust your gut: Often, your body knows the slope before your eyes do.
Gauging the Green’s Tilt: Putting Green Slope
The putting green slope is the main force that makes your putt curve. Gravity pulls the ball downhill. If the green is tilted, the ball will not go straight. It will curve. You need to know how much it will curve.
Finding the High and Low Points:
Look for the highest part of the green. Water would flow from there to the lowest part. This gives you the general direction of the slope.
- Look for water: Imagine pouring water on the green. Where would it go?
- Spot the drains: If you see drain covers near the green, the green usually slopes toward them.
- Use your plumb bob (more on this later): Your putter can help you see the slope.
Types of Slopes:
Greens are rarely perfectly flat. They have different kinds of slopes.
- Straight slopes: The green goes downhill in one clear direction.
- Bowl-shaped: The edges are high, and the middle is low, like a bowl. Putts roll toward the middle.
- Dome-shaped: The middle is high, and the edges are low, like a dome. Putts roll away from the middle.
- Plateau: Flat on top, then slopes down on the sides.
How Slope Affects Break:
A bigger slope means more golf green break. A small slope means less break. But even small slopes can cause a putt to miss if you do not see them.
- Steep slope: The ball will move a lot sideways. You need to aim far from the hole.
- Gentle slope: The ball will move a little sideways. You still need to aim away, just not as much.
Table: Common Green Slopes and Their Effects
| Slope Type | Description | Effect on Putt |
|---|---|---|
| Straight Down | Green drops steadily in one direction. | Strong, consistent break in one direction. |
| Bowl-shaped | Edges are higher, middle is lower. | Putts from edge break toward the center. |
| Dome-shaped | Middle is higher, edges are lower. | Putts from center break outward. |
| Subtle Undulation | Small, gentle rises and falls. | Minor, sometimes hard-to-see breaks. |
Predicting the Ball’s Curve: Golf Green Break
Golf green break is how much your putt will curve due to the slope. This is the most important part of reading a green. You need to see the line the ball will take. It is not always a straight line to the hole.
Gravity’s Role:
Gravity pulls the ball downhill. The ball will start on your chosen line. But as it slows down, gravity will pull it more. So, the break is usually greater near the hole.
Estimating Break:
You need to guess how far left or right of the hole you must aim. This is often described in “feet” or “inches” of break. For example, “It breaks a foot to the left.”
- High side vs. Low side: The ball will always break from the high side of the slope to the low side.
- Visualizing the path: Imagine the ball rolling. Try to see its whole journey from your ball to the hole.
Reading Break from Different Sides:
Look at your putt from both behind the ball and behind the hole. Sometimes, one view makes the break clearer.
- Behind the ball: Helps you see the starting line.
- Behind the hole: Helps you see where the ball will enter the hole. It also helps you see the slope near the cup.
- From the side: Look at the putt from the side. This can help you see the elevation changes.
Reading the Green’s Bumps and Dips: Interpreting Green Contours and Undulations
Green contours are the smaller, often subtle, changes in the green’s surface. These are not always big slopes you can see easily. They are the little hills and valleys that make a putt tricky. Reading undulations means seeing these slight waves in the green.
Subtle Slopes:
Sometimes, a green looks flat, but it is not. There might be a slight rise or dip. These small changes can still make your ball move off line.
- Walk slowly: As you walk, feel the ground with your feet.
- Look for shadows: In strong light, subtle changes can create small shadows that show you the contours.
- Listen to your caddie: If you have one, they often know the subtle breaks.
Double Breaks:
A double break putt happens when the ball curves in one direction, then changes and curves in another. This often happens on a long putt with a big dip or rise in the middle.
- Spot the change: You will see a point where the slope changes.
- Break it down: Think of a double break putt as two separate putts. First, the ball breaks right. Then, it hits a new slope and breaks left.
- Focus on the first break: Aim for the first break. Once the ball passes that point, the new slope will take over.
Example of a Double Break:
Imagine a putt that starts going downhill and left. Then, it crosses a small ridge and starts going downhill and right towards the hole. You need to aim for the left break first. Your speed must be right to carry the ball over the ridge to catch the right break.
How Grass Direction Changes Your Putt: Green Grain Influence
The way the grass grows, called green grain influence, can change both the speed and the break of your putt. Grass blades lean in a certain direction. This leaning affects how the ball rolls.
How to See the Grain:
The grain is often hard to see. But there are clues:
- Color: Grass looks shinier when you are looking with the grain (the grass leans away from you). It looks duller or darker when you are looking against the grain (the grass leans toward you).
- Pace: Putts with the grain will roll faster. Putts against the grain will roll slower.
- Hole edges: Look at the rim of the cup. If the grass is pushed down on one side, that’s the direction of the grain. The grass around the hole often points towards the sun, or towards drainage areas.
- Foot traffic: Greens often have grain pushed down by walking paths or common lines.
Grain’s Effect on Break:
The grain also pulls the ball slightly in its direction.
- With the grain: The ball will roll a little faster and break a little more in the direction of the grain.
- Against the grain: The ball will roll a little slower and break a little less.
- Across the grain: If the grain runs left to right, it will make a right-to-left putt break a little more, and a left-to-right putt break a little less.
Table: Green Grain Effects
| Grain Direction | Visual Cue | Speed Effect | Break Effect |
|---|---|---|---|
| With the grain | Shinier, lighter | Faster roll | More break in grain direction |
| Against the grain | Dull, darker | Slower roll | Less break |
| Across the grain | Half-half look | Minor speed change | Slight pull in grain direction |
Using a Plumb Bob to See the Slope: Plumb Bobbing Putting
Plumb bobbing putting is a way to use your putter to help see the slope. It is like using a carpenter’s level. It helps you see which side of the hole is higher.
How to Do It:
1. Stand behind your ball: Get in your putting stance, but do not touch the ball.
2. Hold your putter out: Hold your putter out in front of you. Let it hang straight down. Do not grip it tightly. Let gravity pull it straight.
3. Close one eye: Look at the putter shaft with one eye.
4. Align with the hole: Move your head until the putter shaft lines up with the center of the hole.
5. Look left and right: See if the green on one side of the shaft is higher than the other. If the green is higher to the left of the shaft, the green slopes from left to right. The ball will break to the right. If the green is higher to the right, it slopes right to left. The ball will break left.
Tips for Plumb Bobbing:
* Use the same eye: Always use the same eye for consistency.
* Stay still: Do not move your body or head once you line up.
* Use for major slope: Plumb bobbing is best for seeing the main slope. It is less useful for small, subtle breaks or double breaks.
* Combine with other methods: It’s just one tool. Use it with your other ways of reading the green.
Picking the Perfect Path for Your Putt: Putt Line Analysis
Putt line analysis is the process where you put all your observations together. You decide exactly where you want your ball to start. This is your “aiming point” or “target line.”
Steps for Analyzing Your Putt Line:
- Assess the overall slope: Look at the land around and on the green. Get the big picture. Is it uphill, downhill, or flat?
- Find the high point: Identify the highest spot relative to the hole. This is where the ball will start to break from.
- Trace the path: Imagine the ball rolling from your current spot to the hole. Draw a line in your mind. This line will not be straight if there’s a break.
- Factor in speed: Think about how fast you will hit the ball. A faster putt will break less. A slower putt will break more. This is key to judging putt speed.
- Consider the grain: How will the grass affect the roll? Will it speed it up or slow it down? Will it pull the ball slightly?
- Account for undulations/contours: Are there any small bumps or dips that will change the line? If so, where will the ball go over them?
- Identify the aiming point: Based on all of this, pick a spot on the green that you will aim for. This spot is usually away from the hole, on the high side of the break.
Visualize the Line:
Many golfers visualize their putt. They imagine a faint line on the green that their ball will follow. Some even stand behind the ball and make practice swings, looking at the line.
- Walk the line: Walk along your chosen putt line. Feel the ground. Look for anything you missed.
- Pick a target: Choose a small leaf, an old spike mark, or a blade of grass a few inches in front of your ball on your chosen line. This helps you start the ball on the right path.
Hitting the Ball Just Right: Judging Putt Speed
Judging putt speed is as important as reading the break. Even if you pick the perfect line, if you hit the ball too hard or too soft, it will not go in.
Speed and Break Connection:
Speed directly affects how much a ball breaks.
- Too fast: A ball hit too hard will “fight” the break. It will not have enough time to be pulled by gravity, so it will break less than you planned. It might go straight past the hole.
- Too slow: A ball hit too soft will be pulled more by gravity. It will break more than you planned. It might stop short of the hole.
The “Dying Putt”:
Many pros aim for a putt that barely gets to the hole and just falls in. This “dying putt” uses the break fully. It means the ball loses most of its speed right as it gets to the hole. This gives the ball the best chance to drop.
Tips for Speed Control:
- Practice: Spend time on the practice green hitting putts of different lengths.
- Feel the green: Roll a few practice putts to a specific distance to get a feel for the green’s speed.
- Practice stroke: Use the same length of backswing and follow-through for similar putt lengths.
- Look at the hole: Some pros recommend looking at the hole as you make your practice stroke. This helps your brain judge the distance.
Table: Speed vs. Break
| Putt Speed | Effect on Break | Outcome if Line is Correct |
|---|---|---|
| Too Fast | Less break than planned | Ball goes past the hole |
| Just Right | Full, intended break | Ball drops in |
| Too Slow | More break than planned | Ball stops short or breaks too much |
Where to Point for the Curve: Aiming for Break
Once you have figured out the break, the next step is aiming for break. This means picking a spot on the green that is not the hole. It is where you want your ball to start.
Visualizing the Aiming Point:
Imagine a clock face on the green. If the ball breaks left, you might aim at 1 o’clock or 2 o’clock relative to the hole. If it breaks right, you might aim at 10 o’clock or 11 o’clock.
- Use a reference point: Pick a leaf, an old spike mark, or a discolored patch of grass on your aiming line. Use this as your target.
- Line up your putter face: Make sure the face of your putter points directly at this aiming point.
- Trust your line: Once you have picked your aiming point, commit to it. Do not second-guess it over the ball.
How Far to Aim Away:
This is the hardest part. It comes with practice and experience.
- Small break: Aim just outside the hole.
- Medium break: Aim one to two feet outside the hole.
- Big break: Aim much further, maybe even several feet away.
- Uphill vs. Downhill: Uphill putts break less because they slow down faster. Downhill putts break more because they keep speed longer.
Putting to a “Spot”:
Instead of thinking “I need to make this putt,” think “I need to hit my ball to that spot on the green.” This shifts your focus from the result to the process.
Putting It All Together: Practice and Routine
Reading greens is a skill that gets better with time. You need to practice. You also need a routine.
Build a Pre-Putt Routine:
A good routine helps you go through all the steps of reading the green without missing anything.
- Walk behind the ball: See the overall slope.
- Walk behind the hole: See the slope from the other side.
- Walk around the putt: Look for subtle contours and grain.
- Use plumb bob (optional): Get a quick check on the main slope.
- Pick your line: Decide where the ball will roll.
- Pick your aiming point: Find a spot on the green to aim at.
- Take practice strokes: Feel the speed.
- Line up: Point your putter at your aiming point.
- Make the putt: Hit the ball with confidence.
Practice Makes Perfect:
Spend time on the practice green. Do not just hit putts to the hole.
- Read every putt: Even practice putts.
- Experiment with speed: Hit putts too fast, too slow, and just right to see how speed changes break.
- Use aim sticks: Place alignment sticks on the ground to confirm your aiming point.
- Play games: Make up games to test your green reading skills. For example, try to get every putt to stop within a foot of the hole.
Learning from Every Putt:
Every putt you hit, whether good or bad, teaches you something.
- Watch the ball: After you hit, watch your ball closely. Did it break more or less than you thought? Did it go past or stop short?
- Remember the conditions: Note the green speed, the slope, and the grain. This will help you next time.
- Trust your eyes, but confirm with feel: Sometimes your eyes can play tricks. Trust your feet and your instincts.
By carefully observing the putting green slope, predicting the golf green break, considering the green grain influence, performing thorough putt line analysis, interpreting green contours and reading undulations, judging putt speed, using techniques like plumb bobbing putting, recognizing double break putts, and finally aiming for break, you will greatly improve your putting. It takes time and practice, but soon you will be reading greens like an expert.
Frequently Asked Questions (FAQ)
Q1: How do I tell if a green is fast or slow?
A1: Greens feel hard and firm when fast, soft and spongy when slow. You can also roll a few practice putts to gauge their speed. Dry, warm weather often means faster greens. Wet or cold weather makes them slower.
Q2: Does looking at the surrounding landscape really help?
A2: Yes, it does. Greens often slope towards the lowest points of the land, like water hazards or valleys. If the whole course is built on a hill, the green will generally slope down that hill.
Q3: Is plumb bobbing always accurate?
A3: Plumb bobbing is a good tool for seeing the main slope. But it does not tell you about subtle breaks or changes in the middle of the putt. It works best on simple, clear slopes. Always use it with your own visual clues.
Q4: How do I handle very long putts?
A4: Long putts need more break and careful speed control. Break them into smaller sections in your mind. Focus on hitting the first part of the putt correctly. Your speed needs to carry the ball all the way to the hole, letting gravity do its work.
Q5: What if I can’t decide on the break?
A5: When in doubt, play less break than you think. Also, aim for the high side of the hole. A putt that is a little too high can still go in, but a putt that is too low will always miss.