
So, what is a golf cart lithium conversion? It means swapping out old, heavy lead-acid batteries for new, lighter, and more powerful lithium ones. Can you convert your golf cart to lithium? Yes, most golf carts, both 36V and 48V models, can make this change. Is it hard to convert? For a handy person, it’s a project you can do. It needs careful work and following steps closely, but it is very doable for many DIY fans. This guide will show you how to give your golf cart a big power boost with lithium batteries.
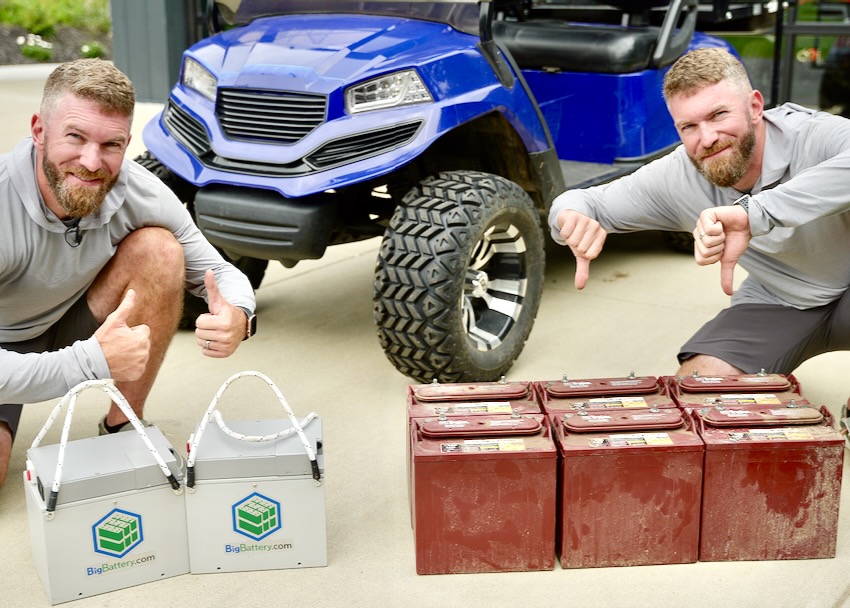
Image Source: rogueengineer.com
Why Choose Lithium for Your Golf Cart?
Making the switch to lithium batteries offers many good things for your golf cart. It is not just a change; it is an upgrade. Think about how your cart works now. Lithium batteries can make it much better.
Clear Benefits of Lithium Batteries
Many reasons exist to pick lithium. These batteries bring new life to your cart. They change how your cart drives and how you care for it.
- Lighter Weight: Lithium batteries weigh much less than lead-acid ones. This lighter load helps your golf cart in many ways. It means less stress on the motor and suspension. It also means your cart can go faster. It can also carry more people or gear without feeling slow. The total weight of your cart drops, making it easier to handle.
- Longer Life: Lithium batteries last a lot longer. Lead-acid batteries might need changing every few years. Lithium ones can last 8 to 10 years or even more. This means less money spent over time. It also means less hassle with battery changes.
- Faster Charging: You can charge lithium batteries much quicker. Many lead-acid batteries take 8 to 10 hours to charge fully. Lithium batteries can often charge in 2 to 3 hours. Some can even charge faster. This is great if you use your cart often. You spend less time waiting.
- Consistent Power: Lead-acid batteries lose power as they drain. Your cart might feel slower as the charge drops. Lithium batteries give full power until they are almost empty. This means your cart will keep its speed and strength. You get a steady ride every time.
- No Maintenance: Lead-acid batteries need water checks and cleaning. They can spill acid. Lithium batteries need no water. They are sealed units. They do not leak. This saves you time and keeps things cleaner.
- More Range: Because they are lighter and hold power better, lithium batteries often give your cart more miles on a single charge. You can go further without worrying about running out of power.
All these lithium battery benefits golf cart make the conversion worth it. You get a better-performing cart that is easier to own.
Is Lithium Right for Your Cart?
Before you buy a golf cart lithium conversion kit, you need to check a few things. Not all carts are the same. You want to make sure lithium will work well with your specific model.
Cart Voltage Check
Most golf carts use a 36V or 48V system. Some might be 72V. You need to know your cart’s voltage. This is key for picking the right lithium battery pack.
- How to check: Look at your current lead-acid battery setup. Count the number of batteries. Each standard lead-acid golf cart battery is usually 6V, 8V, or 12V.
- Six 6V batteries make a 36V system (6 x 6V = 36V).
- Six 8V batteries make a 48V system (6 x 8V = 48V).
- Four 12V batteries make a 48V system (4 x 12V = 48V).
- Matching Voltage: Your new lithium battery pack must match this voltage. If your cart is 48V, you need a
48V lithium golf cart upgrade. You cannot put a 36V lithium pack into a 48V cart system.
Motor Type
Most golf cart motors work fine with lithium batteries. Older carts might have series wound motors. Newer ones usually have shunt or AC motors. Lithium batteries give a steady high voltage. This can make some older series motors run hotter. This is usually not a big problem. But it is good to know. If you have an old cart, check online forums or with a golf cart expert. They can tell you if your motor is a good match for lithium.
Space for Batteries
Lithium battery packs are often smaller than the old lead-acid ones. This is good because it gives you more space. But you still need to make sure the new pack fits.
- Measure: Measure the area where your current batteries sit.
- Check Kit Size: Compare these numbers to the dimensions of the
golf cart lithium conversion kityou plan to buy. Some kits are one big battery. Others use smaller modules. Make sure it all fits. You might even gain storage space.
Getting Your Tools and Materials
Before you start, gather everything you need. Having all your tools ready saves time and makes the job smoother.
List of Essential Tools
You will need some basic tools for this project.
- Wrenches/Socket Set: To loosen and tighten battery terminals and hold-downs.
- Wire Cutters/Strippers: For cutting and preparing new wires.
- Multimeter: Very important for checking voltage and connections.
- Safety Glasses and Gloves: Always protect your eyes and hands. Lead-acid batteries can be risky.
- Battery Terminal Cleaner: To clean posts and cables.
- Zip Ties or Cable Clamps: For neat wire routing.
- Heat Gun (Optional): For heat-shrink tubing if you use it for cable protection.
- Drill (Optional): If you need to make new mounting holes.
- Torque Wrench (Optional): For exact tightening of terminals.
Key Components of Your Conversion Kit
A good golf cart lithium conversion kit will include the main parts you need.
- Lithium Batteries: These are usually
lithium iron phosphate golf cart(LiFePO4) batteries. LiFePO4 is safe and lasts a long time. You will likely get one large battery pack or a few smaller ones. Make sure the total voltage matches your cart. - Battery Management System (BMS): This is the brain of your lithium battery. It protects the battery from overcharging, over-discharging, and too much current. It also balances the cells. Some lithium batteries have an internal BMS. Others need an external one.
- Lithium Golf Cart Charger: You cannot use your old lead-acid charger. Lithium batteries need a special
golf cart lithium battery charger. This charger has a different charging plan. It is built to keep your lithium battery healthy. - New Cables and Connectors: Your old cables might be too small or worn. New, thick cables are often included in kits. They ensure safe power flow.
- Battery Tray/Mounting Hardware: Some kits come with special trays or brackets. These help secure the new lithium battery. You might need to do some
golf cart battery tray modificationto fit the new battery.
The Core Components Explained
Let’s look closer at the main parts of your new lithium system. Knowing what each part does helps you with the install.
Lithium Batteries (LiFePO4 Focus)
The heart of your conversion is the battery. Most kits use lithium iron phosphate golf cart batteries, or LiFePO4 (LFP).
-
Why LiFePO4?
- Safety: They are very stable. They are less likely to overheat or catch fire than other lithium types. This is key for something you ride.
- Long Cycle Life: They can be charged and discharged many thousands of times. This means they last a very long time.
- Performance: They deliver full power until they are nearly empty. They do not suffer from “voltage sag.”
- Temperature Tolerance: They work well in a wide range of temperatures.
-
Battery Types: Some kits use one large
48V lithium golf cart upgradebattery. This is like a big brick. Others use smaller, individual lithium cells wired together. The single large battery is often simpler to install.
Battery Management System (BMS)
The BMS is vital for any lithium battery. It is a smart electronic device.
-
What it does:
- Protects from Overcharge: Stops charging when the battery is full.
- Protects from Over-discharge: Stops the battery from draining too low. This saves it from damage.
- Balances Cells: Makes sure all the small cells inside the battery have the same charge. This makes the battery last longer.
- Monitors Temperature: Prevents the battery from getting too hot or too cold.
- Monitors Current: Shuts off power if too much current is pulled. This prevents damage to the battery or cart.
-
Golf cart BMS installation: If your lithium battery does not have a built-in BMS, you will need to wire one. It connects to each cell (or group of cells) and to the main power lines. The BMS is usually a small box that you mount near the battery. Follow the wiring diagram exactly.
Golf Cart Lithium Battery Charger
Your old lead-acid charger will not work. It charges differently. It tries to push a constant voltage. Lithium batteries need a charger that uses a specific charging plan.
- Lithium Charger Needs:
- It charges in stages.
- It stops charging when the battery is full.
- It often has a voltage and current specific to lithium.
- The
golf cart lithium battery chargeris a key part of your kit. Make sure it matches your battery’s voltage.
Cables and Connectors
Good cables are a must. Your golf cart motor pulls a lot of power.
- Cable Thickness: Use thick cables, usually 2 AWG or 4 AWG. Thicker cables carry more power with less heat.
- New vs. Old: Even if your old cables look okay, new ones are often better. The kit usually provides them.
- Secure Connections: All connections must be clean and tight. Loose wires can cause heat, lose power, or even start a fire.
Step-by-Step Conversion Guide
Now, let’s get to the actual work. This is the DIY lithium golf cart conversion process. Take your time, and follow each step.
Safety First!
Before you touch anything, always put safety first.
- Wear Safety Gear: Put on your safety glasses and gloves.
- Disconnect Main Power: Find your golf cart’s main power switch or connector. Turn it off or pull the plug. If there is no switch, disconnect the main negative cable from your existing battery pack first. This stops any power from flowing.
Removing Old Lead-Acid Batteries
This is where you start replacing lead acid golf cart batteries. They are heavy, so be ready.
- Take Pictures: Before you unhook anything, take clear photos of how your old batteries are wired. This is your future
golf cart lithium wiring diagramguide. Pay attention to how they connect in series. - Label Cables: Use tape and a marker to label each cable as you remove it. Note where it went (e.g., “main positive,” “controller,” “first series connection”). This helps later.
- Remove Cables: Disconnect the cables one by one. Always start with the negative (-) cables. Then remove the positive (+) cables.
- Remove Hold-Downs: Take off any straps or clamps holding the batteries in place.
- Lift Out Batteries: This is the hard part. Lead-acid batteries are very heavy. Get help if you need it. Lift them straight up and out. Avoid tilting them, as acid can spill.
- Proper Disposal: Do not just throw away old batteries. They contain lead and acid. Take them to a recycling center that handles car or marine batteries. Most auto parts stores or battery shops will take them.
Preparing the Battery Tray
Your old battery tray might need some work. This is the golf cart battery tray modification step.
- Clean the Area: The old batteries might have left acid residue or dirt. Clean the tray thoroughly with a mix of baking soda and water. This neutralizes any acid. Rinse well and let it dry.
- Check for Damage: Look for rust or cracks. Repair any damage.
- Make Space: Your new lithium battery might be a different size or shape.
- If it is smaller, you might need to add wood blocks or foam inserts to hold it steady.
- If it is a different shape, you might need to move some hold-down points. Some kits have special brackets.
- The goal is to make sure the new battery sits firmly and cannot move around when the cart drives.
Placing New Lithium Batteries
Now, put in your new power source.
- Careful Placement: Gently lower the
lithium iron phosphate golf cartbattery into the cleaned tray. - Orient Correctly: Make sure the terminals are facing the right way for easy wiring. Look at your new
golf cart lithium wiring diagram. - Secure the Battery: Use the new hold-down straps or clamps from your kit. If your kit did not come with them, you might reuse parts from your old setup or buy new ones. Make sure the battery is held tightly. It should not shift at all.
Wiring the System
This is a critical step. A correct golf cart lithium wiring diagram is key.
- General Principles:
- Start with Main Cables: Connect the main positive (+) and negative (-) cables from your lithium battery to the golf cart’s system (usually the controller). Follow the diagrams from your kit and your cart’s manual.
- Individual Batteries (if applicable): If you have multiple smaller lithium batteries (not one big one), you will likely wire them in series. This means connecting the positive of one to the negative of the next. This adds up the voltage to reach your 48V or 36V total.
- Clean and Tight: Every connection must be clean and very tight. Use new terminals if needed. Loose connections cause heat and power loss.
- Insulate: Use heat shrink tubing or electrical tape over exposed terminals to prevent short circuits.
48V Lithium Golf Cart UpgradeSpecifics:- If you are doing a
48V lithium golf cart upgrade, your single lithium battery pack will output 48V. You simply connect its main positive and negative terminals to the cart’s main battery cables. - If you are using multiple smaller 12V lithium batteries to make 48V (e.g., four 12V batteries), you will wire them in series. Connect the positive terminal of the first battery to the negative terminal of the second, and so on. The main positive will come from the last battery, and the main negative from the first.
- Always double-check your
golf cart lithium wiring diagramfrom the kit.
- If you are doing a
Installing the BMS
If your battery has an external BMS, install it now. This is the golf cart BMS installation step.
- Placement: Find a dry, secure spot near the battery. Mount the BMS box firmly.
- Balance Leads: The BMS will have thin wires called balance leads. These connect to specific points on your battery pack (or to each individual cell if you have multiple batteries). These wires tell the BMS the voltage of each part of the battery. Connect them carefully following the BMS diagram. This is crucial for battery health.
- Main Power Connections: Connect the main positive and negative cables from the battery through the BMS if your BMS is designed for it. Some BMS units act as a switch for the main power. Again, follow the specific
golf cart BMS installationdiagram that came with your unit. If in doubt, get help from an expert.
Connecting the Charger Port
Your new golf cart lithium battery charger will have a different plug than your old one.
- Replace Port: You will likely need to replace your cart’s charging port with one that matches your new lithium charger’s plug. This is usually straightforward. Remove the old port and wire in the new one.
- Wiring: Ensure the new charging port is wired correctly to the battery system. Positive to positive, negative to negative. Double-check with a multimeter.
Final Checks and Testing
You are almost done! Now, be very careful before powering up.
- Double-Check All Connections: Look at every wire. Is it tight? Is it insulated? Does it match your
golf cart lithium wiring diagram? - Voltage Check: Use your multimeter.
- Check the voltage at the main battery terminals. It should be close to 48V (or 36V).
- Check the voltage at the charging port. It should match the battery’s voltage.
- Initial Charge: Connect your new
golf cart lithium battery charger. Let the battery charge fully. The charger should show it is working and eventually stop charging. - First Test Drive:
- Turn on your golf cart’s main power.
- Slowly press the pedal. Listen for any strange noises.
- Drive a short distance. Feel the difference in power and speed.
- Check for any warning lights or smells.
- The cart should feel much stronger and lighter.
Troubleshooting Common Issues
Even with careful work, sometimes things go wrong. Here are a few common issues and how to fix them.
- Cart Not Moving:
- Check Main Power: Is the main switch on? Is the battery fully charged?
- Loose Connections: Go back and check every cable, especially the main battery ones and connections to the motor controller. A loose connection will stop power.
- BMS Trip: The BMS might have cut power for safety. This happens if the voltage is too low, current is too high, or there is a short. Check your BMS for error lights or a reset button. Recharge the battery if it is too low.
- Blown Fuse: Some systems have fuses. Check them.
- Charger Not Working:
- Plugged In? Is the charger plugged into the wall and the cart?
- Correct Port? Is the charging port wired correctly and matching the charger?
- Battery Voltage: Is the battery voltage too low for the charger to start? Some chargers need a minimum voltage to start.
- Charger Fault: The charger itself might be faulty.
- BMS Errors:
- Refer to BMS Manual: Each BMS has its own lights or codes. Check the manual for what they mean.
- Balance Leads: Often, BMS errors relate to unbalanced cells. Double-check all balance lead connections. They must be perfect.
Maintenance Tips for Lithium Batteries
One of the great things about lithium iron phosphate golf cart batteries is they need very little care.
- No Watering: Forget about adding distilled water. Lithium batteries are sealed.
- Charging Habits: You do not need to fully charge them every time. Short charges are fine. You can also charge them at any time, even if they are half-full. It will not hurt them.
- Storage: If you store your cart for a long time, charge the battery to about 50-80%. Do not store it fully empty or fully charged. Keep it in a cool, dry place.
- Keep Clean: Once in a while, wipe down the battery and terminals to remove any dust or dirt. Check connections to make sure they are still tight.
DIY vs. Professional Installation
You are doing a DIY lithium golf cart conversion. Is it right for everyone?
Pros of DIY:
- Save Money: You save on labor costs.
- Learn Skills: You learn a lot about your golf cart.
- Sense of Achievement: It feels good to do it yourself.
Cons of DIY:
- Time: It takes time and effort.
- Tools: You need the right tools.
- Risk: If done wrong, it can damage the cart or battery, or even be dangerous.
- No Warranty on Labor: If something goes wrong, you fix it yourself.
If you are not sure about any step, it is okay to ask for help. A golf cart shop can do the conversion for you. It might cost more, but they have the tools and know-how. For a DIY lithium golf cart conversion, being careful and following guides is very important.
Frequently Asked Questions (FAQ)
Q: How long do lithium batteries last in a golf cart?
A: Lithium batteries (LiFePO4) can last 8 to 10 years or even longer in a golf cart. This is much longer than lead-acid batteries, which usually last 3-5 years.
Q: Do I need a special charger for lithium golf cart batteries?
A: Yes, absolutely. You must use a golf cart lithium battery charger made specifically for lithium batteries. Old lead-acid chargers will not work correctly and can damage lithium batteries.
Q: Can I mix old lead-acid batteries with new lithium batteries?
A: No, never mix battery types. Each battery type has different charging and discharge needs. Mixing them can cause damage, performance issues, or even safety risks.
Q: What is the cost difference between lead-acid and lithium golf cart batteries?
A: Lithium batteries have a higher upfront cost than lead-acid ones. However, due to their longer life, zero maintenance, and better performance, they often save you money over the long run.
Q: Is converting to lithium worth the effort and cost?
A: For most golf cart owners, yes, it is worth it. The benefits of lighter weight, longer range, faster charging, and zero maintenance make the 48V lithium golf cart upgrade (or 36V) a very good investment. Your cart will perform better and be more enjoyable to use.