
Image Source: i.ytimg.com
Simple Way To Check: How To Check Batteries On Golf Cart
You can check golf cart batteries using a few simple tools. You can use a multimeter for a golf cart battery voltage test. You can check the specific gravity of golf cart batteries with a hydrometer. Also, you can do a visual check and a load test. These steps help you know your golf cart battery charge status and overall health. Knowing how to do this keeps your cart running well.
Golf carts run on batteries. These batteries give power to the motor. Over time, batteries can lose their strength. If your golf cart is slow or stops often, the batteries might be the problem. Checking your batteries often helps them last longer. It also stops small problems from becoming big ones. This guide will show you how to check your golf cart batteries simply.
Essential Tools for Battery Checks
You need a few tools to check your golf cart batteries. These tools are easy to find and use. They help you get good readings.
- Multimeter (Volt-Ohm Meter): This tool checks voltage. It tells you how much power is in each battery. It can also check the whole battery pack.
- Hydrometer: This tool checks the acid in your batteries. It measures specific gravity. This tells you how much charge is in each cell. It can also show if a cell is bad.
- Battery Terminal Cleaner: This brush helps clean battery posts. Clean posts make sure power flows well.
- Distilled Water: You need this for filling battery cells. Do not use tap water. Tap water has minerals that can hurt your batteries.
- Safety Gear: Always wear safety glasses and rubber gloves. Battery acid can burn your skin and eyes.
- Battery Load Tester: This tool puts a “load” on the battery. It checks how the battery works under stress. This is a good way to find weak batteries. You can buy one or have a shop do it.
Having these tools ready makes checking your batteries easy.
Safety First: Before You Begin
Working with batteries needs care. Battery acid is harmful. Batteries can also give off gas. This gas can light up. Always follow these safety rules.
- Wear Safety Glasses: Protect your eyes from acid splashes.
- Wear Rubber Gloves: Protect your hands from acid.
- Turn Off Your Golf Cart: Make sure the key is off. Set the parking brake.
- Disconnect the Charger: Unplug your golf cart from its charger.
- Work in a Well-Aired Spot: Batteries can make hydrogen gas. This gas can explode. Work outside or in a place with good airflow.
- No Smoking or Open Flames: Do not smoke near batteries. Keep sparks and flames away.
Always put safety first. These steps protect you from harm.
The Visual Inspection: First Look at Your Batteries
Before you test anything, look at your batteries. A simple look can tell you a lot. This is your first golf cart battery health assessment.
- Open the Battery Area: Most golf carts have batteries under the seat. Lift the seat to see them.
- Look for Dirt and Grime: Batteries should be clean. Dirt can cause power leaks.
- Check the Battery Tray: Make sure the tray is not wet or rusted. Leaking acid can cause rust.
Battery Terminal Inspection Golf Cart
Look closely at the battery posts and cables.
- Look for Rust or Corrosion: You will see a white or green powder on the posts. This is rust. It stops power from flowing well.
- Check for Loose Cables: Wiggle each cable. They should be tight. Loose cables can cause power loss. They can also get hot.
- Look for Cracks or Bulges: A cracked battery case means damage. A bulging case means too much heat or gas inside. These batteries are bad. Replace them right away.
- Clean Terminals: If you see rust, clean it. Use a battery terminal cleaner brush. You can also use a mix of baking soda and water. Put the mix on the rust. It will fizz. Wait a bit, then rinse with clean water. Dry the terminals well.
Battery Water Levels Golf Cart
Most golf cart batteries are “wet cell” batteries. They need water. Checking water levels is very important for golf cart battery maintenance tips.
- Remove Vent Caps: Each battery has caps on top. Gently twist or pry them off.
- Look Inside: Look into each cell. You will see lead plates.
- Check Water Level: The water should cover the lead plates. It should be about 1/4 to 1/2 inch above the plates. There is often a fill line inside.
- Add Distilled Water if Low: If the water is low, add distilled water. Add it just enough to cover the plates. Do not fill to the very top. Leave some space for expansion.
- Do Not Overfill: Overfilling can cause acid to spill out. This can cause rust and waste power.
- Put Caps Back On: Make sure all caps are tight.
Checking water levels regularly helps your batteries last longer. Do this once a month.
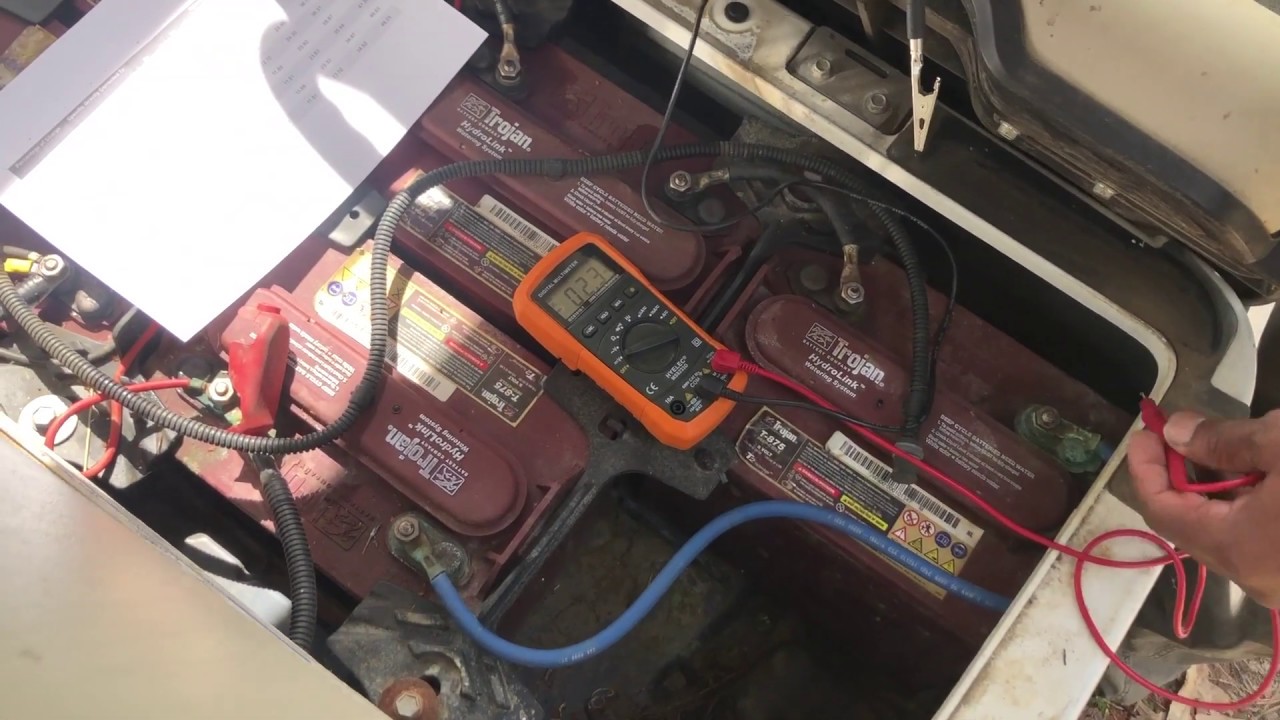
Measuring Voltage: The Golf Cart Battery Voltage Test
Measuring voltage is a good way to check your golf cart battery charge status. You will use a multimeter for this.
Multimeter Golf Cart Battery Check
A multimeter is a tool that measures electricity. It can check voltage, current, and resistance. For batteries, you will use it to check voltage.
- Set the Multimeter: Turn the dial on your multimeter to “DC Volts.” This is often marked with a “V” and a straight line or “DCV.” Choose a range that is higher than your battery’s voltage. For a 6-volt battery, pick 10V or 20V. For a 48-volt system, pick 200V.
- Find Your Battery Voltage: Golf carts use sets of batteries. Common types are 6-volt, 8-volt, or 12-volt batteries. A 36-volt cart uses six 6-volt batteries. A 48-volt cart might use six 8-volt batteries or four 12-volt batteries.
- Check Each Battery (Individual Voltage):
- Put the red probe (positive) on the positive (+) post of one battery.
- Put the black probe (negative) on the negative (-) post of the same battery.
- Read the number on the multimeter screen. Write it down.
- Do this for every single battery in your golf cart.
- Check Total Pack Voltage:
- Find the first battery in the series. Put the red probe on its positive (+) post.
- Find the last battery in the series. Put the black probe on its negative (-) post.
- Read the total voltage. This tells you the charge of the whole system.
- This is a quick way to see the overall golf cart battery charge status.
Interpreting Voltage Readings
The voltage numbers tell you how much charge your batteries have. Batteries lose voltage as they run down. Use the tables below to know what your readings mean.
For a 6-Volt Battery:
| Voltage Reading | Charge Status (Approx.) |
|---|---|
| 6.37 V | 100% Full |
| 6.27 V | 90% |
| 6.18 V | 80% |
| 6.09 V | 70% |
| 6.00 V | 60% |
| 5.90 V | 50% |
| 5.81 V | 40% |
| 5.72 V | 30% |
| 5.63 V | 20% |
| 5.54 V | 10% |
| 5.45 V | 0% Empty |
For an 8-Volt Battery:
| Voltage Reading | Charge Status (Approx.) |
|---|---|
| 8.49 V | 100% Full |
| 8.36 V | 90% |
| 8.24 V | 80% |
| 8.11 V | 70% |
| 7.99 V | 60% |
| 7.86 V | 50% |
| 7.74 V | 40% |
| 7.61 V | 30% |
| 7.49 V | 20% |
| 7.36 V | 10% |
| 7.24 V | 0% Empty |
For a 12-Volt Battery:
| Voltage Reading | Charge Status (Approx.) |
|---|---|
| 12.73 V | 100% Full |
| 12.50 V | 90% |
| 12.27 V | 80% |
| 12.04 V | 70% |
| 11.81 V | 60% |
| 11.58 V | 50% |
| 11.35 V | 40% |
| 11.12 V | 30% |
| 10.89 V | 20% |
| 10.66 V | 10% |
| 10.43 V | 0% Empty |
For Total Pack Voltage:
Add up the full charge voltage for each battery.
* 36-Volt Cart (six 6V batteries): Full charge is 6 x 6.37V = 38.22V
* 48-Volt Cart (six 8V batteries): Full charge is 6 x 8.49V = 50.94V
* 48-Volt Cart (four 12V batteries): Full charge is 4 x 12.73V = 50.92V
What if voltages are very different? If one battery’s voltage is much lower than the others (more than 0.2V difference), that battery might be bad. This is a key part of troubleshooting golf cart battery issues.
Deciphering Battery Health: Specific Gravity Golf Cart Batteries
Specific gravity is another important check. It tells you how dense the acid is inside each battery cell. A hydrometer measures this. This is the best way to find a truly bad battery cell.
- What is Specific Gravity? Battery acid is a mix of sulfuric acid and water. When a battery is fully charged, the acid is dense. When it is discharged, the acid mixes with water and becomes less dense. Specific gravity tells you this density.
- When to Test: Test specific gravity when batteries are fully charged. Let them rest for a few hours after charging. This makes readings more accurate.
- How to Use a Hydrometer:
- Safety First: Wear safety glasses and gloves.
- Remove Cell Caps: Open all the caps on the battery.
- Insert Hydrometer: Squeeze the bulb on the hydrometer. Put the tip into a cell. Release the bulb. It will draw acid into the hydrometer.
- Read the Float: A small float inside will rise. Read the number where the acid level meets the float.
- Record Readings: Write down the reading for each cell of every battery. Each 6-volt battery has three cells. An 8-volt battery has four cells. A 12-volt battery has six cells.
- Return Acid: Squeeze the bulb again to put the acid back into the cell.
- Clean Hydrometer: After checking all cells, rinse the hydrometer with water.
What Do the Numbers Mean?
Specific gravity readings tell you the charge level of each cell. They also show if a cell is weak or dead.
Specific Gravity Readings and Charge Status (at 80°F or 27°C):
| Specific Gravity | Charge Status (Approx.) |
|---|---|
| 1.265 – 1.275 | 100% Full |
| 1.240 – 1.250 | 90% |
| 1.220 – 1.230 | 80% |
| 1.195 – 1.205 | 70% |
| 1.170 – 1.180 | 60% |
| 1.145 – 1.155 | 50% |
| 1.120 – 1.130 | 40% |
| 1.095 – 1.105 | 30% |
| 1.070 – 1.080 | 20% |
| 1.045 – 1.055 | 10% |
| 1.020 – 1.030 | 0% Empty |
Important Note on Temperature: Battery readings change with temperature. If the battery is hot (above 80°F), add 0.004 to the reading for every 10°F above 80°F. If it’s cold (below 80°F), subtract 0.004 for every 10°F below 80°F. Most hydrometers have a thermometer built in or a chart.
Interpreting Differences Between Cells:
If one cell’s specific gravity is 0.050 or more lower than the others, that cell is likely bad. For example, if most cells read 1.260, but one reads 1.150, that cell is failing. A bad cell will make the whole battery pack weak. You cannot fix a bad cell. The battery needs to be replaced. This is a very useful part of any golf cart battery health assessment.
Advanced Checks: Load Testing Golf Cart Batteries
Voltage and specific gravity tell you about the static charge. A load test tells you how a battery works when it’s actively providing power. This is a deeper check.
- What is Load Testing? A load tester puts a heavy drain on a battery for a short time. It mimics the strain of driving your golf cart. This shows if the battery can hold up under real use. Weak batteries will show a sudden drop in voltage.
- Why It’s Important: A battery might show full voltage when not in use. But under load, it might fail. Load testing finds these hidden weak spots. This is a key step in troubleshooting golf cart battery issues.
-
How to Do It:
- Professional Tool: You can buy a battery load tester. These tools have big clamps. They apply a specific load (e.g., 100 amps) for 10-15 seconds.
- Simple Test (Use with Caution): If you do not have a load tester, you can do a simple test.
- Fully charge your batteries.
- Measure the total pack voltage with your multimeter.
- Drive the golf cart slowly on flat ground.
- Have someone else watch the multimeter. They should watch the total voltage as you drive.
- If the voltage drops sharply (e.g., from 48V to 40V quickly) when you start driving, it means your batteries are weak.
-
Interpreting Results:
- Good Battery: The voltage should drop only a little under load. Then it should stay steady for the test time.
- Weak Battery: The voltage will drop a lot and quickly. It might not recover.
- Bad Battery: The voltage will drop to almost zero. Or it will drop too much. This battery is dead.
Load testing helps find the “culprit” battery that is dragging down the whole pack. It is a vital part of golf cart battery health assessment.
Troubleshooting Common Golf Cart Battery Issues
Sometimes, your golf cart acts strange. It might be the batteries. Here are common problems and what to check. This is your guide to troubleshoot golf cart battery issues.
Cart Runs Slow or Has Low Power
- Check Charge Status: Is the battery pack fully charged? Use your multimeter to check total pack voltage.
- Individual Battery Voltage: Check each battery with the multimeter. Is one much lower than the others? A low battery will make the whole cart slow.
- Specific Gravity: Check specific gravity. A weak cell means a weak battery.
Short Run Time (Cart Dies Quickly)
- Charge Level: Is the charger working right? Is it giving a full charge?
- Specific Gravity: This is the best check for run time. If readings are low across all cells, the batteries are not holding a full charge. They might be old.
- Load Testing Golf Cart Batteries: A load test will show if batteries drop too much voltage under use. This confirms they are tired.
Batteries Not Charging
- Check Charger: Is the charger plugged in? Is it working? Look for lights on the charger. Try a different outlet.
- Charger Plug/Receptacle: Check the charger plug and the golf cart’s charge port. Look for bent pins or dirt.
- Main Fuse: Some carts have a main fuse near the charger port or main battery. Check if it’s blown.
- Battery Connections: Make sure all battery cables are tight and clean. Loose cables can stop charging.
- Battery Voltage: If the total pack voltage is too low (e.g., below 30V for a 48V cart), some chargers will not turn on. You might need a special “trickle charge” or a quick boost from another battery to get the charger to start.
One Battery is Hot
- Overcharging: One battery might be getting too much charge.
- Short Circuit: There might be a short inside the battery.
- Bad Cell: A bad cell can cause a battery to get hot. This battery is likely failing.
- Action: If a battery is hot, stop using the cart. Disconnect the hot battery. Replace it right away. Hot batteries can be dangerous.
Power Loss on Hills
- Weak Battery Pack: This usually means the whole battery pack is tired. When going uphill, the motor needs more power. If the batteries cannot give it, the cart slows or stops.
- Load Test: This is where a load test really helps. It will show how much voltage drops when the cart is working hard.
Always address battery issues quickly. Ignoring them can lead to more damage or leave you stuck.
Sustaining Battery Life: Golf Cart Battery Maintenance Tips
Good care makes batteries last longer. Here are key golf cart battery maintenance tips.
- Charge Often: Charge your batteries after every use. Do not let them sit discharged. Even a short drive needs a recharge. Deeply discharging batteries often shortens their life.
- Keep Water Levels Right: Check battery water levels golf cart once a month. Add distilled water if needed. Always fill after charging, not before. When you charge, water expands. If you fill it before, it might overflow.
- Clean Terminals Often: Do battery terminal inspection golf cart regularly. Clean any rust or corrosion. Use a wire brush and the baking soda mix. Clean terminals mean better power flow.
- Keep Batteries Clean: Wipe down battery tops. Dirt and acid residue can create a path for electricity to leak. This drains your batteries slowly.
- Store Properly in Winter: If you store your cart for months, charge batteries fully. Then, either use a “float” charger that keeps them charged or charge them once a month. Store them in a cool, dry place. Make sure water levels are good.
- Use the Right Charger: Always use a charger that matches your golf cart’s voltage system (e.g., 36V charger for a 36V cart). Using the wrong charger can hurt your batteries.
- Avoid Overcharging: Most modern chargers turn off when batteries are full. If you have an old charger, be careful not to leave it on too long. Overcharging can boil off water and damage plates.
- Avoid Over-Discharging: Do not run your batteries completely flat. This causes damage. When the cart starts to slow down, it’s time to charge.
Following these tips will make your golf cart batteries last longer and work better.
Assessing Overall Health: Golf Cart Battery Health Assessment
You have learned many ways to check your batteries. Now, let’s put it all together for a full golf cart battery health assessment.
- Visual Check (Quick & Easy): Look at your batteries. Are they clean? Are terminals free of rust? Are there any cracks or bulges? Are the cables tight? This is your first hint of battery health.
- Battery Water Levels Golf Cart (Essential): Check and fill distilled water. Low water hurts batteries.
- Golf Cart Battery Voltage Test (Daily Check): Use a multimeter to check the total pack voltage. This tells you the overall golf cart battery charge status. If it’s low after charging, there’s a problem. Check individual battery voltages to find weak ones.
- Specific Gravity Golf Cart Batteries (Deep Dive): This is the best test for finding a truly bad cell. Do this once a month or if you suspect issues.
- Load Testing Golf Cart Batteries (Under Pressure): This shows how batteries perform when working hard. It finds batteries that look good but are weak under load.
When to Replace Batteries:
Even with great care, golf cart batteries do not last forever. Most last 4-6 years. Some can go longer with perfect care.
Signs of Dying Batteries:
- Short Run Time: Your cart does not go as far as it used to.
- Slow Speed: The cart feels sluggish, especially uphill.
- Long Charge Times: It takes longer to charge, or the charger never shuts off.
- Hot Batteries: One or more batteries get hot after charging or use.
- Low Specific Gravity in One Cell: One cell consistently reads much lower than others.
- Low Voltage in One Battery: One battery consistently shows much lower voltage than the others, even after charging.
- Physical Damage: Cracks, bulges, or a strong sulfur smell.
If you see these signs, it might be time for new batteries. Replacing the whole set is usually best. Do not mix new and old batteries.
Frequently Asked Questions (FAQ)
How often should I check my golf cart batteries?
You should check battery water levels once a month. Do a visual check and measure total voltage weekly. Do a full golf cart battery voltage test (individual batteries) and specific gravity check every 3-6 months.
Can I mix new and old golf cart batteries?
No, you should not mix new and old golf cart batteries. New batteries have more capacity and strength. If you mix them, the older, weaker batteries will pull down the new ones. The new batteries will wear out faster. Always replace all batteries in the pack at the same time.
What causes golf cart batteries to go bad?
Many things can make golf cart batteries go bad.
* Lack of Water: Not adding distilled water kills batteries quickly.
* Not Charging Often: Letting batteries sit discharged damages them.
* Overcharging or Undercharging: Using the wrong charger or leaving it on too long.
* Physical Damage: Vibrations or impacts can hurt battery plates.
* Age: Batteries simply wear out over time.
* Temperature Extremes: Very hot or very cold weather can shorten battery life.
How long do golf cart batteries last?
Most golf cart batteries last about 4 to 6 years. With excellent golf cart battery maintenance tips, some can last 7 or 8 years. How you use and care for them affects their lifespan a lot. Regular checks and good habits will help them last longer.