
Ultimate Guide: How To Adjust Brakes On Golf Cart Properly
Good brakes on your golf cart are vital. They keep you safe. They stop your cart quickly. If your golf cart does not stop well, or if the brake pedal feels soft, it is time to check your brakes. Adjusting golf cart brakes can make them work like new again. This guide will show you how to do it right. We will cover many things, from simple fixes to bigger repairs.
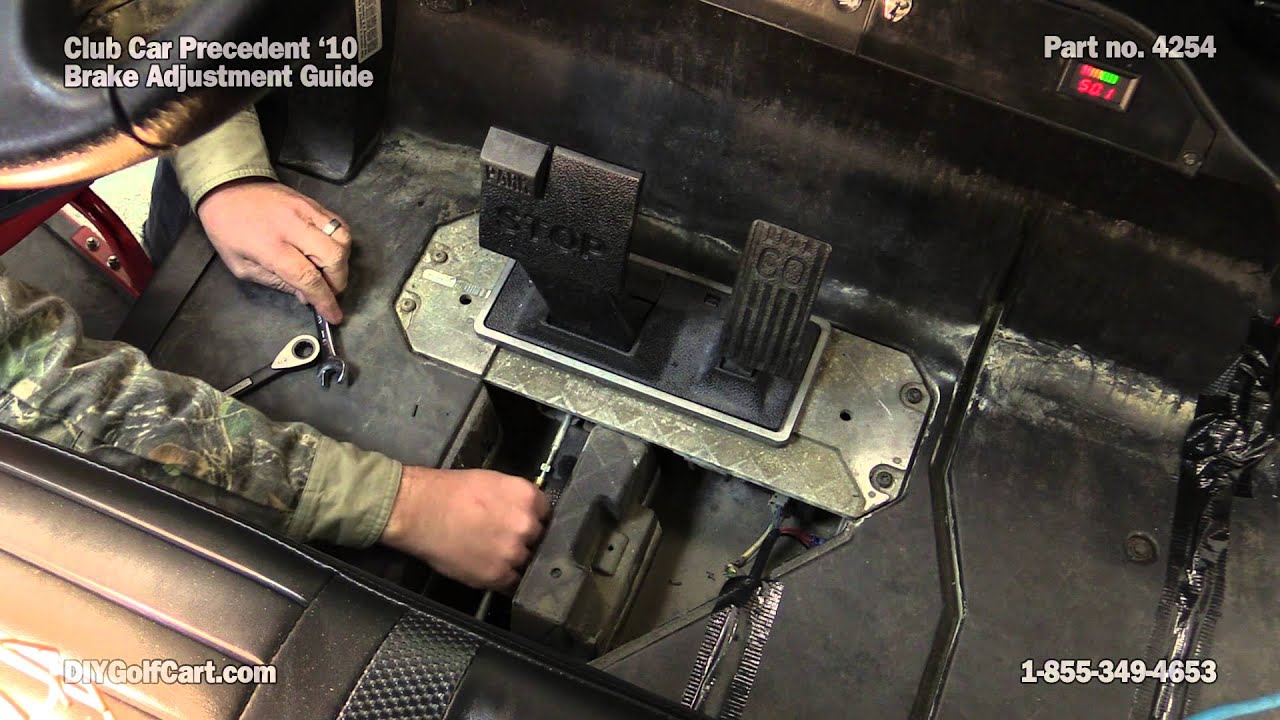
Image Source: i.ytimg.com
Why Golf Cart Brakes Matter
Your golf cart needs strong brakes. Brakes are a key safety part. They let you slow down or stop fast. Bad brakes can cause accidents. They make your ride unsafe. A golf cart with good brakes gives you control. It helps you avoid hitting things. It protects you and others.
Good brakes also help your golf cart last longer. If brakes are not adjusted, parts can wear out fast. This means more costly repairs later. Keeping your brakes in top shape saves you money. It also makes driving your golf cart more fun and worry-free.
How Golf Cart Brakes Work
Most golf carts use a simple brake system. It is much like a car’s. When you push the brake pedal, cables pull on levers. These levers push brake shoes against brake drums. This rubbing action creates friction. Friction slows the wheels. It stops the cart.
Many golf carts have brakes on the rear wheels only. Some carts have brakes on all four wheels. Electric golf carts also use a motor braking system. This helps slow the cart down. It also recharges the battery a little. But the main brakes are still key for full stops.
Symptoms of Bad Golf Cart Brakes
It is easy to tell if your golf cart brakes are not working well. Here are some common signs. Pay close attention to these warnings. They tell you it is time for a check.
- Slow Stopping: Your golf cart takes too long to stop. You push the pedal, but it rolls far.
- Soft Brake Pedal: The brake pedal feels mushy. It goes down too easily. There is no firm feel.
- Hard Brake Pedal: The pedal is very stiff. You need to push hard to make it stop.
- Squealing Noises: You hear a loud squeal or grind when you brake. This often means worn brake shoes.
- Pulling to One Side: The cart pulls left or right when you brake. One brake may be working better than the other.
- No Parking Brake Hold: The parking brake does not hold the cart still on a hill. It rolls.
- Uneven Brake Wear: One wheel’s brake parts look more worn than others.
- Leaking Fluid: For hydraulic brake systems, you might see fluid leaks. Most golf carts do not have hydraulic brakes.
If you see any of these symptoms of bad golf cart brakes, act fast. Do not wait for a full brake failure. Fixing a small problem now can prevent a big one later.
When to Adjust Your Golf Cart Brakes
You should check your golf cart brakes often. A quick check can save you trouble. Here are times to adjust or inspect them:
- Every 3 to 6 Months: Do a quick check. See how the pedal feels. Test stopping power.
- After Heavy Use: If you drive your cart a lot, check brakes more often. Rough trails wear brakes faster.
- When You Feel a Change: If the pedal feels different, or stopping is slow, check it right away.
- Before a Long Trip: Always check brakes before a big outing. Safety first.
- During Routine Maintenance: Make brake checks part of your regular golf cart care.
Adjusting brakes is not hard. It can fix many common brake issues. This simple task can make your cart safe again. It can also save you money on bigger repairs.
Tools You Will Need
Before you start, get your tools ready. Having them on hand makes the job easier. Here is what you will likely need:
- Socket Wrench Set: For lug nuts and other bolts.
- Open-End Wrench Set: For brake cable nuts.
- Jack: To lift the cart safely.
- Jack Stands: To support the cart once lifted. Never work under a cart held by only a jack.
- Wheel Chocks: To keep the cart from rolling.
- Penetrating Oil: Like WD-40, for rusty nuts.
- Wire Brush: To clean parts.
- Brake Cleaner: To clean brake dust.
- Safety Glasses: To protect your eyes.
- Gloves: To keep hands clean and safe.
- Shop Rags: For cleaning.
- Flashlight or Headlamp: To see in dark spots.
- Measuring Tape or Ruler: To check brake pedal free play.
Safety First: Crucial Precautions
Working on your golf cart brakes needs care. Safety is the most important part. Always follow these steps to stay safe:
- Park on Level Ground: Find a flat, solid surface. This stops the cart from rolling.
- Turn Off the Cart: Remove the key. For electric carts, put the tow/run switch to “Tow.” This stops the motor.
- Engage Parking Brake: Set the parking brake. This adds another layer of safety.
- Chock the Front Wheels: Place blocks or wheel chocks in front of the front wheels. This stops the cart from moving.
- Lift with a Jack: Use a strong jack to lift the rear of the cart. Lift it high enough to remove the wheels.
- Use Jack Stands: Once lifted, place sturdy jack stands under the axle. Lower the cart onto the stands. Never rely on just the jack.
- Wear Safety Gear: Always wear safety glasses. Use gloves to protect your hands from dirt and sharp edges.
- Do Not Work Under a Cart on Uneven Ground: The cart could fall.
- Keep Hands Clear: Watch where you put your hands. Moving parts can pinch fingers.
Follow these steps every time. Your safety is worth it.
Step-by-Step Brake Adjustment Guide (General)
Most golf cart brake adjustments are similar. You will adjust the brake cables. This makes the brakes tighter or looser. Here is a general guide:
-
Prepare the Cart:
- Park the cart on flat ground.
- Turn off the key. Set the tow/run switch to “Tow” (if electric).
- Set the parking brake.
- Place wheel chocks in front of the front wheels.
- Loosen the lug nuts on the rear wheels slightly before lifting.
- Jack up the rear of the cart.
- Place jack stands under the rear axle for support.
- Remove the rear wheels. This gives you better access.
-
Locate Brake Cables:
- Look behind each rear wheel. You will see a brake drum.
- A cable goes from the brake pedal area to each brake drum. This is the brake cable.
- Near the brake drum, the cable connects to a lever. This is where you will adjust.
- Sometimes, the main adjustment point is under the cart, near the pedal, where both cables join.
-
Check Brake Pedal Free Play:
- Before adjusting, check how much the pedal moves before the brakes grab. This is “free play.”
- For most carts, you want about 1 to 2 inches of free play.
- Push the pedal slowly with your hand. Note when it starts to feel firm. Measure this distance.
-
Adjust the Brake Cables:
- Find the adjustment nuts on the brake cables. They are usually two nuts, one a lock nut, the other an adjustment nut.
- Use two wrenches. Hold one nut still. Turn the other.
- To tighten the brakes (reduce free play): Turn the adjustment nut away from the cable housing. This pulls the cable tighter.
- To loosen the brakes (increase free play): Turn the adjustment nut towards the cable housing. This loosens the cable.
- Make small turns, about a quarter turn at a time.
- Do this for both left and right rear brakes. Keep the adjustments equal. This stops the cart from pulling to one side.
- After each small adjustment, test the pedal free play. Push the pedal by hand. Make sure it feels firm.
-
Test the Brakes:
- Once you adjust both sides, spin each rear wheel by hand.
- The wheels should spin freely when the brake pedal is up.
- When you push the brake pedal down a little, the wheels should stop spinning.
- Check for equal tension. Both wheels should drag about the same amount when you apply a little brake.
- Reinstall the wheels. Lower the cart. Tighten the lug nuts.
- Take the cart for a slow test drive in a safe area. Test the brakes at low speed.
- Check for smooth, straight stops. The pedal should feel firm.
-
Adjust Parking Brake (if needed): We will cover this in a separate section.
This general method works for many golf carts. But some brands have specific details.
EZGO Brake Adjustment Guide
EZGO golf carts are very common. Their brake adjustment is quite simple. This EZGO brake adjustment guide will help you. Most EZGO TXT and RXV models have a similar setup.
h4 EZGO TXT Brake Adjustment
For EZGO TXT models, the main adjustment is usually at the rear wheels.
- Prepare the Cart: Follow the general safety steps above. Lift the rear. Remove wheels.
- Locate Adjustment Point: Each rear wheel has a brake cable. This cable goes into the brake drum area. You will see a small lever on the back of the brake assembly. An adjusting nut sits on a threaded rod near this lever.
- Adjust the Cables:
- Use a wrench to loosen the lock nut.
- Then, turn the adjustment nut.
- Turn it clockwise to tighten the brakes. This pulls the cable in.
- Turn it counter-clockwise to loosen the brakes. This lets the cable out.
- Adjust each side equally.
- Test the wheel spin by hand. The wheel should turn freely when the pedal is up.
- Check the brake pedal free play. Aim for 1 to 2 inches.
- Tighten the lock nut once you are happy with the adjustment.
h4 EZGO RXV Brake Adjustment
EZGO RXV models can be a bit different. They often use a self-adjusting system. But you still might need to adjust the main cable.
- Prepare the Cart: Use the safety steps.
- Find the Main Cable Equalizer: On RXV models, the main adjustment often sits under the cart, near the center. It is where the single brake pedal cable splits into two cables for the rear wheels. This part is called the equalizer.
- Adjust the Equalizer:
- You will see a large nut on a threaded rod. This nut moves the equalizer.
- Use a wrench to turn this nut.
- Turning it clockwise tightens both rear brakes at once.
- Turning it counter-clockwise loosens them.
- Make small adjustments. Check pedal free play often.
- Aim for 1 to 2 inches of free play at the pedal.
- After adjusting, check that both rear wheels spin freely when the pedal is up. They should stop equally when the pedal is pressed.
If adjusting the main cable does not help enough, you may need to adjust the individual cables at each wheel. These are similar to the TXT method.
Club Car Brake Cable Adjustment
Club Car golf carts, like Precedent or DS models, also have their own way to adjust brakes. The Club Car brake cable adjustment is usually done from under the cart.
- Prepare the Cart: Follow all safety guidelines. Lift the rear and support it with stands. You do not always need to remove the wheels for this adjustment, but it helps to test wheel drag.
- Locate the Adjustment Point:
- Look under the cart, near the middle.
- Find the brake pedal rod. It goes to a metal plate called an equalizer.
- Two separate cables go from this equalizer to each rear wheel.
- There will be a large nut on a threaded rod where the pedal rod meets the equalizer. This is your main adjustment point.
- Adjust the Cable:
- Use two wrenches. One to hold the rod, one to turn the nut.
- Turn the large nut clockwise to tighten the brakes. This pulls both rear brake cables tighter.
- Turn it counter-clockwise to loosen the brakes.
- Make small adjustments, like half a turn.
- Check the brake pedal free play often. Club Car often aims for about 1 to 1.5 inches of pedal travel before the brakes engage.
- Spin the rear wheels (if removed) or try to push the cart (if on the ground). The wheels should spin freely. They should stop firmly and evenly when you push the pedal.
- Check the Parking Brake: Club Car parking brakes are often tied into this main adjustment. Make sure it still holds well after the main adjustment.
Yamaha Golf Cart Brake Maintenance
Yamaha golf carts need good brake care too. Yamaha golf cart brake maintenance includes adjusting the cables. Yamaha carts often have a main adjustment point and individual wheel adjustments.
h4 Yamaha G-Series Brake Adjustment
For Yamaha G-series models (like G14, G16, G19, G22), the main adjustment is at the brake equalizer.
- Prepare the Cart: Safety first. Lift the cart’s rear. Put it on stands.
- Find the Equalizer: Look under the cart. You will see the brake pedal rod connect to an equalizer plate. The two rear brake cables connect here.
- Adjust the Cables:
- There is usually a large nut on a threaded rod that connects the pedal rod to the equalizer.
- Turn this nut clockwise to tighten the brakes.
- Turn it counter-clockwise to loosen them.
- Adjust in small steps. Check the brake pedal free play. Yamaha often suggests 1.5 to 2 inches of play.
- Make sure both rear wheels drag evenly when the pedal is pressed lightly.
- Individual Wheel Adjustment (If Needed): If the main adjustment does not give even braking, or if one wheel still feels loose, you might need to adjust the individual cables at each wheel.
- These are usually found on the back of the brake backing plate.
- They look like a bolt and nut on a threaded rod.
- Adjust them similar to the EZGO method, tightening or loosening the cable.
- Ensure both sides are adjusted equally for even braking.
h4 Yamaha Drive/Drive2 Brake Adjustment
Newer Yamaha Drive/Drive2 models also have an equalizer. The process is much the same.
- Prepare the Cart: Follow safety steps.
- Locate Equalizer: Under the cart, find the equalizer where the brake cables meet.
- Adjust: Use the nuts on the threaded rod to adjust cable tension. Tighten clockwise, loosen counter-clockwise.
- Test: Check pedal free play and even wheel drag.
Regular Yamaha golf cart brake maintenance helps prevent common brake issues. This simple adjustment is a big part of that care.
Golf Cart Parking Brake Adjustment
The golf cart parking brake adjustment is very important. It keeps your cart from rolling away when parked. A weak parking brake is a safety risk.
How to adjust it:
- Locate the Parking Brake Cable: The parking brake cable usually runs from the parking brake handle to the rear brake equalizer or directly to the rear brakes.
- Find the Adjustment Point:
- Some carts have a separate adjustment nut on the parking brake cable itself, often near the handle or under the dash.
- On other carts, the parking brake is adjusted along with the main brake cables. When you tighten the main brake cables, the parking brake often gets tighter too.
- Adjusting a Separate Cable:
- Loosen the lock nut.
- Turn the adjustment nut to pull the cable tighter. This makes the parking brake engage sooner.
- Tighten the lock nut.
- Testing the Parking Brake:
- With the cart on jack stands, engage the parking brake.
- Try to spin the rear wheels by hand. They should be locked solid.
- If they still spin, tighten the cable more.
- Once back on the ground, test it on a slight incline. The cart should not roll.
Important: Do not over-tighten the parking brake. If it is too tight, it can drag while you drive. This wears out brake shoes fast. The wheels should spin freely when the parking brake is off.
Tightening Golf Cart Brakes: Key Tips
When you are tightening golf cart brakes, remember these tips for the best results:
- Adjust Both Sides Equally: This is key. Uneven adjustment makes the cart pull to one side.
- Small Adjustments: Do not turn the nuts too much at once. A quarter turn or half turn is enough. Test, then adjust more if needed.
- Check Pedal Free Play: Always measure this before and after. It tells you if you are doing it right.
- Spin Wheels Freely: When the brake pedal is up, the wheels must spin without drag. If they drag, the brakes are too tight.
- Listen for Noises: After adjustment, listen for squeaks or rubs. New noises can mean a problem.
- Lubricate Moving Parts: A little grease on pivots and cables can help smooth action. Do not get grease on the brake shoes or drums!
- Test Drive Safely: Always test brakes slowly in a safe area. Do not drive fast until you are sure they work.
Golf Cart Brake System Troubleshooting
Sometimes, adjusting the cables is not enough. You might have a deeper problem. This is where golf cart brake system troubleshooting comes in.
Here are common issues and what to check:
- Brakes Feel Spongy After Adjustment:
- Worn Brake Shoes: The friction material on the shoes might be gone. They need replacing.
- Stretched Cables: Old cables can stretch. They lose their ability to pull tight. Replace them.
- Loose Linkages: Check all nuts and bolts connecting the pedal to the cables. Tighten any loose ones.
- Brakes Dragging (Cart Feels Slow, Wheels Hot):
- Over-Adjusted Cables: You tightened them too much. Loosen them.
- Stuck Cable: A rusty or bent cable can get stuck. It does not release fully. Replace the cable.
- Damaged Return Spring: A spring that pulls the brake shoes back may be broken.
- Warped Brake Drum: The drum is not round anymore. It can cause uneven contact.
- Loud Squealing or Grinding:
- Worn Brake Shoes: Most common cause. Metal on metal.
- Dirt/Debris: Dust or grit inside the drum. Clean it out.
- Glazed Shoes/Drums: Hard, shiny surface. Can happen from overheating. Scuff with sandpaper or replace.
- Cart Pulls to One Side When Braking:
- Uneven Adjustment: One side is tighter than the other. Re-adjust.
- Worn Brake Shoes on One Side: One shoe is more worn than the other.
- Stuck Cable on One Side: One cable is not pulling evenly.
- Contamination: Grease or oil on one side’s brake shoes. This makes them slick.
- Worn Wheel Bearings: Less common, but bad bearings can affect how the wheel spins and brakes.
When troubleshooting, a visual check is key. Look for rust, loose parts, or signs of wear.
Golf Cart Brake Drum Removal
If your troubleshooting points to worn brake shoes or a damaged drum, you will need to perform golf cart brake drum removal. This is often needed for brake shoe replacement or deeper cleaning.
- Prepare the Cart: Follow all safety steps. Lift the rear. Support with stands. Remove the wheel.
- Remove the Dust Cap: At the center of the wheel hub, you will see a small metal cap. Pry it off carefully with a flat-head screwdriver.
- Remove the Cotter Pin: Inside, you will see a cotter pin holding a castle nut or retaining nut. Pull out the cotter pin with pliers.
- Remove the Castle Nut/Retaining Nut: Use a socket wrench to remove this nut.
- Pull Off the Brake Drum:
- The drum should slide straight off the axle spline.
- It might be stuck if the brake shoes are worn or if there’s rust.
- You can try to gently pry it off with a screwdriver.
- If it is very stuck, you may need to loosen the brake adjustment very much, or even tap the drum lightly with a rubber mallet.
- Do not hit it too hard. You do not want to damage the axle or bearings.
- Once off, inspect the drum for cracks, deep grooves, or excessive wear.
When putting the drum back on, make sure it slides on smoothly. Line up the splines. Put the nut back on and a new cotter pin.
How to Replace Golf Cart Brake Shoes
Replacing brake shoes is a big part of golf cart brake maintenance. It is needed when shoes are worn thin. This process builds on brake drum removal.
- Prepare the Cart and Remove Drum: Follow the safety steps. Lift the cart, remove the wheel, and perform golf cart brake drum removal.
- Inspect Old Shoes: Look at the brake shoes inside the drum. Note how they are installed. Take a picture if it helps.
- Remove Retaining Springs: Brake shoes are held in place by springs and pins. Use brake spring pliers or needle-nose pliers to carefully remove these springs. They are under tension.
- Remove Old Brake Shoes: Once springs are off, the shoes should come out. You might need to wiggle them.
- Clean the Brake Assembly:
- Use a wire brush to clean away brake dust and rust from the backing plate.
- Spray with brake cleaner. Let it dry. Do not breathe in brake dust.
- Inspect Brake Hardware: Check the springs, pins, and adjusters. Replace any that look rusty, bent, or worn. Many brake shoe kits come with new hardware.
- Install New Brake Shoes:
- Put the new shoes on the backing plate. Make sure they fit right.
- Reattach all springs and pins. This can be tricky. Use your pliers. Make sure springs are seated firmly.
- Ensure the adjusting mechanism is clean and moves freely. Apply a tiny bit of high-temp grease to the points where the shoes rub the backing plate (not on the friction material!).
- Reinstall Brake Drum: Slide the drum back onto the axle spline. Put the castle nut back on. Tighten it well, but do not overtighten. Put in a new cotter pin. Bend the pin ends to secure it.
- Replace Dust Cap: Put the dust cap back on.
- Repeat for Other Side: Do the same for the other rear wheel.
- Adjust Brakes: After replacing shoes, your brakes will be very loose. You must now adjust both sides carefully. Follow the steps for tightening golf cart brakes. Set the pedal free play correctly.
- Test Drive: Lower the cart. Tighten lug nuts. Test drive slowly. The new shoes will need a “break-in” period. Avoid hard stops for the first few miles.
Electric Golf Cart Brake Repair: Special Notes
Most electric golf cart brake repair steps are the same as for gas carts. The mechanical parts are much alike. However, electric carts have regenerative braking. This means the motor helps slow the cart. This can make the mechanical brakes last longer.
If you have brake issues with an electric cart, always check the mechanical system first. Issues with the motor braking usually mean a problem with the controller or motor itself, which is a much bigger repair.
Key things for electric carts:
- Tow/Run Switch: Always put the switch to “Tow” when working on the cart. This cuts power.
- Battery Disconnect: For any major electrical work, disconnect the main battery pack.
- Brake Sensor: Some electric carts have a brake sensor. This tells the controller you are pressing the brake. If this sensor is bad, the cart might not stop right or might lose regenerative braking. Check if the brake lights come on.
Comprehensive Table for Golf Cart Brake Issues
Here is a table that summarizes common brake issues, their symptoms, and likely fixes:
| Symptom | Possible Cause | Action Needed |
|---|---|---|
| Slow Stopping / Soft Pedal | Worn brake shoes, stretched cables, loose adjustment | Adjust brake cables, replace brake shoes, replace cables |
| Squealing / Grinding Noise | Worn brake shoes, dirt/debris in drum, glazed shoes | Replace brake shoes, clean brake drums and shoes, scuff shoes/drums |
| Pulling to One Side | Uneven brake adjustment, worn shoe on one side, contaminated shoe | Re-adjust cables evenly, replace brake shoes on both sides, clean any contamination |
| Parking Brake Does Not Hold | Loose parking brake cable, worn shoes | Adjust parking brake cable, replace brake shoes |
| Brakes Drag / Wheels Get Hot | Over-tightened adjustment, stuck cable, seized wheel cylinder (hydraulic) | Loosen brake adjustment, lubricate or replace cable, inspect wheel cylinder (if applicable) |
| Hard Brake Pedal | Seized cables, seized brake pivot points, damaged pedal linkage | Lubricate cables/pivot points, replace cables, inspect pedal linkage |
| Clicking Sound When Braking | Loose brake drum, damaged spline | Re-tighten axle nut, inspect spline, replace drum/axle if damaged |
| Uneven Pedal Feel | Air in hydraulic lines (rare), uneven cable tension | Bleed hydraulic brakes (if applicable), re-adjust cables |
Regular Maintenance for Brake Longevity
To keep your golf cart brakes working well for a long time, regular care is important.
- Inspect Often: Look at your brakes every few months. Check cables, shoes, and drums.
- Keep Clean: Dust and dirt can harm brakes. Clean brake areas when you have the wheels off.
- Lubricate: Use a little grease on moving parts like pivots. Avoid getting grease on the friction material.
- Drive Smart: Avoid sudden, hard stops. This wears out brake shoes faster.
- Check Tire Pressure: Even tire pressure helps brakes work evenly.
By doing these simple checks and tasks, you will keep your golf cart safe and reliable for many years.
Frequently Asked Questions (FAQ)
Q1: How often should I adjust my golf cart brakes?
A1: You should check your golf cart brakes every 3 to 6 months. Adjust them if the pedal feels soft or if the cart takes longer to stop. Also, adjust them after replacing brake shoes.
Q2: My golf cart brakes are squealing. What does that mean?
A2: Squealing usually means the brake shoes are worn out. It can also be caused by dirt, dust, or moisture in the brake drum. You likely need to inspect and possibly replace your brake shoes.
Q3: Can I adjust golf cart brakes without removing the wheels?
A3: Sometimes, yes. Many golf cart brands, like Club Car and Yamaha, have a main adjustment point under the cart where both rear brake cables meet. You can often adjust this without taking off the wheels. However, removing the wheels lets you test each side’s drag better and inspect the brakes.
Q4: How much free play should my golf cart brake pedal have?
A4: Most golf carts should have about 1 to 2 inches of free play. This is the distance the pedal moves before you feel the brakes start to engage. Check your cart’s manual for exact specs.
Q5: My parking brake does not hold. Is that part of the main brake adjustment?
A5: Often, yes. On many golf carts, adjusting the main brake cables will also affect the parking brake. If it still does not hold, some carts have a separate adjustment point for the parking brake cable itself, often near the handle.
Q6: What if my golf cart still pulls to one side after adjusting the brakes?
A6: If your cart pulls to one side, the brakes are not engaging evenly. Re-check your adjustments to make sure both sides are tightened the same amount. Also, inspect the brake shoes on both sides. One might be more worn, or contaminated with grease or oil.
Q7: How do I know if my golf cart brake shoes are worn out?
A7: You will need to remove the brake drum. Look at the brake shoes. If the friction material is very thin (less than about 1/16th of an inch), or if you see metal parts rubbing, they are worn and need to be replaced.
Q8: Do electric golf carts have different brakes than gas golf carts?
A8: The main mechanical brake system (drums, shoes, cables) is usually the same. However, electric golf carts also use “regenerative braking.” This means the motor helps slow the cart and puts energy back into the battery. If your electric cart has braking issues, check the mechanical brakes first.
Conclusion
Adjusting your golf cart brakes is a key part of keeping your cart safe and fun to drive. It is a simple job that anyone can do with the right tools and a little care. Remember to always prioritize safety. Follow the steps for lifting and supporting your cart. Check your brakes often. Learn the signs of bad brakes. Whether you have an EZGO, Club Car, or Yamaha, keeping your brakes in top shape is a smart move. Regular adjustments and timely replacements will make your golf cart reliable for years to come.